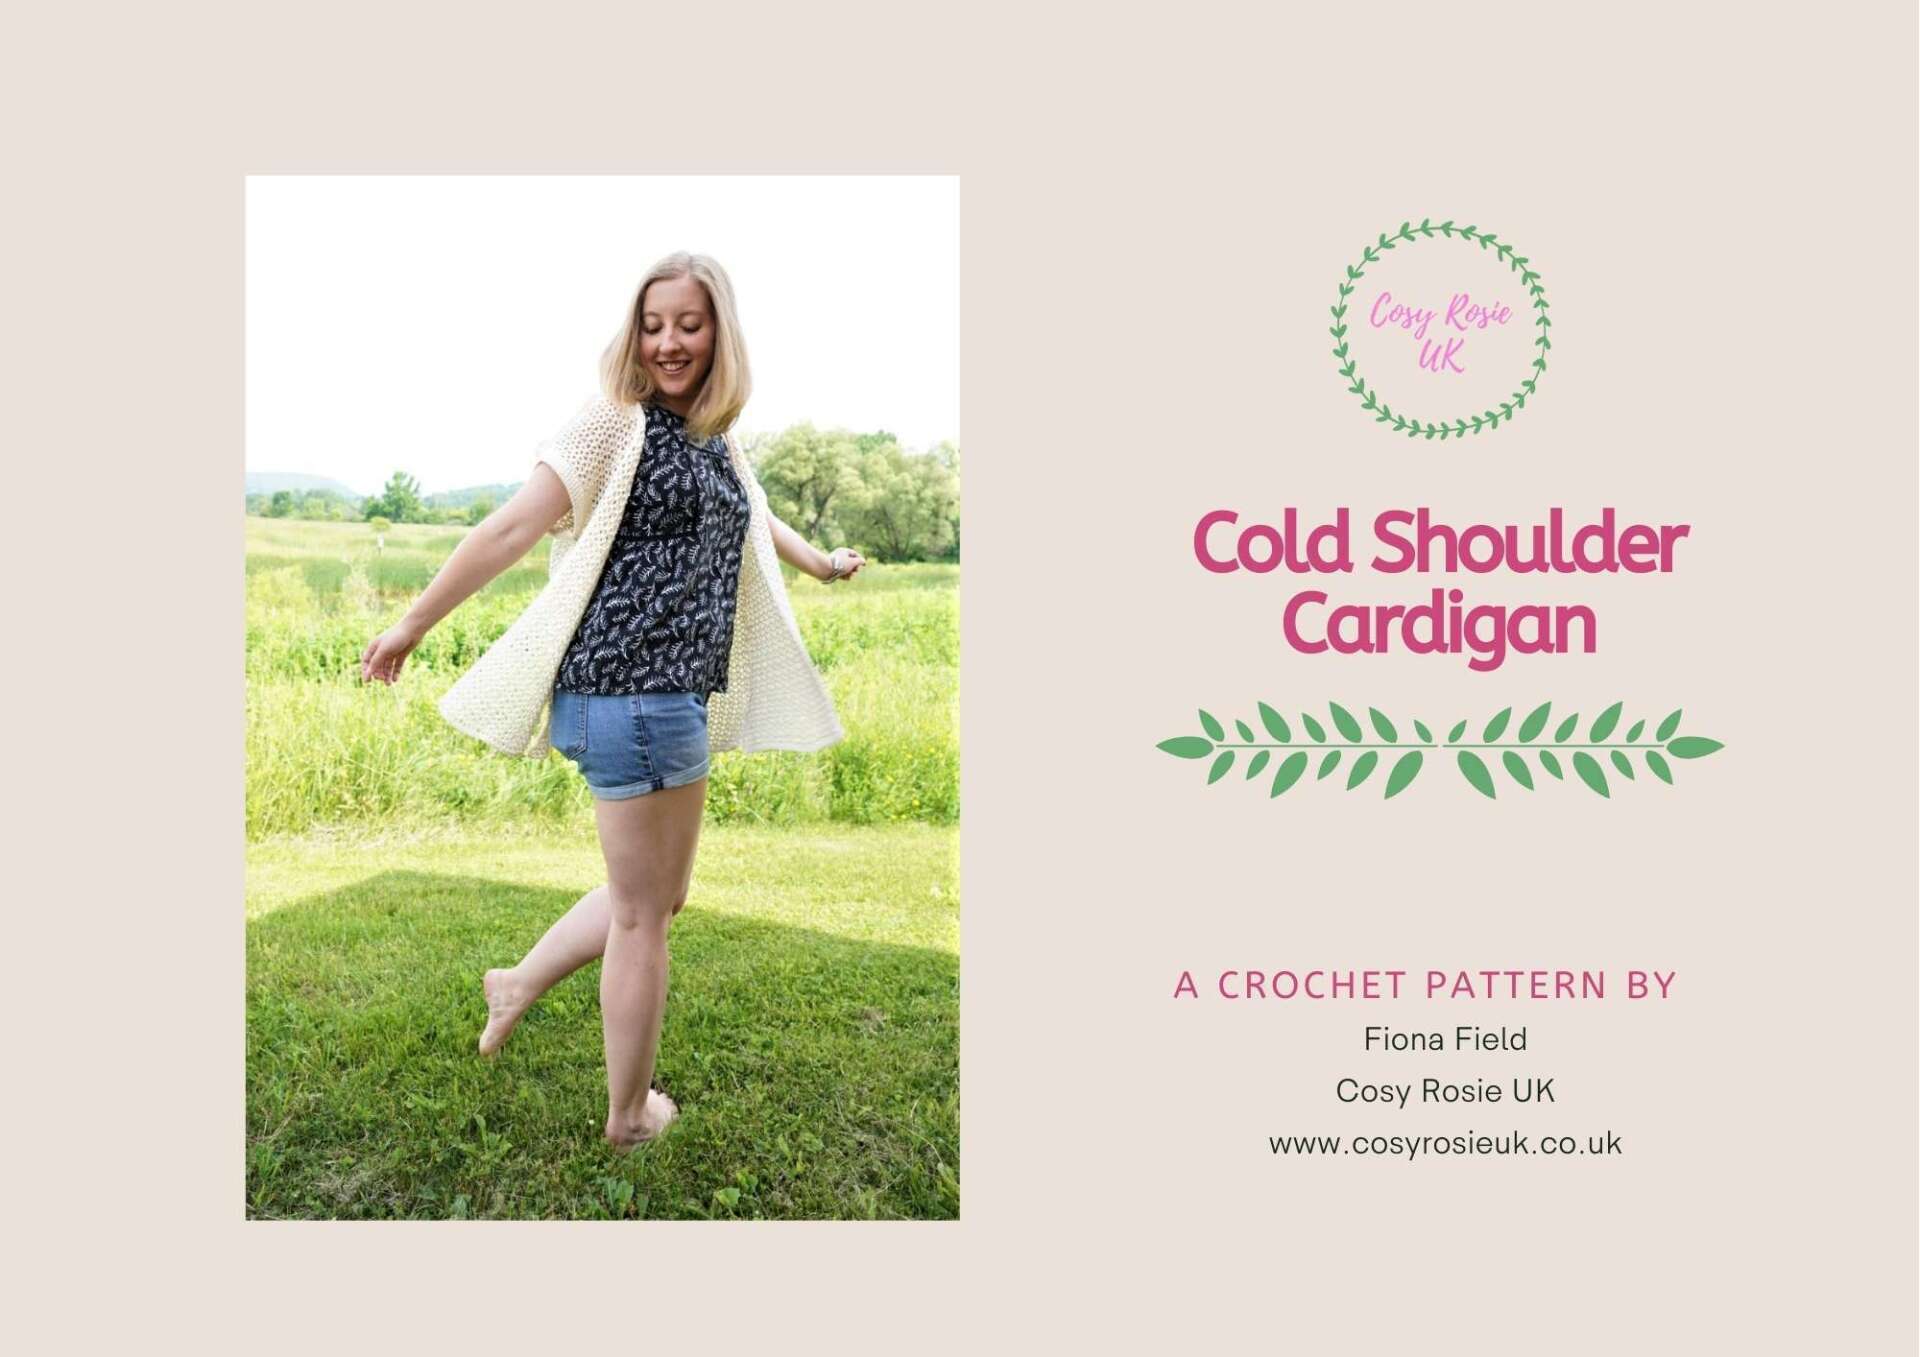
Oversize Crochet Cardigan Pattern
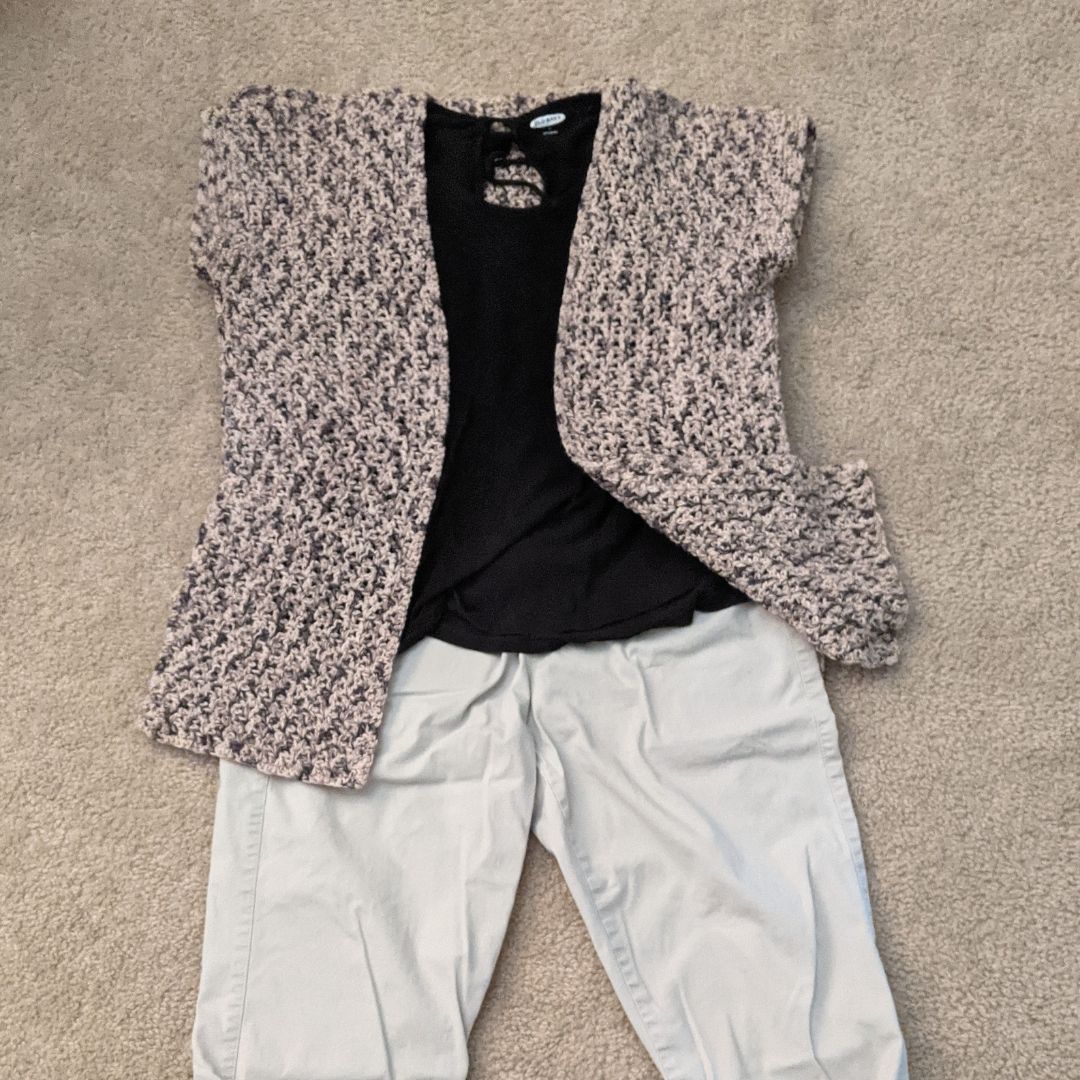
This oversized crochet cardigan pattern features a lightweight, open crochet fabric and an open shoulder to go perfectly with your crochet summer tops and bralettes. It's a quick and easy crochet cardigan pattern that is flatteringly oversized - perfect for those cooler summer nights.

Please note that some of the links in my blog are affiliate links. I may earn a small commission if you purchase via these links, but the price you pay is not affected
Cold Shoulder Cardigan | Free Crochet Patterns
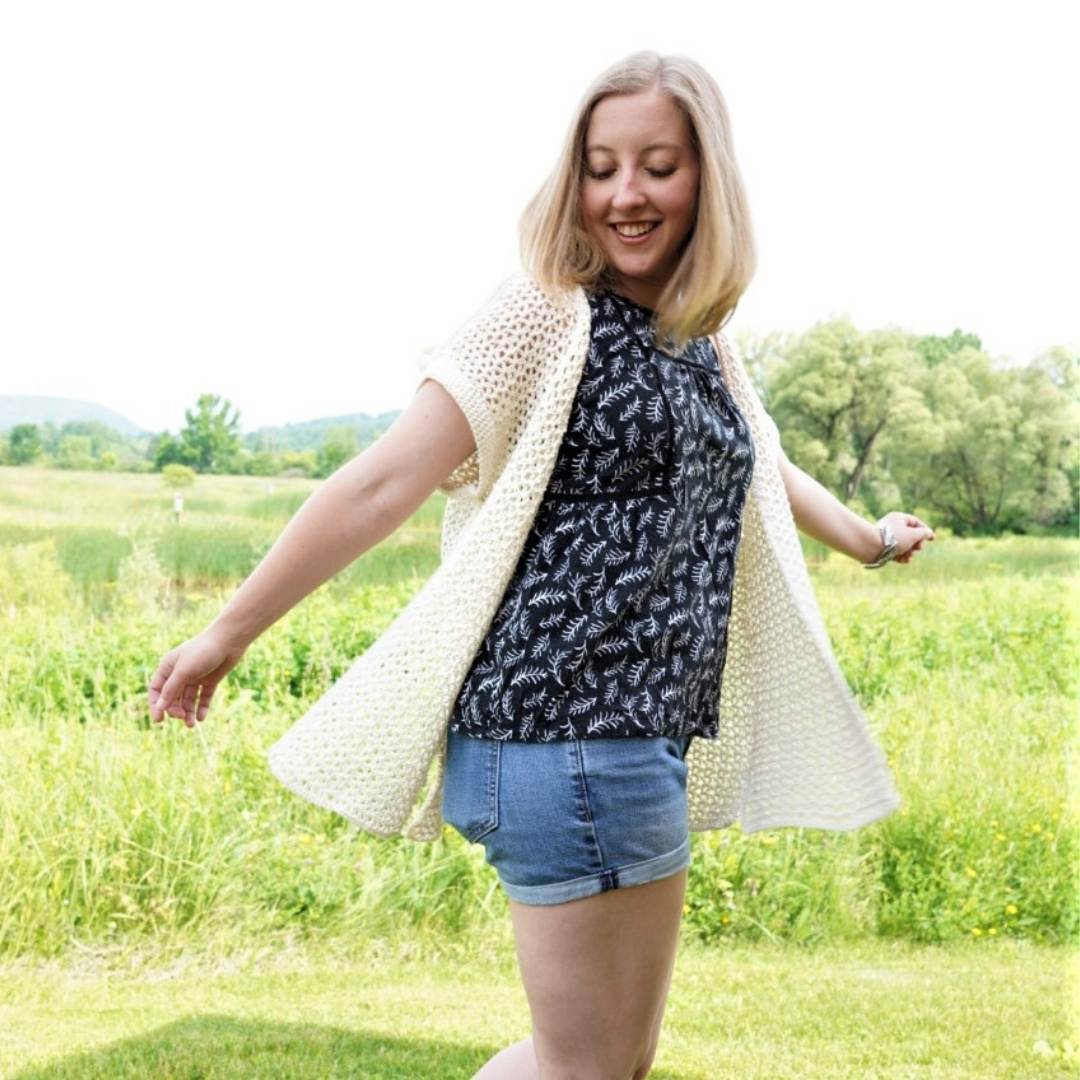
There's something comforting about throwing a cardigan over your shoulders - and being oversized, you can really snuggle into this one!
I love that this cardigan is a bit of a crochet coverup without taking away from the top I've chosen to wear it with!
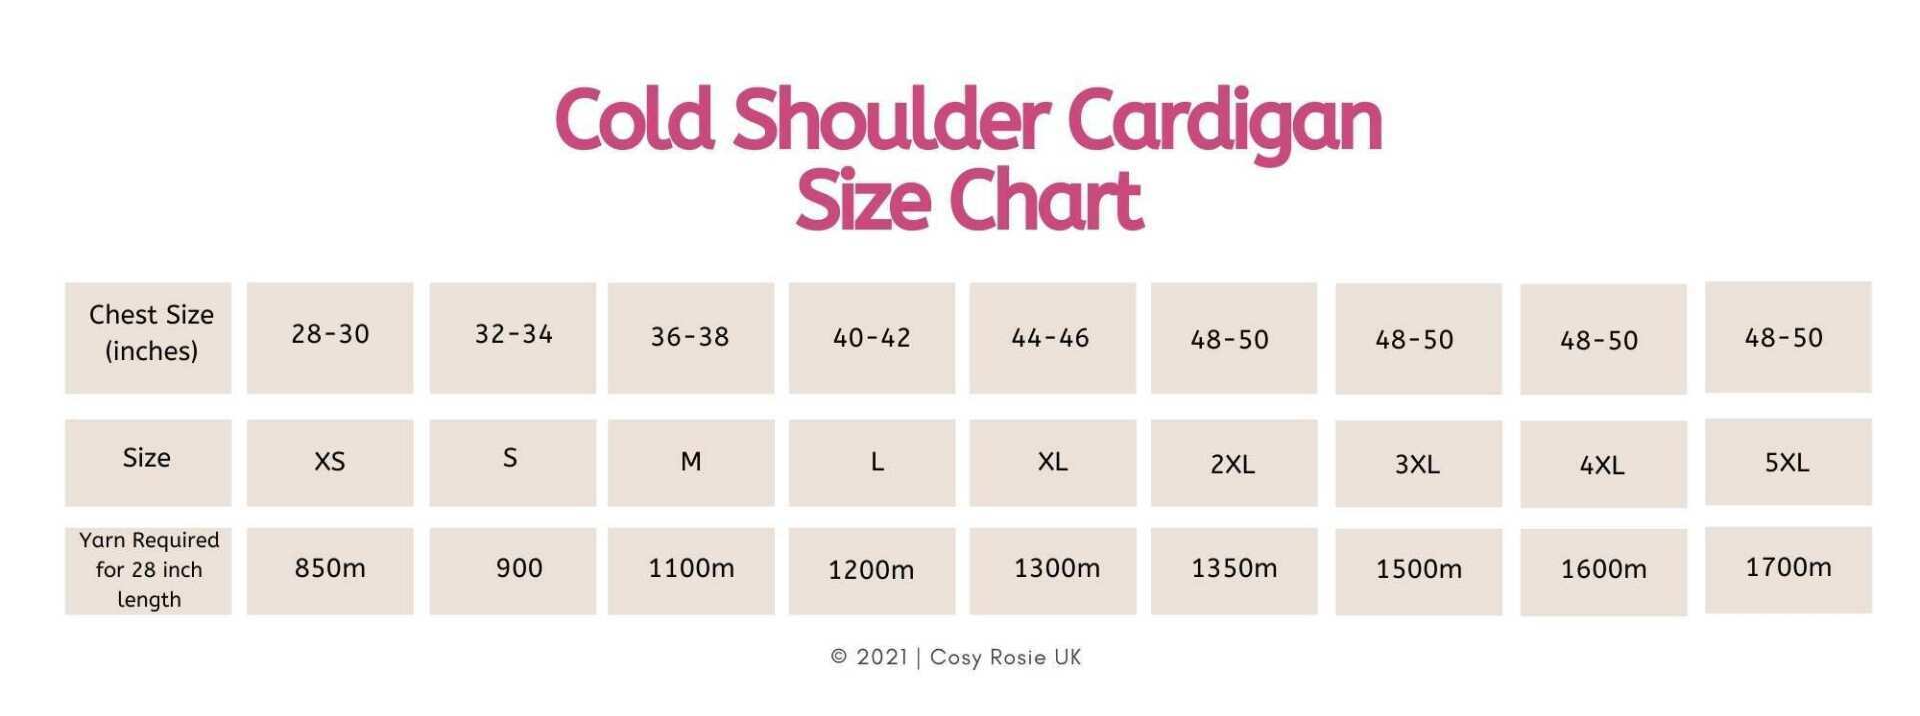
As with all my crochet garment patterns, it's full size inclusive from XS-5XL - and due to it being oversize, those that where bigger than a 5XL can also wear it too!
The addition of the cold shoulder to the pattern makes it a more summer crochet pattern and when teamed with the wonderful Rope Stitch, this oversized crochet cardigan pattern is lightweight and creates a swishy look without excess, heavy fabric!
I'll be wearing this cardigan all year round - teamed with a long sleeve t-shirt, it will sit perfectly and will showcase any patterned detail on the shoulders too!
Purchase the Printable PDF Pattern
You can purchase download a printable PDF copy of the Cold Shoulder Cardigan pattern from either my Etsy Shop or Ravelry Shop. You'll receive 2 copies of the patterns - 1 version in UK Terms and 1 in US Terms.
Click the button below to purchase from your favourite retailer.
Skill Level: Advanced Beginner
Materials:
- Size 3 (DK) yarn
- I used Lion Brand Coboo (51% cotton, 49% Rayon from Bamboo 100g/212m) in shade Mauve (145)
- Click here to read my review of this amazing yarn.
- 4mm Crochet Hook
- Scissors
- Tapestry needle
- Stitch Markers x 6

Sizing
This design is created with a positive ease of 12 inches to create an oversized cardigan. If you'd like a tighter fit, make one smaller size

Inspirational Images!
As always, this pattern would not be complete without the help of my fabulous pattern testers. They have helped me ensure that the pattern is correctly sized for all along with ensuring that the pattern can be easily followed regardless of your crochet skill level.
Below, you will find the photos of just 3 of my beautiful testers who have kindly shared pictures of their finished projects to inspire us with their colours choices they made.


I'm so pleased with the feedback from my testers who explained they loved how quickly it worked up and how luxurious it felt making something so practical and pretty at the same time!
Easy Oversized Crochet Cardigan Pattern Details
Pattern Notes
- Please read through entire pattern before beginning regardless of skill. If you have a question or need help, please email [email protected]
- This pattern is worked in rows to create 3 panels (back panel & 2 x side panel) which are then seamed to join.
- The edging is then added to the arm holes and around the whole cardigan which also joins the shoulders.
- Ch1 at the beginning of the rows DO NOT count as a stitch.
- Ch3 at the beginning of the rows DOES count as a stitch.
- Take a moment to go through the pattern and highlight the stitch counts for your size which will be written in size order. e.g XS (S, M, L, XL, 2XL, 3XL, 4XL, 5XL)
Abbreviations - US terms (UK terms in brackets)
St(s) - Stitch(es)
Ch - Chain
Ch Sp - chain space
Sl St - slip stitch
Sc (dc) - Single crochet (double crochet)
Dc (tr) - Double crochet (treble crochet)
V St - V Stitch
RS - Right side
WS - Wrong side
Finished Size
- see size chart
Gauge
- 7 V st and 8.2 rows = 4 inches (10cm) in pattern using a 4mm hook. Use a larger or smaller crochet hook to obtain the correct gauge
Special Stitches
V St (V Stitch) = [dc, ch 1, dc] into st or ch sp indicated
How to Crochet the V Stitch
How to crochet this easy cardigan pattern
Back Panel
Row 1: Ch 101 (116, 134, 143, 155, 167, 176, 185, 197), V st (dc, ch 1, dc) in 5th ch from hook (skipped st count as dc), *skip 2, V st in next*; repeat between * and * to last 2 ch, dc in last, turn. 32 (37, 43, 46, 50, 54, 57, 60, 64) V st, 2 dc
Row 2: Ch 3 (counts as st), *V st in each ch-1 sp across, dc in beginning ch-3, turn.
For 28 inch length:
Rows 3-62: Repeat Row 2.
Fasten off.
Continue to Side Panel.
For 30 inch length:
Rows 3-66: Repeat Row 2.
Fasten off.
Continue to Side Panel.
For 32 inch length:
Rows 3-70: Repeat Row 2.
Fasten off.
Continue to Side Panel.
Side Panel | Free V Stitch Cardigan Pattern
Side Panels - Make 2
Row 1: Ch 33 (36, 48, 51, 54, 60, 63, 69, 72)) V st (dc, ch 1, dc) in 5th ch from hook (skipped chs count as dc), *skip 2, V st in next*; repeat between * and * to last 2 ch, dc in last, turn. 10 (11, 15, 16, 17, 19, 20, 22, 23) V st, 2 dc
Row 2: Ch 3 (counts as st), *V st in each ch-1 sp across, dc in beginning ch-3, turn.
For 28 inch length:
Rows 3-62: Repeat Row 2.
Fasten off after last row.
For 30 inch length:
Rows 3-66: Repeat Row 2.
Fasten off after last row.
For 32 inch length:
Rows 3-70: Repeat Row 2.
Fasten off after last row.
Lightly block all panels to match size chart.
Continue to Joining & Sewing Up.
Joining | Free Oversized Crochet Cardigan Pattern
Panel Placement
Placing the wrong sides together, position the 2 side panels on top of the main panel.
- check the direction of the V's all match
- Place a stitch marker to join together in the top corners
- Count the stitches along the top of the side panel and pin together through the same stitch on the main panel


Arm Holes
- Measure down the side of the top and place marker for the arm holes. Count the rows and match the row count on both sides.
Recommended arm hole sizes are oversized to allow for drape:
- XS & S: 8 inches
- M, L & XL: 9 inches
- 2XL, 3XL: 10 inches
- 4XL & 5 XL: 11.5 inches
Side Splits (Optional)
- Measure up from the bottom up the side of the top and pin together for the side splits.
- Count the rows and match the row count on both sides.
Create the split the length you'd like. I made mine 8 inches deep.
Sewing Up
- Sew up each side, in between the stitch markers using the mattress stitch.
- Do not join the shoulders.
Continue to Edging
Edging | Free Oversized Crochet Cardigan Pattern
Edging for Arm Holes
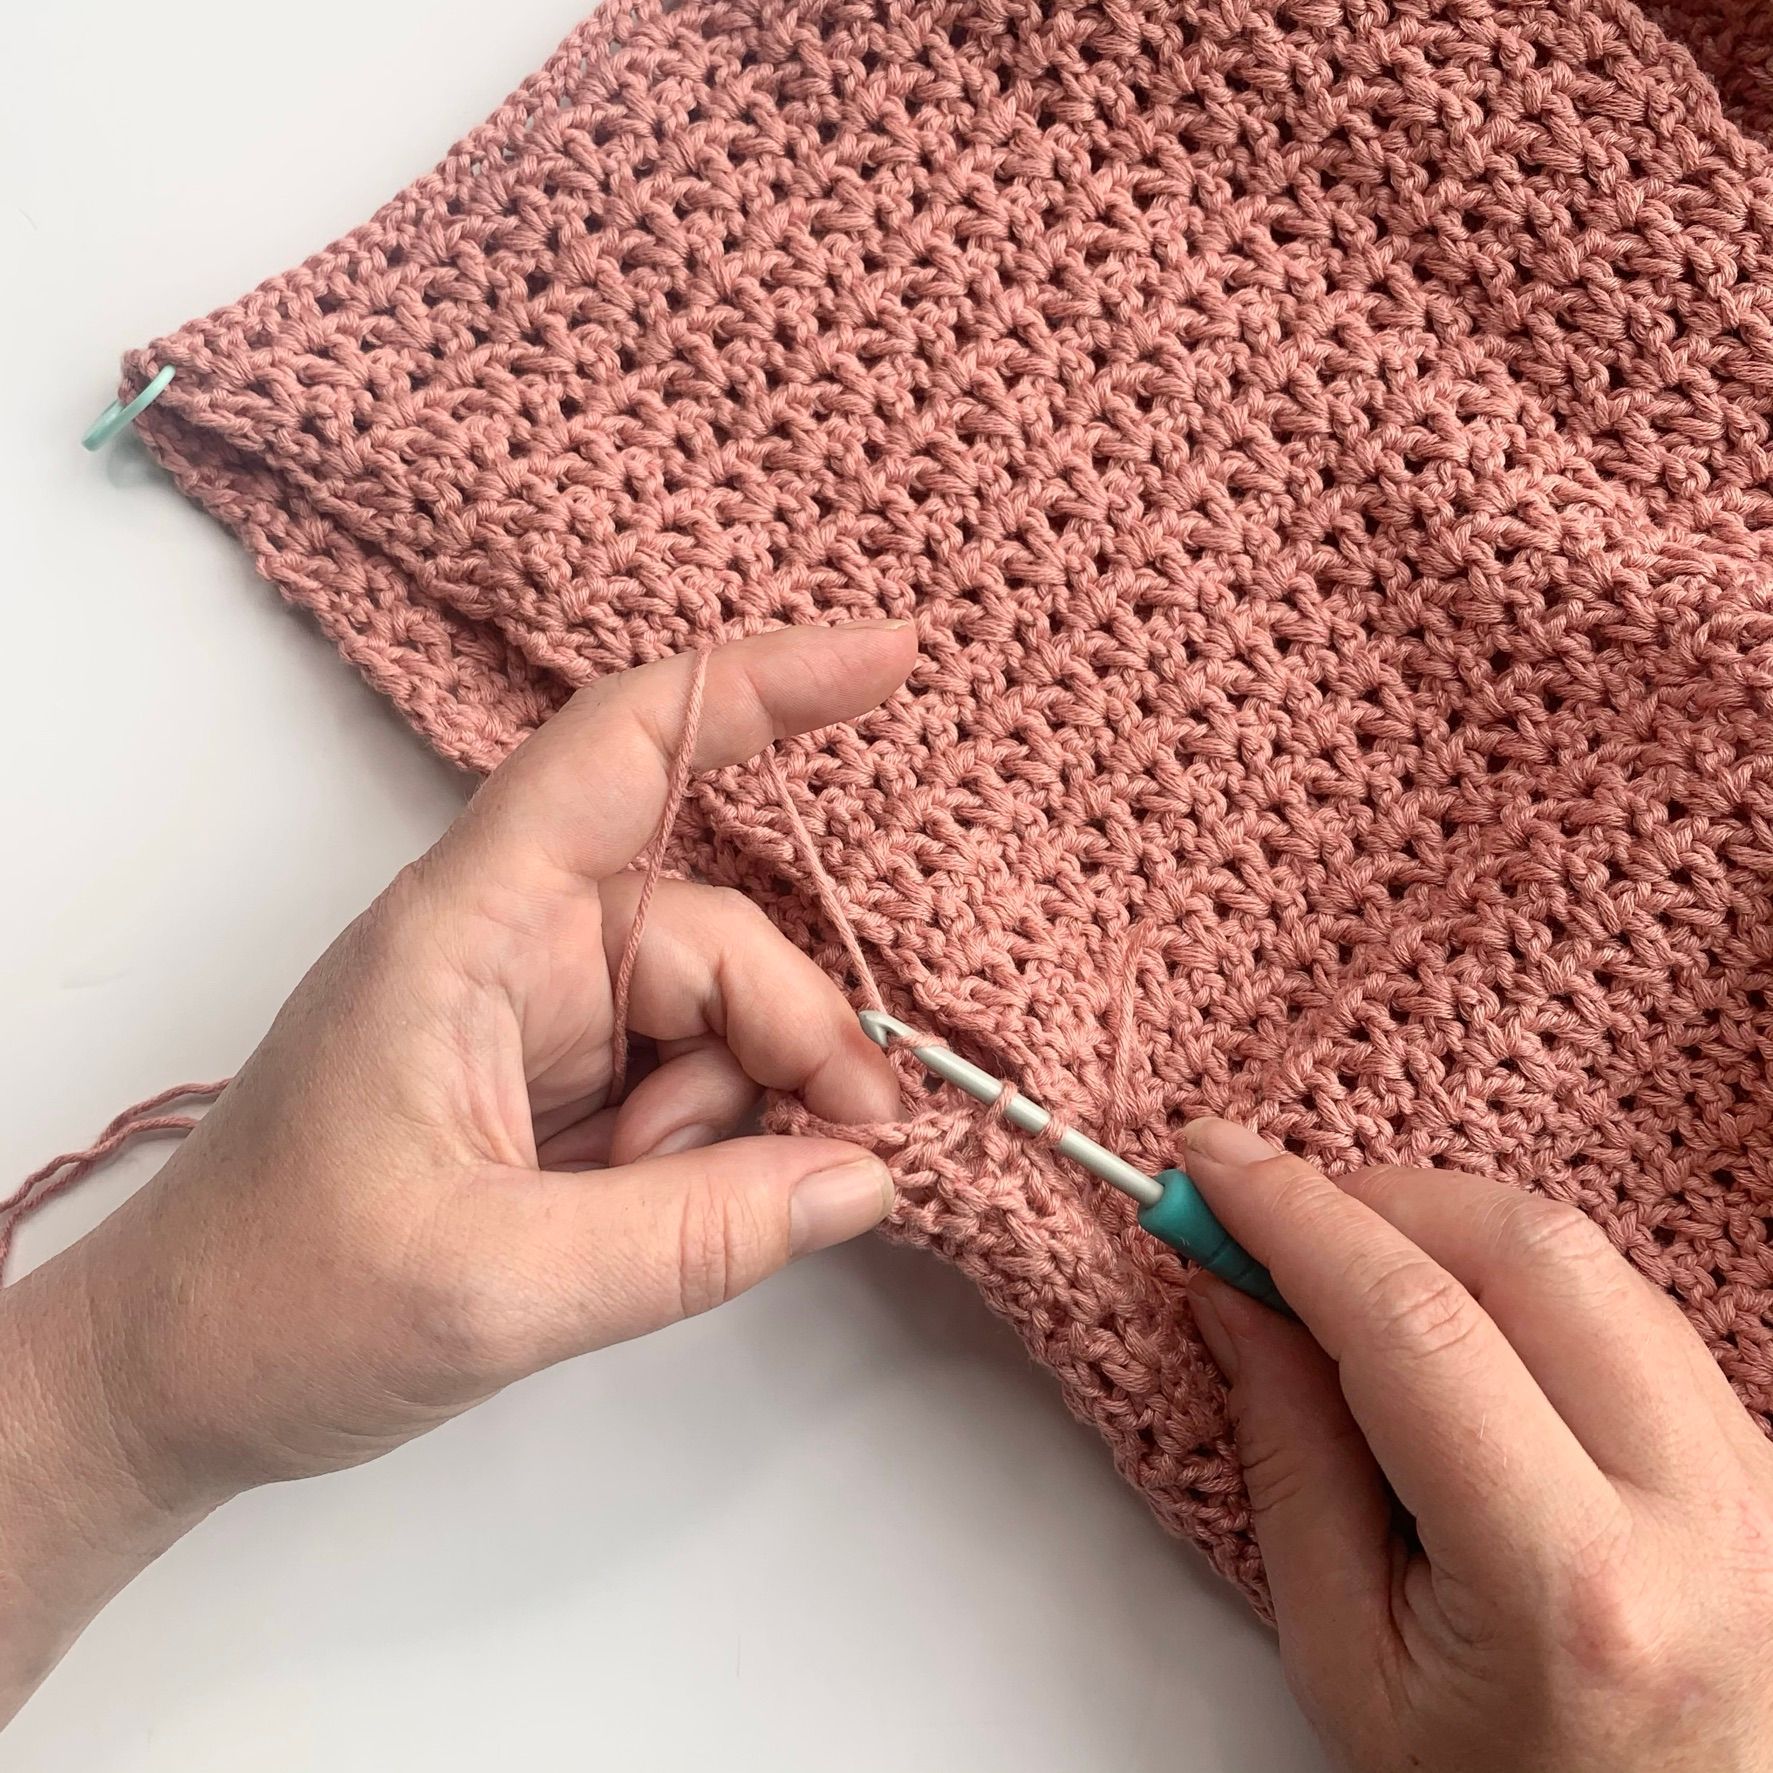
Round 1: Join yarn in seam at bottom of the arm holes (as pictured above), ch 1, working in ends of rows 2sc across each row end to top of side panel, sc through both side panel and back panel to join at shoulder edge, continue to row in end of rows, 2sc event across each row end to bottom of arm hole, sl st to 1st to join.
Rounds 2-5: Ch 1 (does not count as st), sc in each stitch around, sl st o join.
Fasten off and weave in ends.
Repeat for other arm hole.
Edging for Top and Joining Shoulders
The edging is worked in one continuous round which also joins the side panel to the main panel at the neck creating the shoulder opening.
Round 1: With RS facing, join yarn in bottom corner in beginning chain of side panel, ch 1, sc in each across on other side of beginning ch to corner, [sc, ch 1, sc] in corner, *rotate to work up side optional split if required, working in row ends, sc evenly up to the side seam, skip seam, rotate to work down row ends on other side of split, working in row ends, sc evenly down side split to corner, [sc, ch 1,sc] in corner*, rotate to work beginning ch of back panel, sc in each across to next corner; repeat from * to *,
rotate to work beginning ch of side panel, sc in each across to corner, [sc, ch 1, sc] in corner, rotate to work in row ends of side panel, sc evenly in row ends to top of side panel, [sc, ch 1, sc] in corner, leave the stitch marker in the stitch on the main panel that was marked where to join the shoulders.
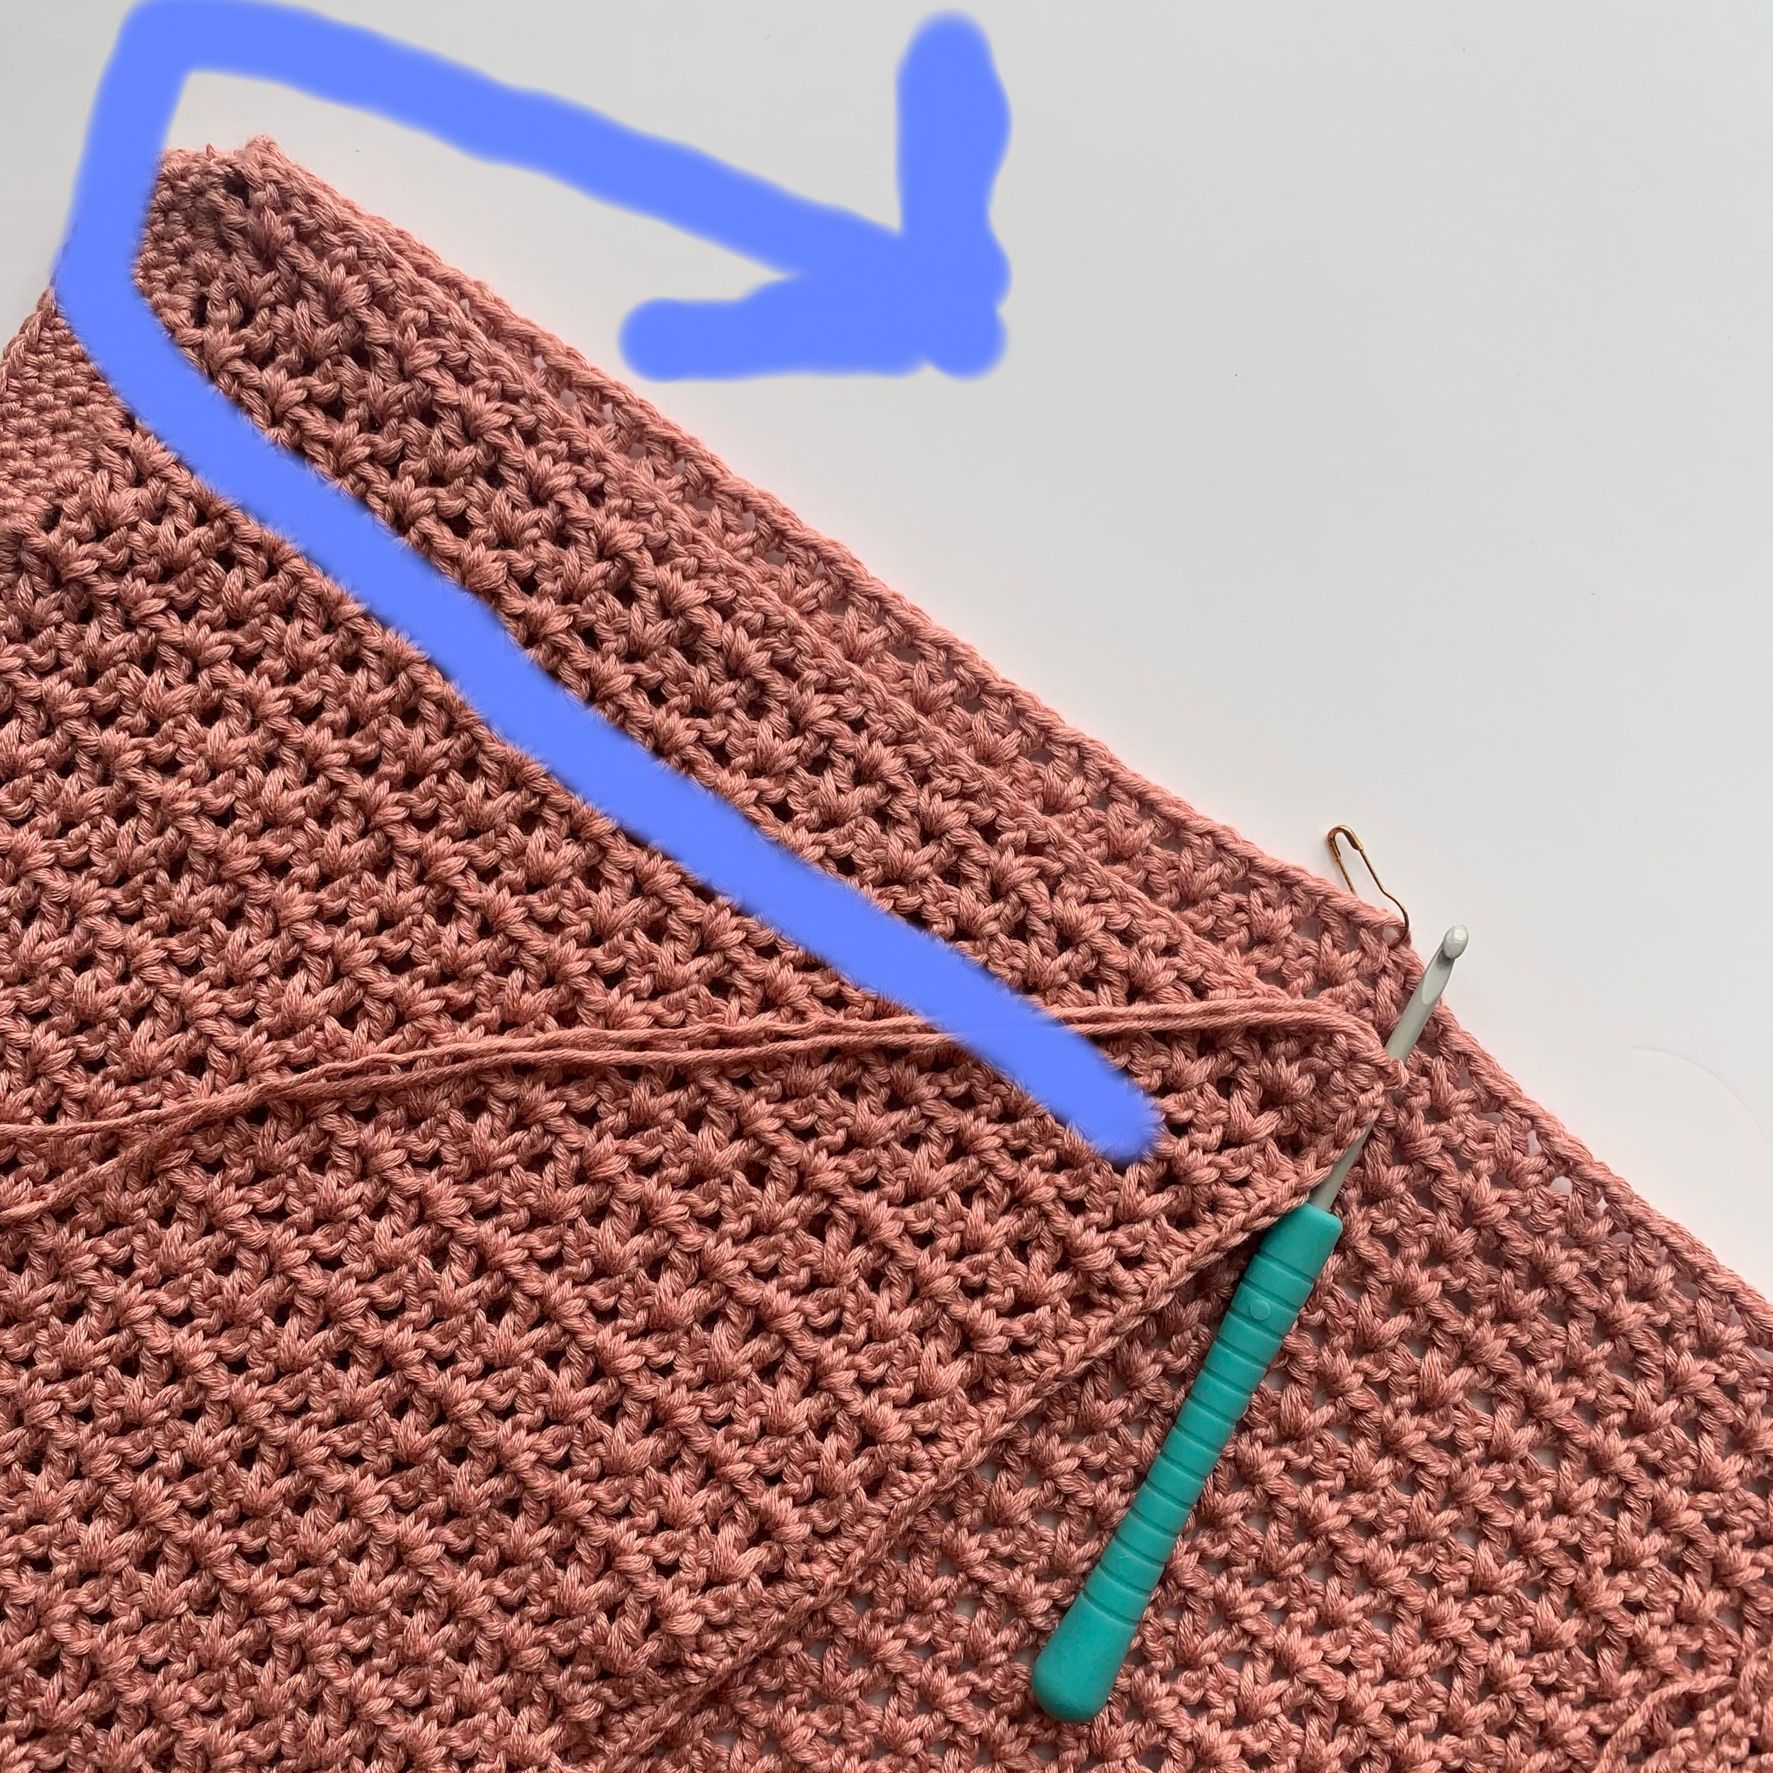
Rotate to work in top of side panel, sc in each across to arm hole, rotate to work across top of back panel, sc in each across to 2 sts before stitch marker, sc through both back and Side panel to join next 2 and marked st, sc through next in back panel and ch-1 sp of corner on side panel, sc in each across to next marked st, sc in marked st, re-place marker once worked, Sc in each across top of back panel to arm hole, rotate to work across top of side panel, sc in each across to 3 sts before edge of side panel, sc in next 2 sts, working through both back and side panel to join, sc through marked st and edge st of side panel, [ch 1, sc] in same edge st, rotate to work in row ends of side panel, sc evenly in row ends down the side panel, [sc, ch 1, sc] in last, sl st to 1st to join.
Fasten off and weave remaining ends.
Made it?
Well done - I'd love to see your finished project and celebrate your success. Why not share a photo with me on social media using the tag @cosyrosieuk.

To get your copy of the Cold Shoulder Crochet Cardigan printable PDF pattern, click on the button below.
If you like the look of this crochet pattern, why not check out all my other free patterns by clicking the button below.

About the Autor
Hi, I'm Fiona, the hands behind Cosy Rosie Crochet - the place to learn to crochet as you make!
With over four years of hands-on experience leading in-person crochet workshops since 2018 and designing and publishing my own patterns since 2019, I bring a wealth of expertise of sharing crochet techniques.....

Cosy Rosie UK Crochet Blog