Free Crochet Beach Cover Up Dress Pattern
Create your own cover up with this free crochet beach cover up pattern. Crochet Beach Cover Ups are a holiday essential that can take us from poolside to tableside - great to throw over your swimsuit or pair with some shorts when moving around the sand. This lightweight crochet beach dress can be made in a length to suit you and your style.

Please note that some of the links in my blog are affiliate links. I may earn a small commission if you purchase via these links, but the price you pay is not affected
Easy Crochet Beach Cover up Dress | Free Crochet Pattern
There is nothing better than a day on the beach or by the pool - sun cream in hand, with your shade's and a good book in your bag, ready to laze the day away.
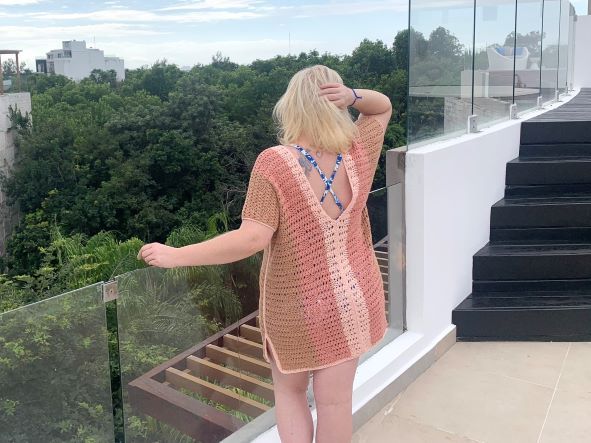
The Iris Blossom Beach Tunic is the perfect throw-over for your swim suit or shorts that makes for a quick and easy beach day outfit.
I worn mine almost every day on my trip to Mexico in 2022 - it made it easy to be ready to go for lunch in seconds after a quick dip in the pool.
This free crochet swimsuit cover up is simply made of 2 rectangles, which are seamed to create a neck opening; you can also add optional side slits to keep things breezy!
There are so many ways to make this pattern in your own style by choosing from:
- The length you want your cover up
- How long your want the side openings
- How deep the V-neck is
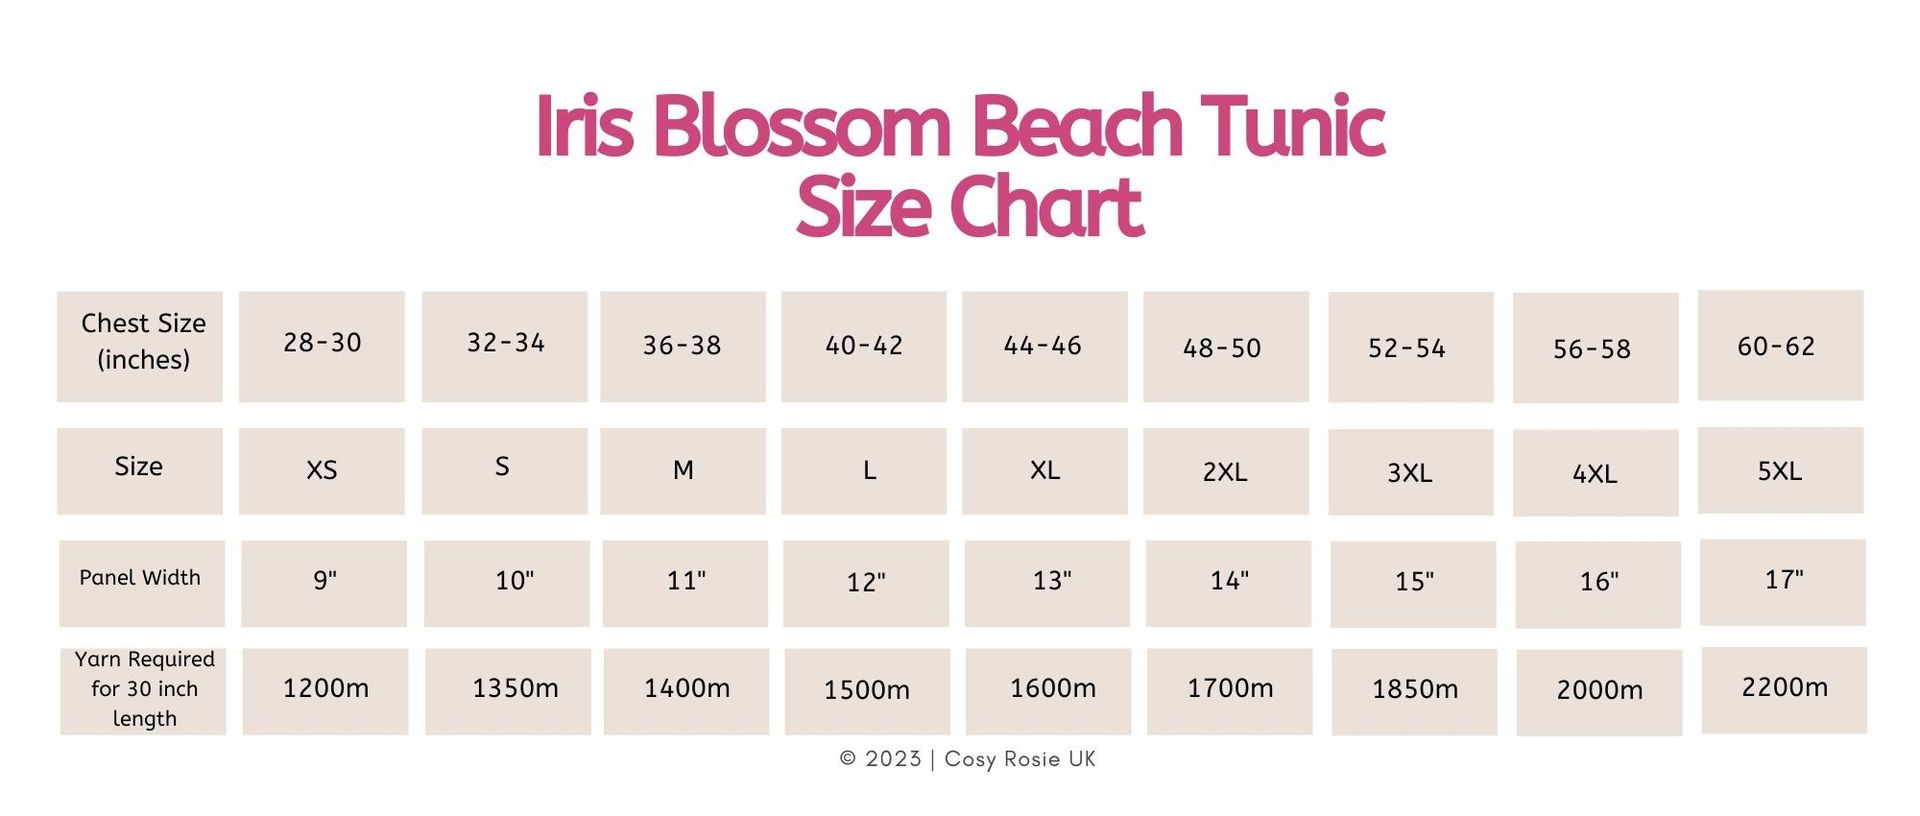
Fully Size Inclusive Crochet Beach Coverup Pattern
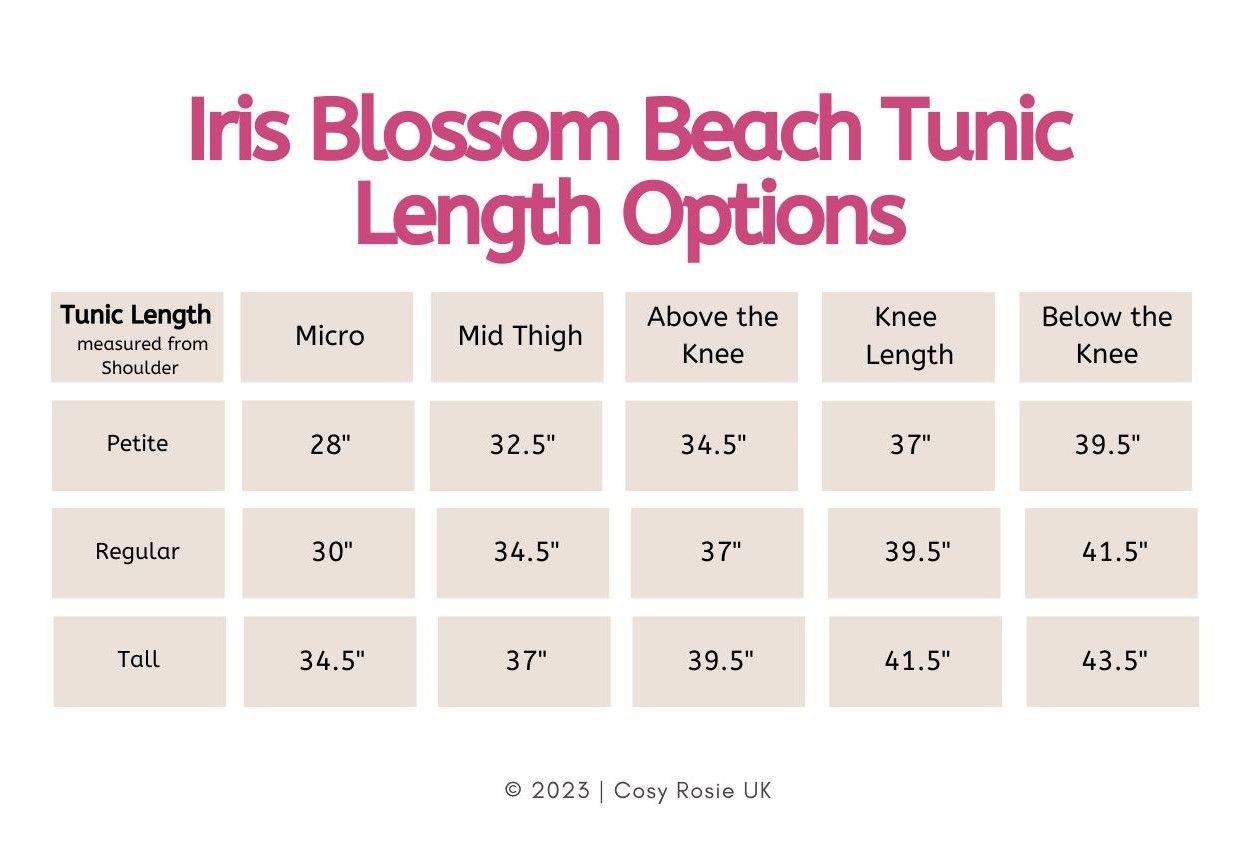
This free crochet swimsuit coverup pattern is written for 9 sizes; XS through to 5XL AND comes with all the length options for petit, regular and tall the following styles:
- Micro
- Mid thigh
- Above the knee
- Knee length
- Below the knee
Once you've decided the length you want to make, make your 2 panels and sew them together to join - See the size chart below to confirm which size and length you'd like to make.

Purchase the Printable PDF Pattern
This pattern is available to purchase in your favourite crochet pattern shops by clicking the button below to purchase.
How to crochet a beach cover dress?
Skill Level: Advanced Beginner (due to joining and sewing)
Materials:
Stylecraft Naturals Cotton Bamboo, DK/#3 yarn (60% Bamboo, 40% Cotton; 273yds/250m per 3.5 oz/100g skein)
• 5 (6, 7, 7, 8, 8, 9, 9, 10) skeins
CLICK HERE TO GET YOUR YARN FROM LOVECRAFTS
- 4mm Crochet Hook
- Scissors
- Tapestry needle
- Stitch Markers
Pattern Notes
- Get in touch if you need any help completing the pattern - [email protected]
- This pattern constructed from 2 rectangular panels and sewn together using mattress stitch worked in to the back loop only
- Ch1 at the beginning of the rows DO NOT count as a stitch.
- Ch3 at the beginning of the rows DOES count as a stitch.
- Take a moment to go through the pattern and highlight the stitch counts for your size which will be written in size order. e.g XS (S, M, L, XL, 2XL, 3XL, 4XL, 5XL)
Gauge
- 4.5 Iris stitch and 9 rows = 4 inches (10cm) in pattern using a 4mm hook. Use a larger or smaller crochet hook to obtain the correct tension.
Size Chart for Crochet Beach Coverup
This tunic is designed with 6 inches of positive easy for a loose, comfy fit.
There is no shaping in this design - check that the chest size will be comfortable across the hips.
If you'd like to find out more about measuring yourself, click here to read my tips for measuring yourself before starting your crochet garments.
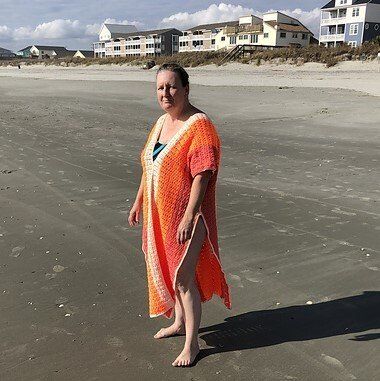
I love that the length can be made to you own choice and my testers all opted for longer or different lengths than I made.
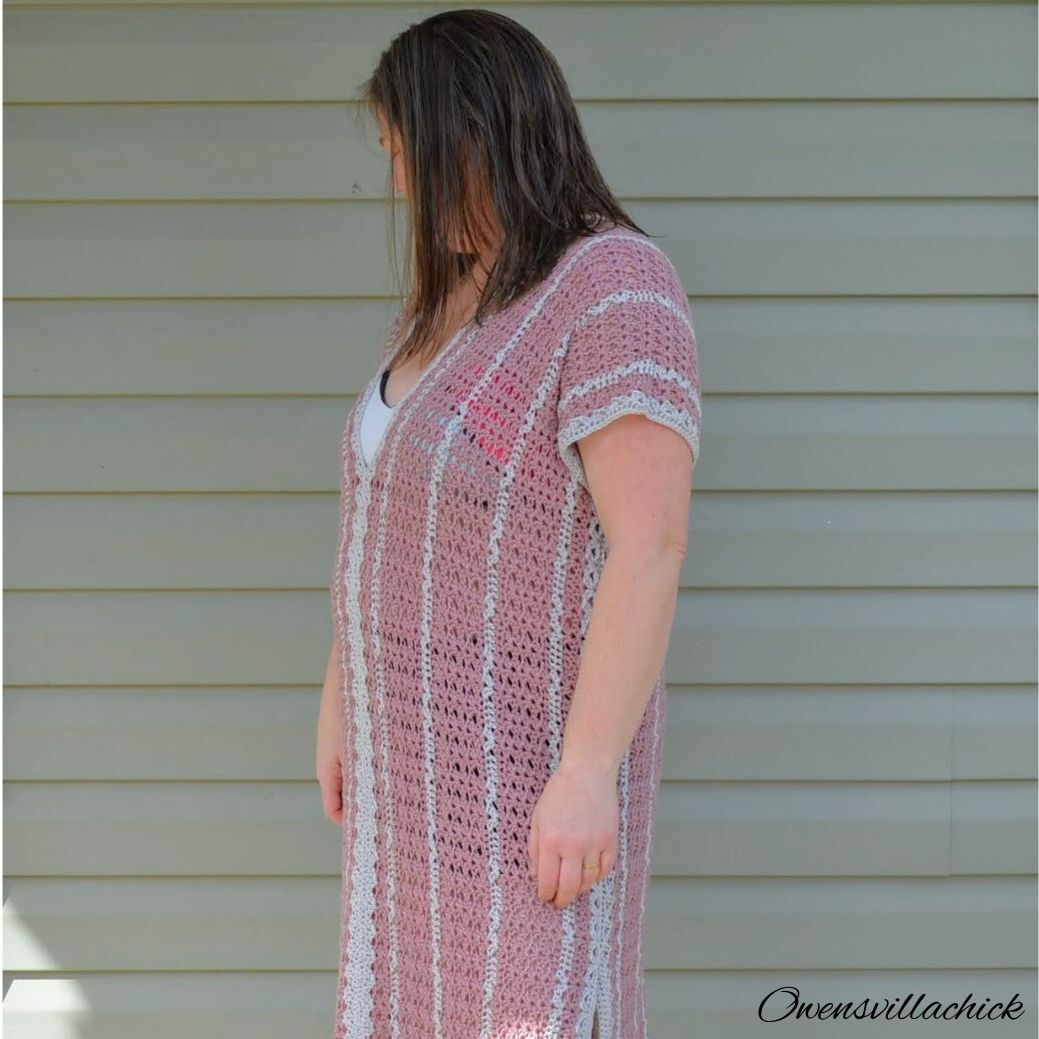
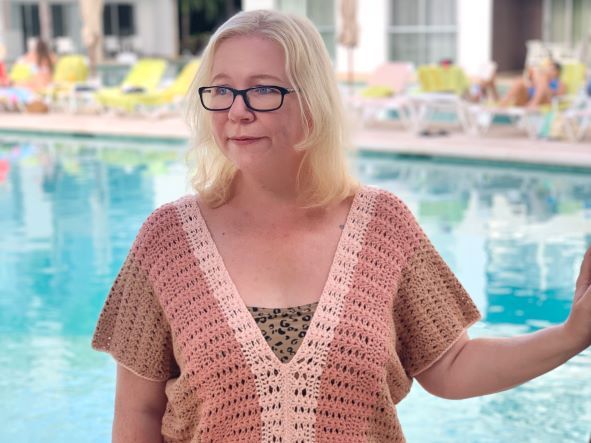
Ethy, pictured above, chose a below the knee length for comfort, keeping the side openings to just above the knee for comfort and ease when moving around.
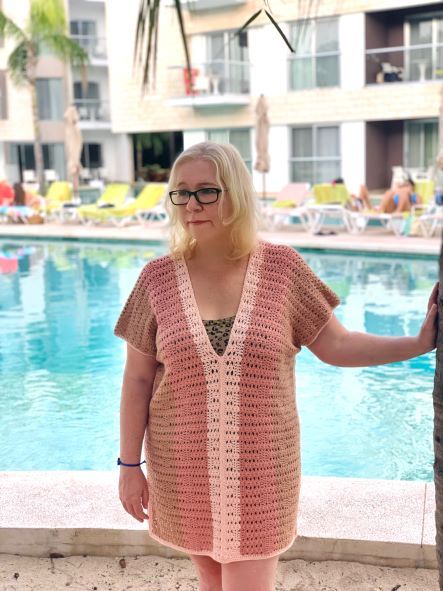
Marie, pictured below chose to go for a full maxi length, with higher side openings to allow her to enjoy her beach days.
Creating the Right Length for You and Your Style
The starting chain for the panels is determined by the length you want your completed tunic to be.
Due to stretching and varied elasticity of different yarns, the piece may have a margin of difference in the measurements of about one inch, even if gauge is met.
Crochet Beach Coverup Length Chart
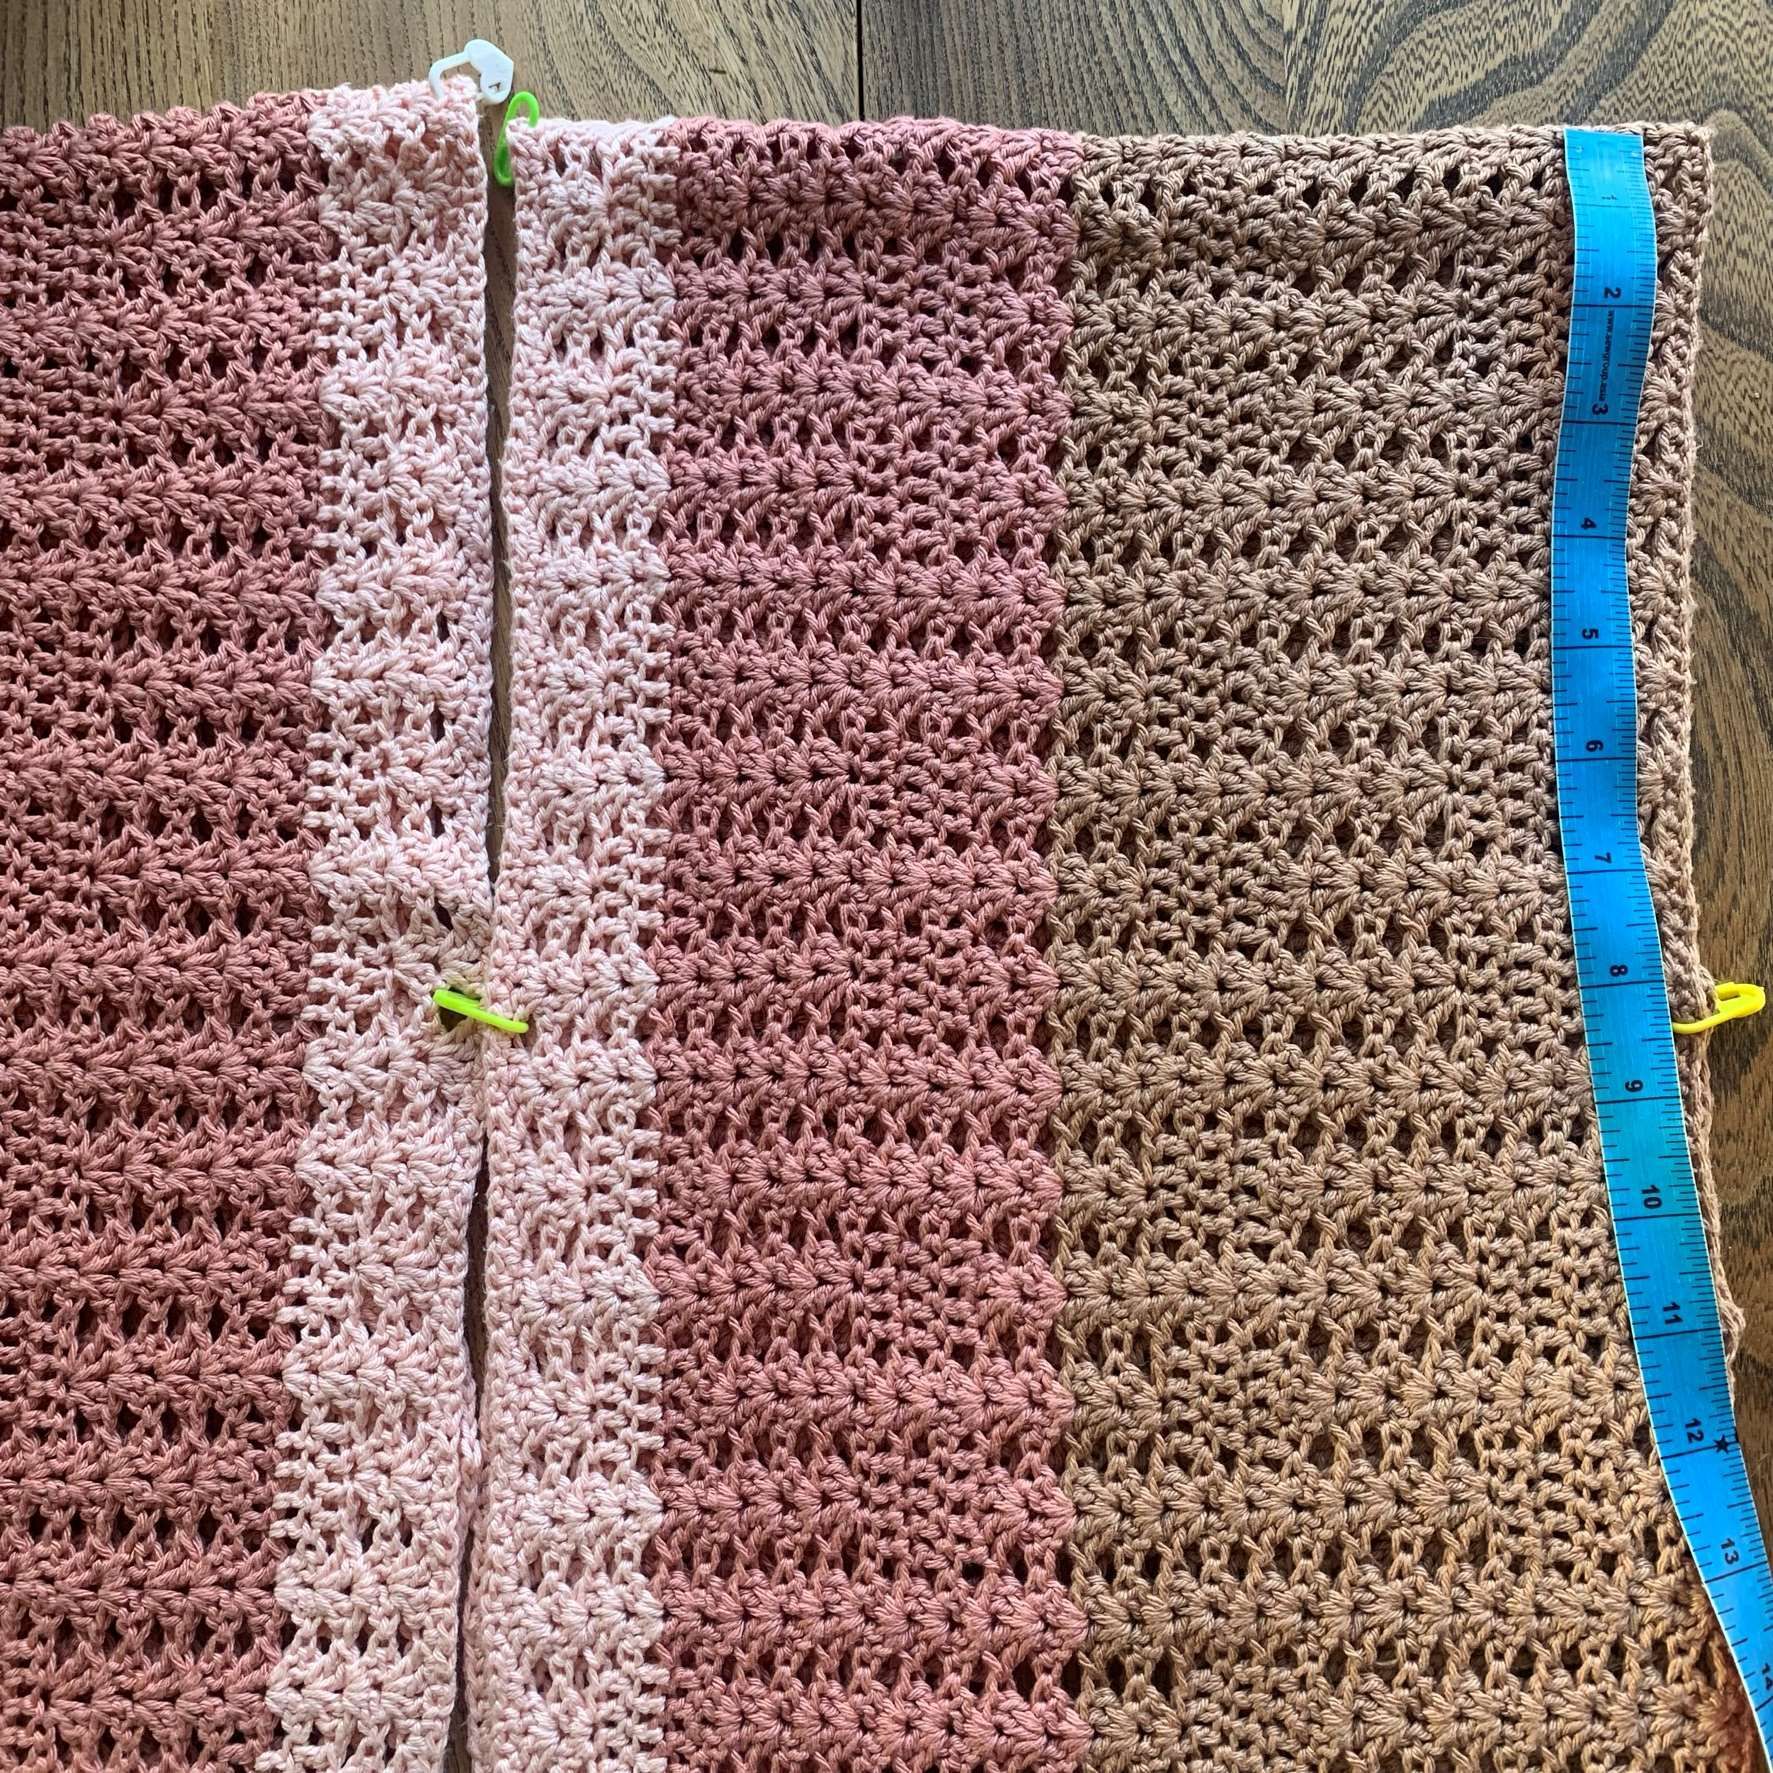
How to create a striped crochet beach coverup
The pattern below does not indicate where to change colours as the width of the panels made to create the crochet cover up varies dependent on which size you are making.
I used 3 shades to create my own crochet coverup (pictured below). I calculated the total number of rows required to complete both panels and divided the total number of rows by the number of yarn colours I chose to use which was 3:
- Nutmeg
- Rose
- Blossom
This allowed me to create an even flow of colours across both panels while accommodating for the V-neck opening.
Pattern Details | Free Crochet Coverup Pattern
Abbreviations - US terms (UK in brackets)
St(s) - Stitch(es)
Ch - Chain
Ch Sp - Chain space
Sc (dc) - Single crochet (double crochet)
FSc (fdc) - Foundation Single (double) crochet
HDc (htr) - Half double (treble) crochet
Dc (tr) - Double crochet (treble crochet)
Iris - Iris Stitch
RS - Right side
WS - wrong side
Special Stitches
fsc (foundation single crochet) = ch 2, insert hook in 2nd ch from hook, yo, pull up loop, yo, pull through 1 loop (ch made), yo, pull through 2 loops (sc made), *insert hook in ch of previous st, pull up loop, yo, pull through 1 loop (ch made), yo, pull through 2 loops (sc made); repeat from * until required number of fsc have been mad
Iris (Iris stitch) = [2Dc, Ch1, 2Dc]
How to make a Crochet Beach Coverup
Panel (make 2)
The starting chain for the panels will be determined by the length you want the finished tunic - see chart below to confirm starting chain.
| Tunic Length | Starting Chain |
|---|---|
| 28" | 246 |
| 30" | 266 |
| 32.5" | 286 |
| 34.5" | 306 |
| 37" | 326 |
| 39.5" | 346 |
| 41.5" | 366 |
| 44" | 386 |
Row 1: Ch 246 (266, 286, 306, 326, 346, 366, 386), sc in 2nd ch from hook and in each across, turn. 245, (265, 285, 305, 325, 345, 365, 385) sc
Alternately, fsc 245 (265, 285, 305, 325, 345, 365, 385, turn.
Row 2 (RS): Ch 3 (counts as dc here and throughout), skip 1, iris in next, *skip 3, iris in next; repeat from * across to last 2, skip 1, dc in last, turn. 61 (66, 71, 76, 81, 86, 91, 96) iris, 2 dc.
Row 3: Ch 3, iris in each ch-1 sp across, dc in last, turn.
Row 4: Ch 3, dc in next 4 dc, *iris in next ch-1 sp, skip 2 dc, dc in next 4 dc, iris in next 2 ch-1 sps, skip 2 dc, dc in next 4; repeat from * across to last, dc in last, turn. 36 (39, 42, 45, 48, 51, 54, 57) iris, 102 (110, 118, 126, 134, 142, 150, 158) dc
Row 5: Ch 3, *dc in next 4 dc, iris in next 2 ch-1 sps, dc in next 4 dc, iris in next ch-1 sp; repeat from * across to last 5, dc in last 5, turn.
Row 6: Repeat Row 4.
Row 7: Ch 3, *iris in 3rd dc of next 4-dc group, iris in next 2 ch-1 sps, skip 2 dc, iris in 3rd dc of next 4-dc group, iris in next ch-1 sp; repeat from * across to last 5, iris in 3rd dc of last 4-dc group, dc in last, turn. 61 (66, 71, 76, 81, 86, 91, 96) iris, 2 dc.
Rows 8-10: Repeat Row 3.
Rows 11-13: Repeat Rows 4-6.
Continue to preferred size.
Size XS
Rows 14-21: Repeat Rows 7-13, ending on Row 7 repeat. Continue to Final Row.
Size S
Rows 14-24:
Repeat Rows 7-13, ending on Row 10 repeat. Continue to Final Row.
Size M
Rows 14-24: Repeat Rows 7-13, ending on Row 10 repeat.
Rows 25-27: Repeat Rows 4-7. Continue to Final Row
Size L
Rows 14-28: Repeat Rows 6-12, ending on Row 6 repeat.
Row 29: Repeat Row 2. Continue to Final Row.
Size XL
Rows 14-31: Repeat Rows 7-13, ending on Row 10 repeat. Continue to Final Row.
Size 2XL
Rows 14-27: Repeat Rows 7-13.
Row 28: Repeat Row 7.
Row 29: Repeat Row 5.
Row 30: Repeat Row 4.
Row 31: Repeat Row 5.
Row 32: Repeat Row 7. #
Row 33: Repeat Row 3. Continue to Final Row.
Size 3XL
Rows 14-35: Repeat Rows 7-13, ending on Row 7 repeat. Continue to Final Row.
Size 4XL
Rows 14-35: Repeat Rows 7-13, ending on Row 7 repeat.
Rows 36-37: Repeat Row 3. Continue to Final Row.
Size 5XL Rows 14-35: Repeat Rows 7-13, ending on Row 7 repeat.
Row 36: Repeat Row 3.
Row 37: Repeat Row 7.
Row 38: Repeat Row 5.
Row 39: Repeat Row 7. Continue to Final Row
Final Row - All Sizes
Ch 1, hdc in same, skipping all ch sps, *hdc in next, sc in next, ch 1, sc in next, hdc in next; repeat from * across to last, hdc in last. Fasten off leaving long tail for sewing. Block to measurements.
Assembly | Free Crochet Beach Cover Up
- Fold panels in half with short edges together
- Place marker in top, center of each panel
- Measure down from fold, on outer edge, place marker through both layers to mark bottom of Armhole per size: 6 ½ (7, 7 ½, 8, 8 ½, 9, 9 ½, 10, 10 ½)”
- Place marker through both inner corners to hold middle together
- Place marker through both layers of bottom outer corners to hold together
Optional Side Opening
- Place markers 6” up from bottom outer edge of Panel to create looser fit across hips
- Place marker on front Panels together where preferred opening will begin – designer placed markers 11” from top edge fold
Armhole Edging
Row 1: With RS facing, join in 1st stitch of bottom corner (or where marker placed for hip opening), ch 1, working through both layers, sc in same, working through single layer, sc evenly around Armhole, join. Fasten off, leaving long tail for sewing. Repeat for other side
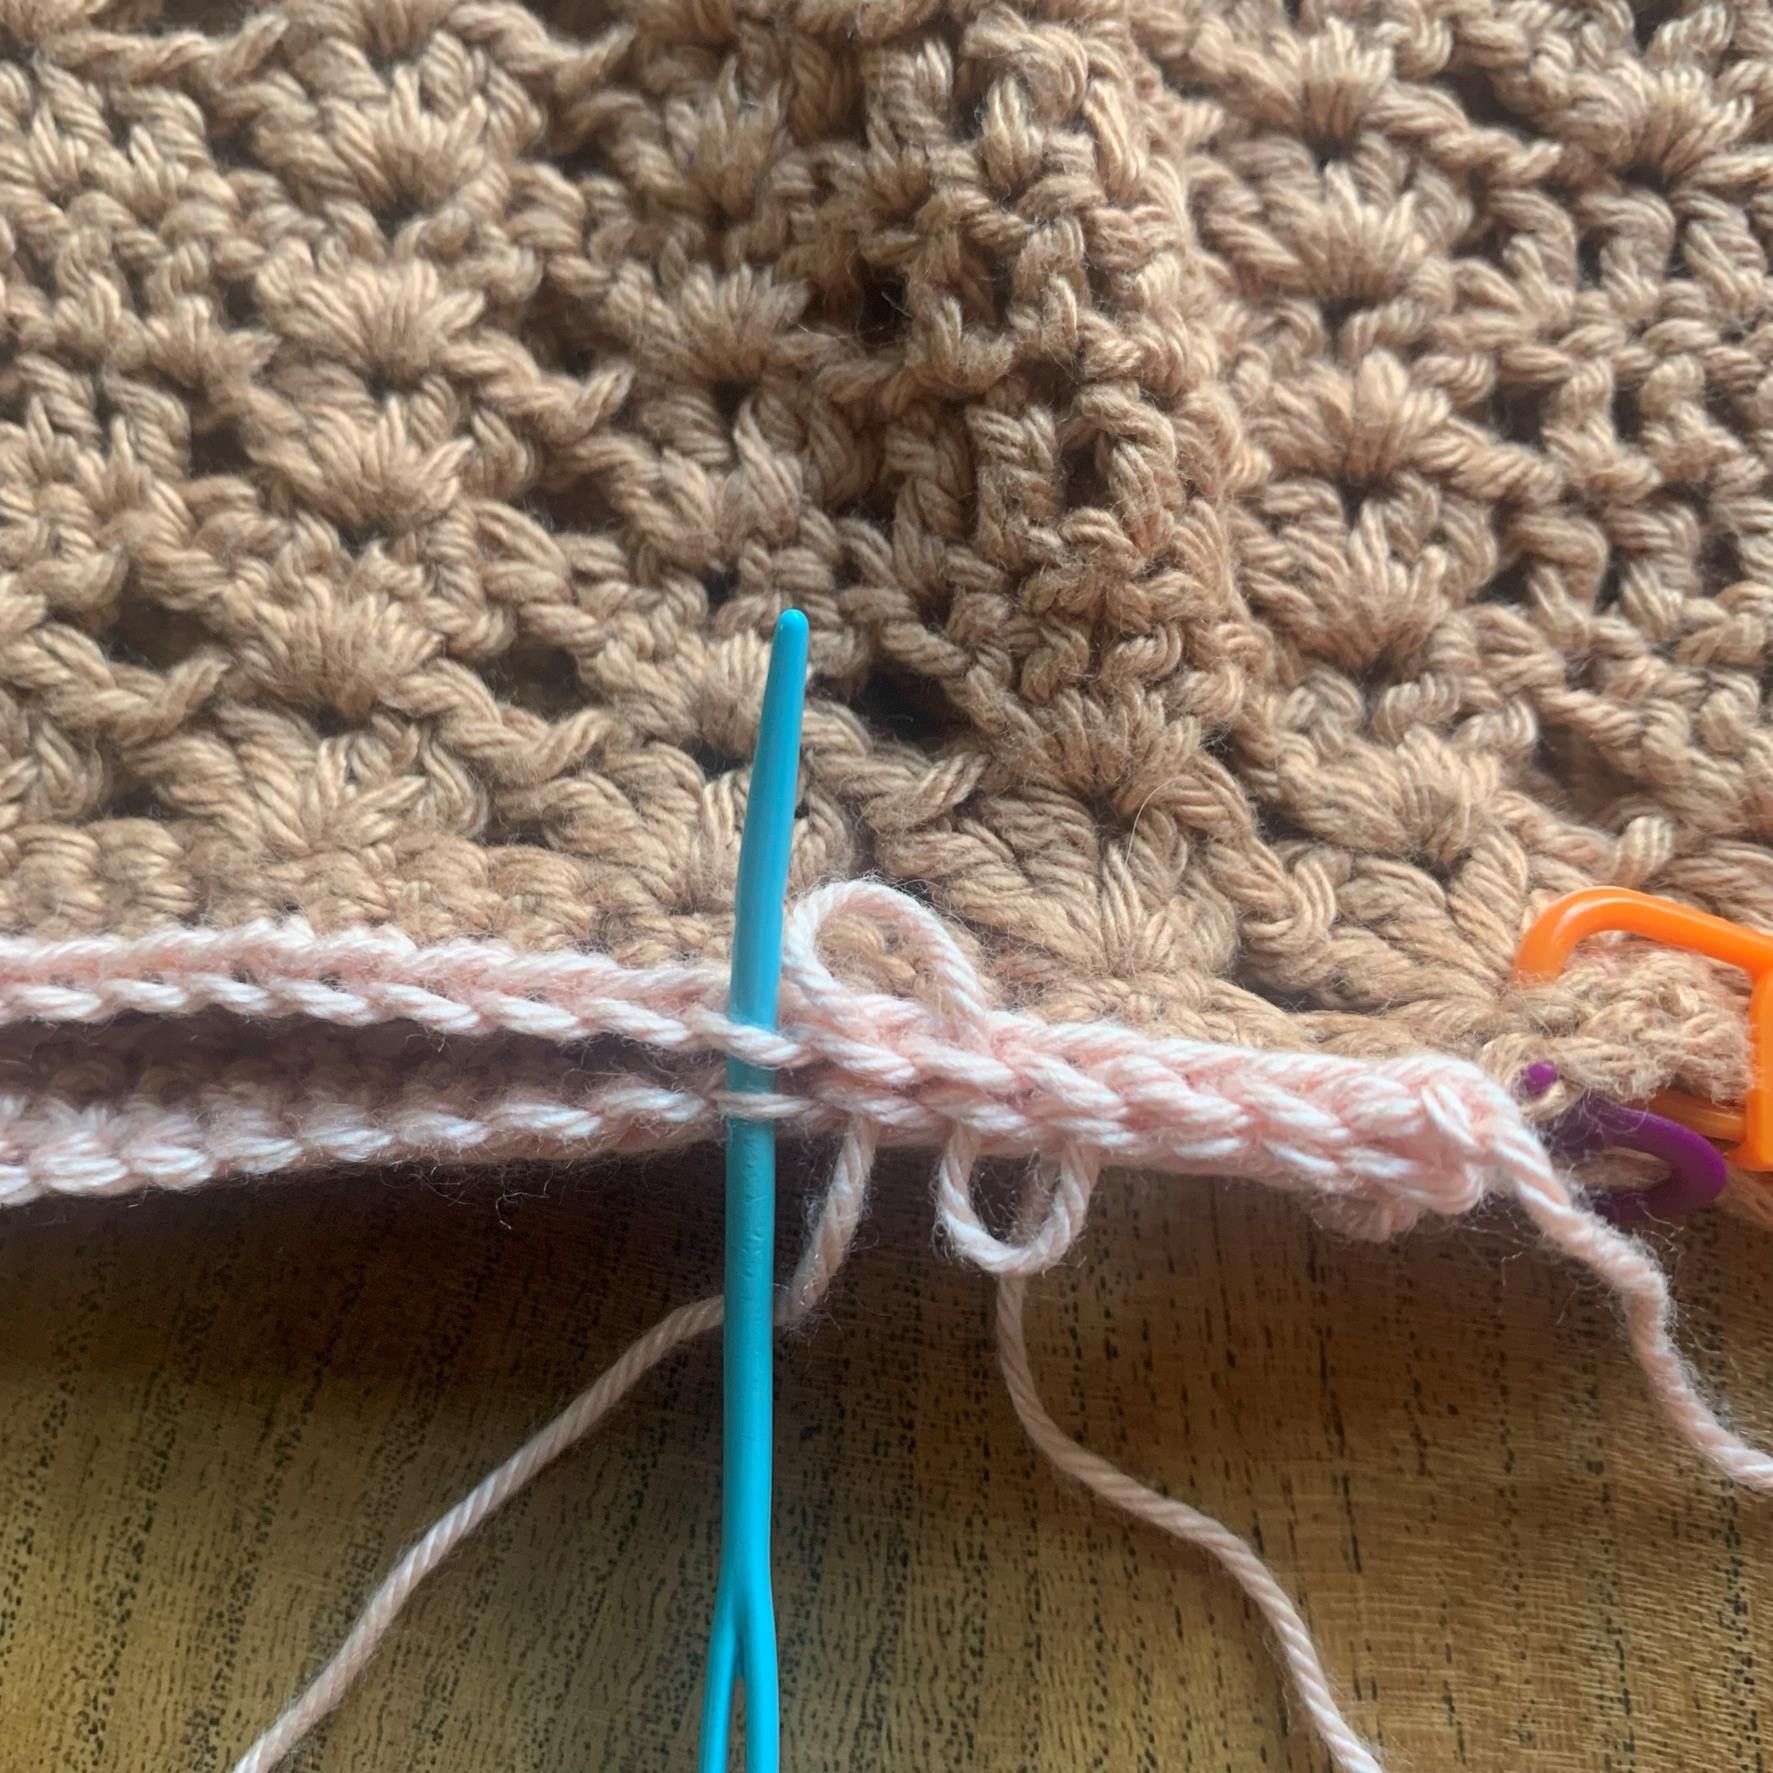
Seaming Sides & Middle | Crochet Beach Coverup
Using long tail and preferred method (designer used mattress st):
- Sew Panel edges together from bottom corner (or top of hip opening) to marker for bottom of Armhole
- Repeat for other side.
Using preferred method (designer used mattress st):
- Sew middle of Panels from bottom up to marker for neck opening on both front and back of panels
- Note - To achieve a neck opening you are comfortable with, try on the tunic and pin the front panels together where you would like the opening to begin.
- Alternatively, pin the front panels together 11 inches down from the top of the fold.
Edging
Round 1: With RS facing, join in any bottom corner, ch 1, hdc evenly across, placing 2 hdc in each row end, join.
Round 2: Ch 1, hdc in each around, join. Fasten off, weave in ends.
Edging for Optional Hip Opening
Round 1: With RS facing, join in bottom corner of opening, ch 1, hdc evenly around, placing 2 hdc in each row end, (hdc, ch 1, hdc) in each corner and hdc3tog across seam, join.
Round 2: Ch 1, hdc in each around, placing (hdc, ch 1, hdc) in each ch-1 sp, join.
Made it? | Crochet Beach Cover Up
Yay! Share your success on social media and tag @cosyrosieuk so I can celebrate your completed project with you!
Check out even more free crochet patterns by clicking the button below:

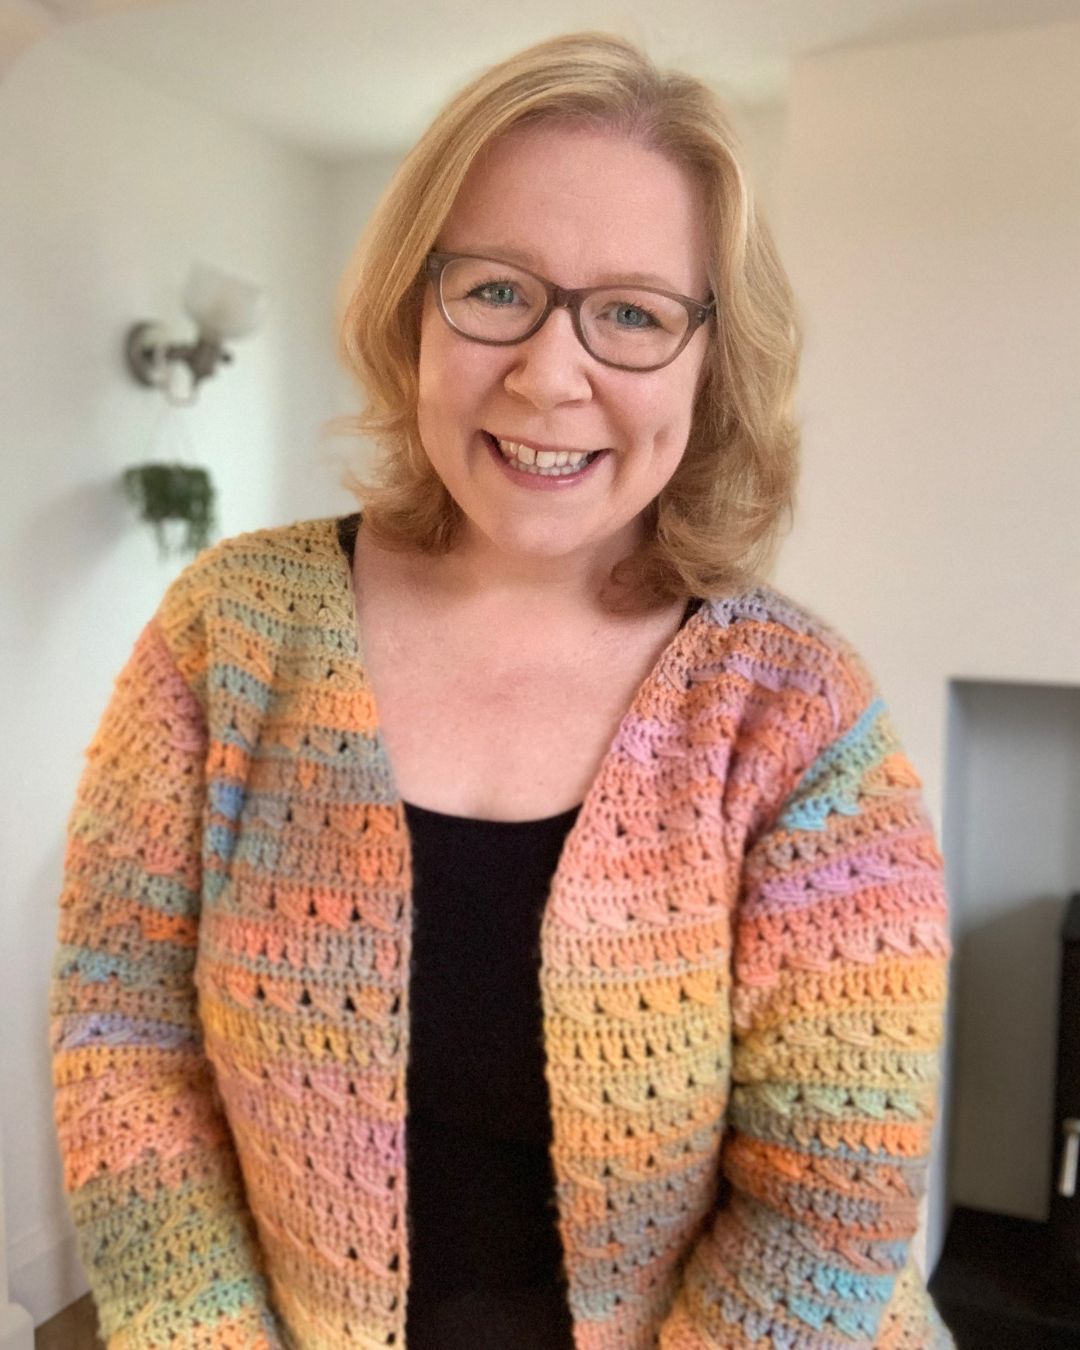
About the Autor
Hi, I'm Fiona, the hands behind Cosy Rosie Crochet - the place to learn to crochet as you make!
With over four years of hands-on experience leading in-person crochet workshops since 2018 and designing and publishing my own patterns since 2019, I bring a wealth of expertise of sharing crochet techniques.....


Cosy Rosie UK Crochet Blog