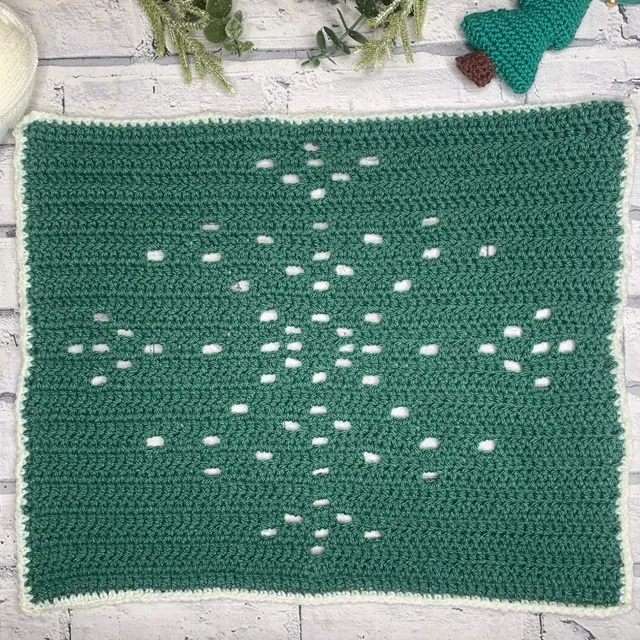
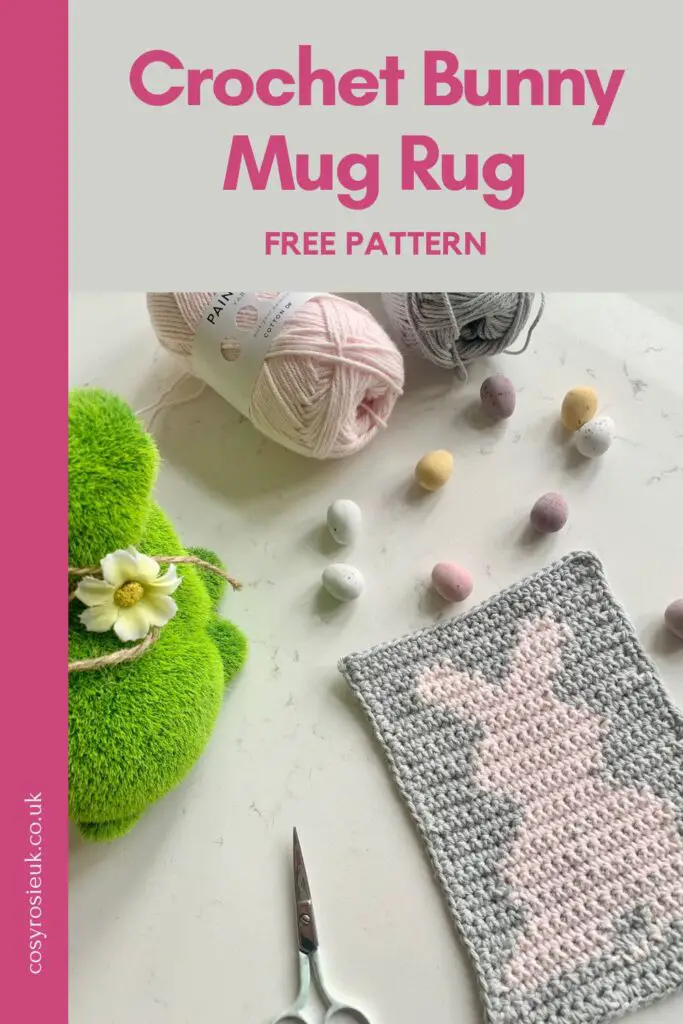
Crochet Easter Bunny Mug Rug
This cute crochet bunny mug rug pattern is a quick and way to add a spring in your step and add a touch of whimsy to your Easter table setting. Make your own crochet bunny coaster with this free crochet pattern.

Bunny Mug Rug | Free Crochet Pattern
Tapestry crochet allows you to re-create any image using our much loved crochet skills – and this adorable Easter-inspired mug rug makes and ideal, non-chocolaty gift for our loved ones.
This free Easter crochet pattern also allows us to bring a little whimsy to the table, while giving a nod to the season of new beginnings.
New to Tapestry Crochet
If you’re new to the tapestry crochet technique, you are going to fall in love with the simplicity of it!
It might be a little fiddly, as you start your project and get used to switching colours between stitches, but you can do it!
Click here to learn more about this technique.
Purchase the Printable PDF Pattern
If you prefer to work from a printed pattern or chart, the Bunny Mug Rug pattern can be purchased from your favourite pattern shop using the buttons below. You’ll receive the pattern written in both UK and US terms, plus the printable chart to mark off your progress as you stitch.
Recommended Materials
This pattern is written using 100% cotton, but you can use any yarn to make this pattern. I choose to use cotton as it’s a great choice for coasters and mug rugs due to the fibres ability to absorb moisture.
You can opt to use acrylic yarn, but be aware that acrylic repels water, so is not absorbent in the same way. Acrylic does make the pattern easier to stitch up, as the fibres are more stretchy that those in cotton yarn – making acrylic a great choice to learn the technique with. Plus, the fluffier yarn helps to disguise any error with the colour changes.
Project Information | Bunny Mug Rug
Materials:
- Any DK/size 3 yarn – I used Paintbox Yarns Cotton DK 100% cotton, (50g/1.7oz, 125m/137yds)
- A – 401 Paper White
- B – 405 Stormy Grey
- 4mm hook
- Yarn needle
- scissors
Abbreviations – US Terms
- st(s) – Stitches
- ch – Chain
- sl st – Slip stitch
- sc – Single Crochet
- RS – Right side
- YO – yarn over
Pattern Notes
- Whatever your skill level with crochet, it’s recommended to read through the pattern before beginning. Email [email protected] if you need any help completing the pattern.
- Beginning ch-1 does NOT count as stitch.
- Entire pattern is worked in sc.
- Follow written rows or chart as preferred.
- To change color: in stitch before colour change, insert hook, yo, pull up loop, drop 1st color, yo with new color, pull through all loops, continue with new color. *Make sure all yarn tails and carried, unworked yarn are on the wrong side of work.
Gauge – Gauge is not essential
Finished Size – 4″ wide by 6″ long
Crochet Easter Bunny Mug Rug Pattern
Row 1 [RS]: With A and 4mm hook, ch 24, sc in 2nd ch from hook and in each across, turn – 24 sc
Row 2: Ch 1, A 46, turn.
Rows 3-31: Follow chart for color changes or written instructions below chart.
Fasten off, weave in ends.
Crochet Easter Bunny Mug Rug Chart

Easter Bunny Mug Rug Pattern – Written Chart
Row 3: Ch 1, A 10, B 3, A 10, turn.
Row 4: Ch 1, A 2, B 8, A 3, B 8, A 2, turn.
Row 5: Ch 1, A 1, B 9, A 3, B 9, A 1, turn.
Row 6: Ch 1, A 2, B 19, A 2, turn.
Row 7: Ch 1, A 3, B 17, A 3, turn.
Row 8: Ch 1, A 5, B 13, A 5, turn.
Row 9: Ch 1, A 5, B 13, A 5, turn.
Row 10: Ch 1, A 4, B 15, A 4, turn.
Row 11: Ch 1, A 4, B 15, A 4, turn.
Row 12: Ch 1, A 4, B 15, A 4, turn.
Row 13: Ch 1, A 5, B 13, A 5, turn.
Row 14: Ch 1, A 6, B 11, A 6, turn.
Row 15: Ch 1, A 7, B 9, A 7, turn.
Row 16: Ch 1, A 8, B 7, A 8, turn.
Row 17: Ch 1, A 7, B 9, A 7, turn.

Row 18: Ch 1, A 6, B 11, A 6, turn.
Row 19: Ch 1, A 5, B 13, A 5, turn.
Row 20: Ch 1, A 5, B 13, A 5, turn.
Row 21: Ch 1, A 6, B 11, A 6, turn.
Row 22: Ch 1, A 7, B 9, A 7, turn.
Row 23: Ch 1, A 8, B 7, A 8, turn.
Row 24: Ch 1, A 7, B 9, A 7, turn.
Row 25: Ch 1, A 6, B 11, A 6, turn.
Row 26: Ch 1, A 5, B 6, A 1, B 6, A 5, turn.
Row 27: Ch 1, A 4, B 6, A 3, B 6, A 4, turn.
Row 28: Ch 1, A 4, B 5, A 5, B 5, A 4, turn.
Row 29: Ch 1, A 5, B 3, A 7, B 3, A 5, turn.
Row 30: Ch 1, A 23, turn.
Row 31: Ch 1, A 23
Fasten off, weave in ends.
Edging
Round 1: With RS facing, join in any corner, working in row ends, sc in end of each row to next corner, [sc, ch 1, sc] in corner, rotate to work along other side of beginning ch, sc in each across to next corner, [sc, ch 1, sc] in corner, rotate to work across row ends, sc in end of each row to next corner, [sc, ch 1, sc] in corner, rotate to work across Row 31, sc in each across, ch 1, join to first sc.
Fasten off, weave ends.

Option to Highlight Image
To highlight the outline of the bunny shape, you can surface crochet:
- Insert hook at edge of outline, colour change, YO, bring up loop, insert hook in next outline, *YO, bring up loop, pull through loop on hook; repeat from * continuing around the outline, join.
Fasten off, weave ends.
Purchase the Printable PDF Pattern
If you prefer to work from a printed pattern or chart, the Bunny Mug Rug pattern can be purchased from your favourite pattern shop using the buttons below. You’ll receive the pattern written in both UK and US terms, plus the printable chart to mark off your progress as you stitch.
Thank you for Making!
I would love to see your finished Easter Bunny Mug Rug – snap a picture and share it with me! Use @cosyrosieuk so I can celebrate you completing your project.