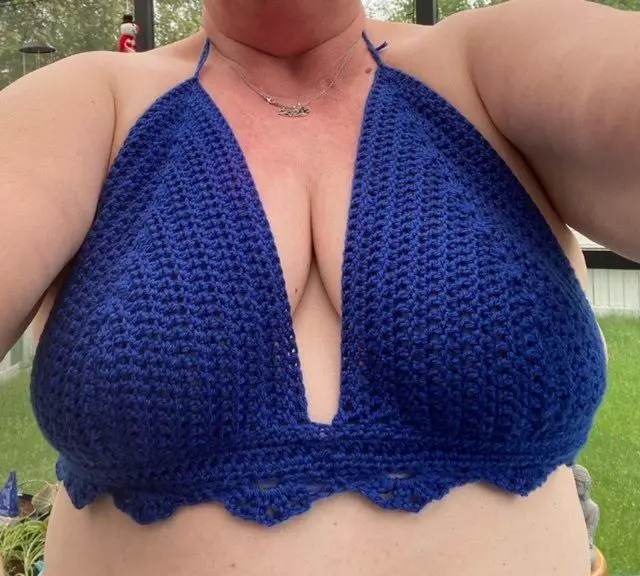
Easy Crochet Bralette Pattern Free
This free crochet bralette pattern is a super quick project. This lacy bralette pattern is great for the warmer weather and uses your bra size for a perfect fit.
Please note that some of the links in my blog are affiliate links. I may earn a small commission if you purchase via these links, but the price you pay is not affected
Bella Bralette Easy Crochet Pattern | Free Crochet Pattern
The Bella Bralette is such a simple design that you can make “made to measure” for your own body.
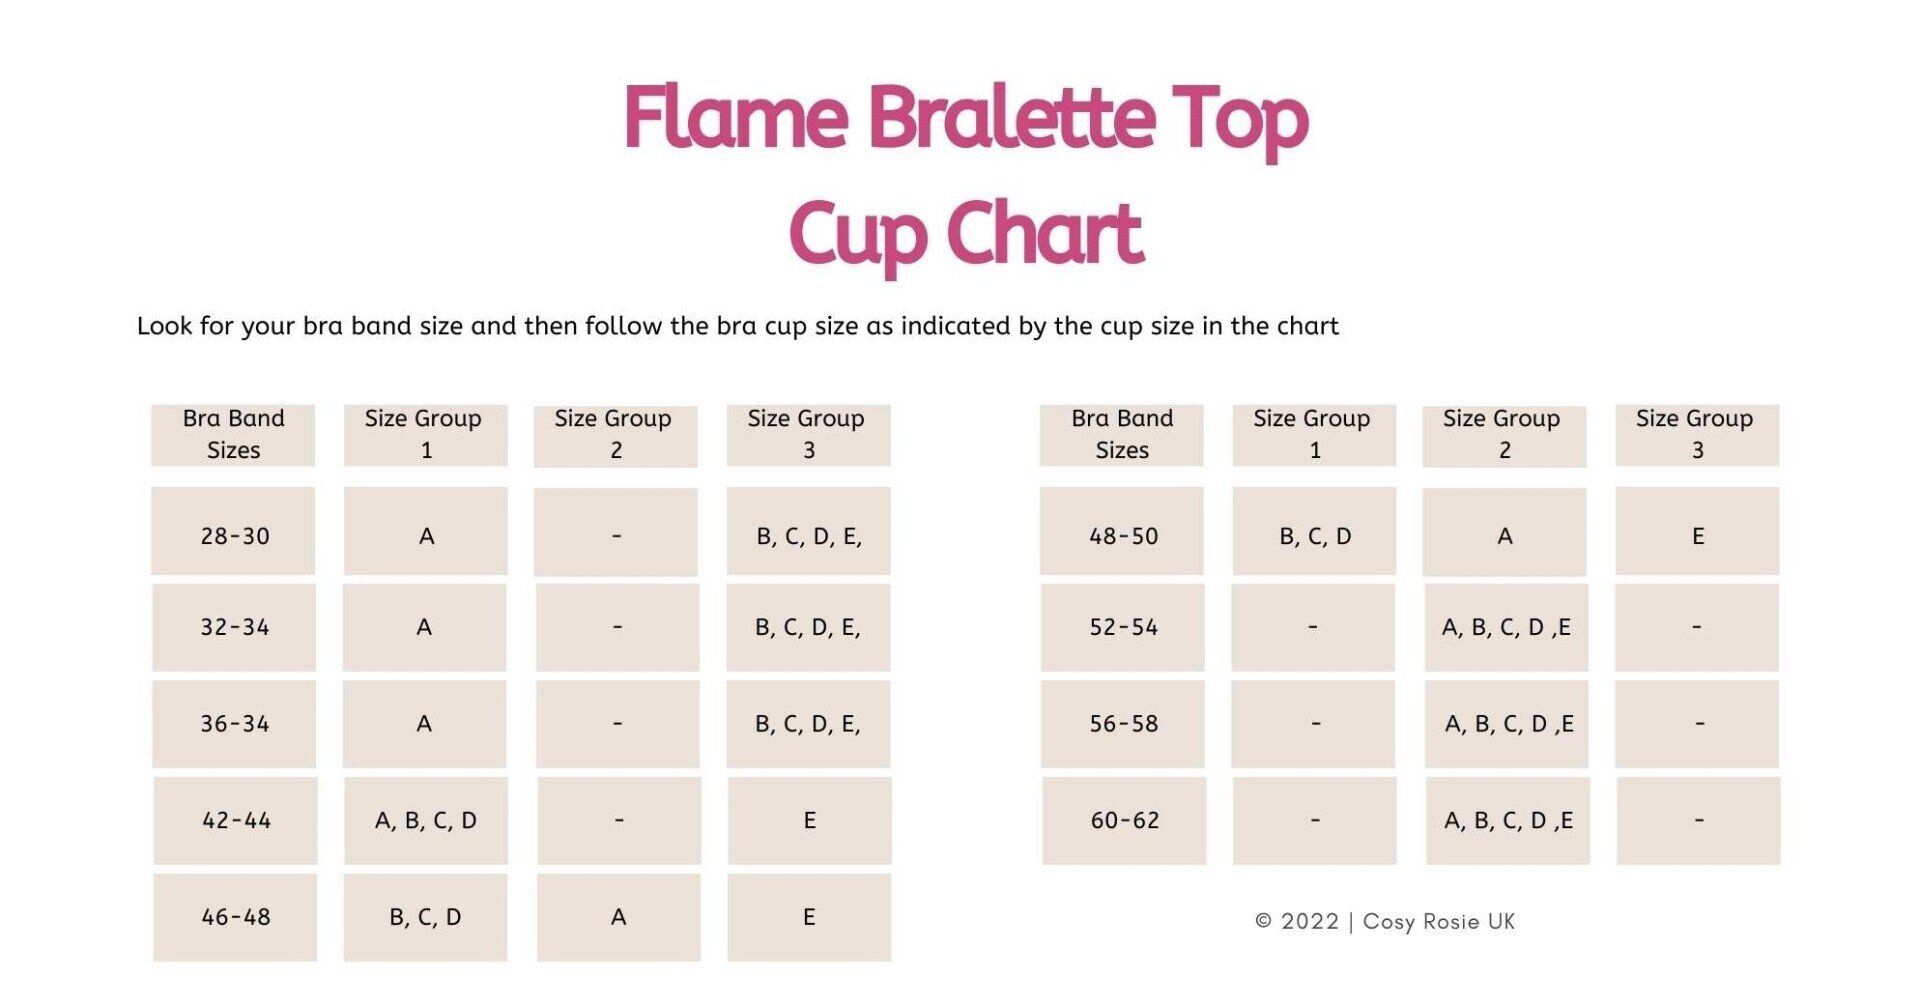
This free bralette pattern is created using standard bra sizes so you can choose your bra band size and your bra cup size to create a bralette that fits and gives you the cup coverage you want from a crochet bikini top quickly and easily.
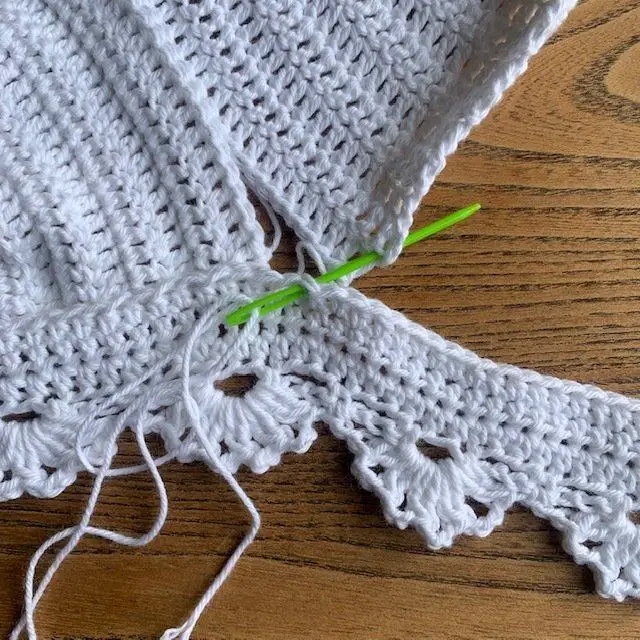
The bralette also features a version of the flame stitch that featured on my Gloriosa Flame Sweater pattern to create a crochet lace element to the design.
The pattern is beginner friendly, and features a double crochet cluster stitch in the lace. There is a full video tutorial to ensure that you can complete the crochet pattern with confidence.
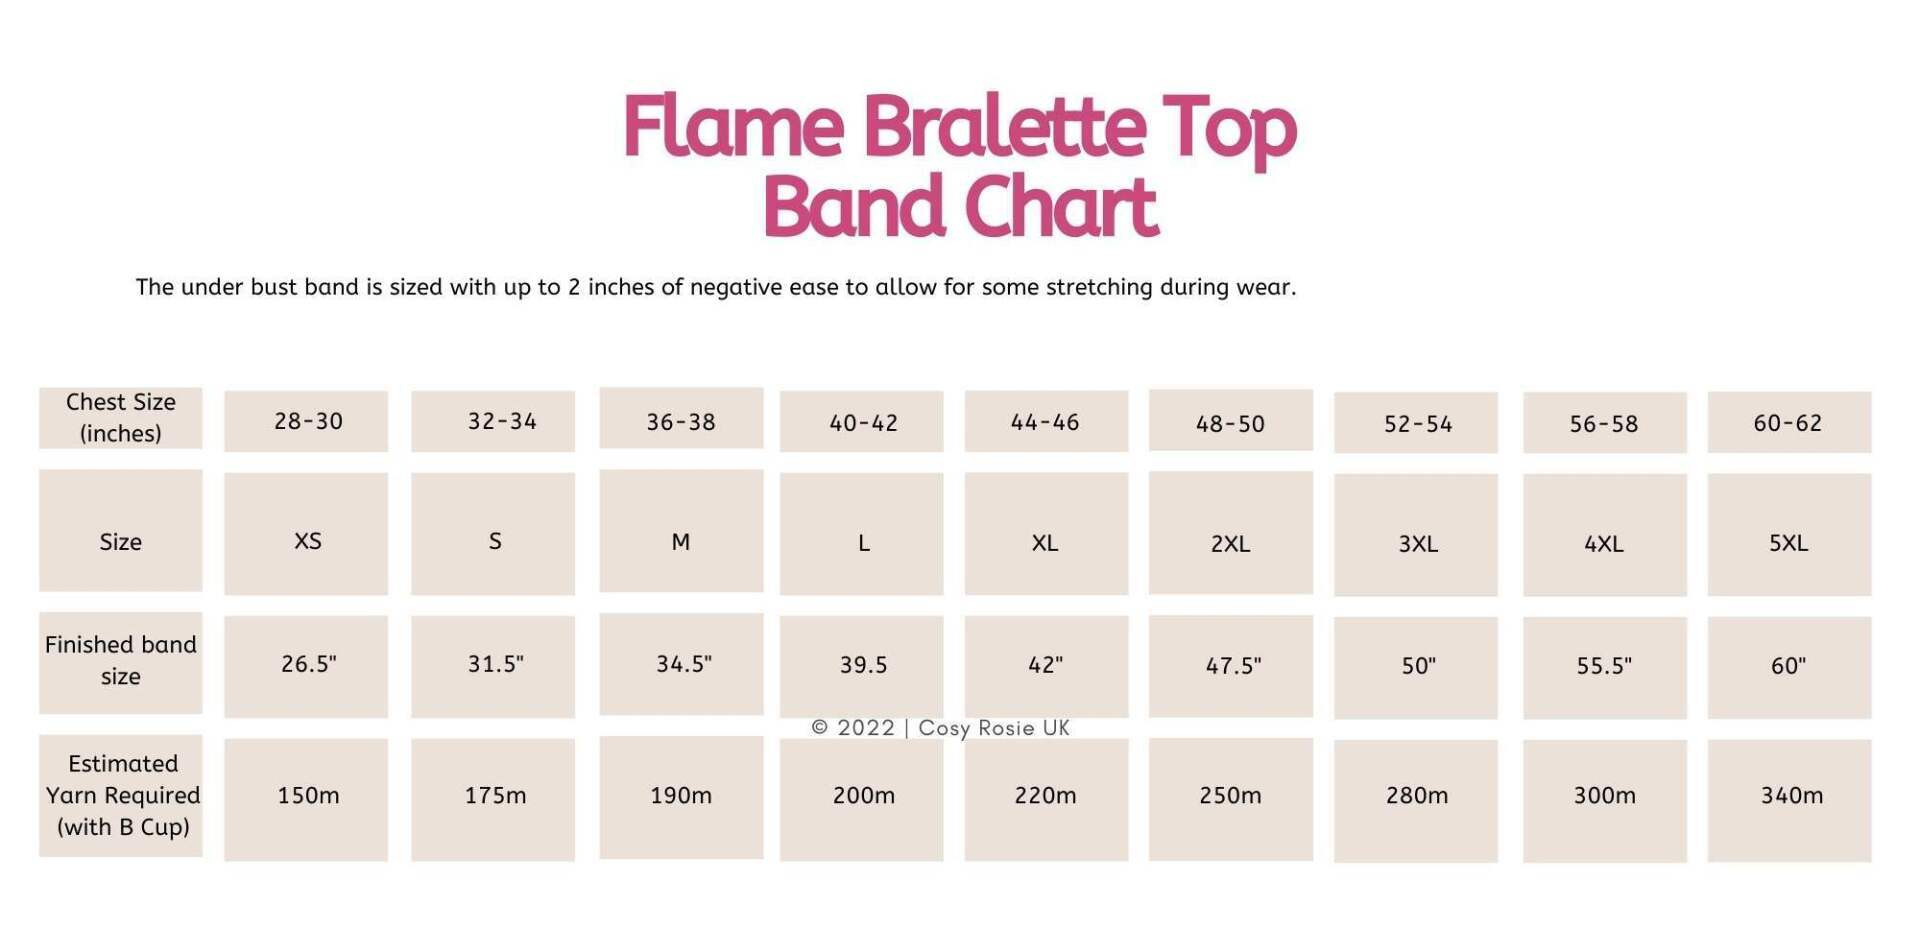
Suitable for All Sizes
As this design is created using the standard bra sizes, you can create the bralette in the fit that you prefer. The bra band is sized from 32-34″ through to 60-62″ and cup sizes A-E.
The video tutorial discusses how to adjust the bra cups to give you the coverage you want for your cup size and if you want more coverage, or larger cups, you can simply add more rows when making the cups for a better fit.
If you’d like less coverage, you can reduce the number of rows and this will create a smaller cup too.
The pattern below also provides detailed information on how to position your bralette cups, but you can also arrange them before sewing on to exactly where you want them to be.
The simplicity of this crochet pattern is what makes it so easy to adjust it for a made to measure fit.
Purchase the Printable PDF Pattern
You can grab a copy of the printable Bella Bralette crochet pattern by simply clicking the link below to be taken to your favourite crochet pattern shop.

Free Crochet Bralette Pattern for Beginners
Skill Level: Beginner
Materials:
- 100% Cotton DK (size 3) yarn (estimated amounts in size chart)
- I used PaintBox Yarns Simply Cotton (50g/125m) in the shade Paper White
- 4mm Crochet Hook
- 3.5mm Crochet hook
- Scissors
- Tapestry needle
- Stitch Markers x 3
Abbreviations: US terms (UK in brackets)
St(s) Stitches
Ch Chain
Ch Sp Chain Space
Sc (dc) Single Crochet
HDc (htr) Half Double Crochet (Half Treble Crochet)
Dc (tr) Double Crochet (Treble Crochet)
2dc-cl 2 Double Crochet Cluster
RS Right Side
WS Wrong side
Gauge:
- 15 sts and 3 rows in hdc with 4mm hook.
Finished Size:
- see size chart
Pattern Notes:
- If you have any questions regarding pattern instructions please reach out – [email protected]
- This pattern is worked in 4 parts
- Under bust band – worked in rows
- Cups – worked in rows and then sewn on to the bust band
- Straps – double stranded and worked onto top of the cups
- Beginning Ch 1 DOES NOT count as a stitch.
- Beginning Ch 2 DOES NOT count as a stitch
- Beginning Ch 3 DOES count as a stitch.
- Take a moment to go through the pattern and highlight the stitch counts for your size which will be written in size order. e.g XS (S, M, L, XL, 2XL, 3XL, 4XL, 5XL)
- Choose your sizing as per your under bust measurement and pair with your bra cup size.
Special Stitches
2dc-cl = Double Crochet Cluster
- [Yo, insert hook in ch-3 sp, yo, pull up loop, yo, pull through 2 loops] 2 times
- Yo, pull through remaining 3 loops on hook
Size Charts
Choose your sizing as per your under bust measurement and pair with your bra cup size.
How to make this Easy Crochet Bralette Pattern
Row 1 (WS): With 4mm hook, ch 102 (122, 132, 152, 162, 182, 192, 212, 232), hdc in 2nd ch from hook and in each ch across, turn–101 (121, 131, 151, 161, 181, 191, 211, 231) hdc.
Rows 2-3: Ch 1 (does not count as st here and throughout), hdc in each st across, turn.
Row 4: Ch 1, sc in same, *ch 3, skip 3, sc in next, ch 3, skip 1, sc in next, ch 3, skip 3, sc in next; repeat from * across to end, turn. 30 (36, 39, 45, 48, 54, 57, 63, 69) ch-3 sps, 31 (37, 40, 46, 49, 55, 58, 64, 70) sc.

Row 5: Ch 1, sc in same, *ch 1, skip 1st ch-3 sp, (2dc-cl, [ch 3, 2dc-cl] 4 times) in next ch-3 sp, ch 1, skip next ch-3 sp, sc in next sc; repeat from * across to end. Fasten off, weave in ends.
Bra Cup – Size Group 1
Size Group 1 – Make 2
28-30 A, 32-34 A, 36-38 A, 40-42 A, 40-42 C, 40-42 D, 44-46 B, 48-50 B, 48-50 C, 48-50 D
Row 1: With 3.5mm Hook, ch 7, dc in 4th ch from hook (skipped chs count as dc), dc in next 2, (2 dc, ch 1, 2 dc) in last, rotate to work opposite side of starting ch, dc in next 4 (last dc will be worked in 3rd ch of starting ch), turn. (12 dc, 1 ch-1 sp)
Row 2: Ch 2 (does not count as st), dc in same, dc in each across to ch-1 sp, (2 dc, ch 1, 2 dc) in ch-1 sp, dc in each across to end (last dc will be made in top of turning ch of Row 1), turn. (16 dc, 1 ch-1 sp)
Row 3: Ch 2 (does not count as st), dc in same, dc in each across to ch-1 sp, (2 dc, ch 1, 2 dc) in ch-1 sp, dc in each across to end, turn. (20 dc, 1 ch-1 sp) (st count will increase by 4 with each repeat of Row 3).
Size 28-30 A Rows 4-10: Repeat Row 3. (48 dc, 1 ch-1 sp after completion of Row 10)
Size 32-34 A Rows 4-11: Repeat Row 3. (52 dc, 1 ch-1 sp after completion of Row 11)
Size 36-38 A Rows 4-13: Repeat Row 3. (60 dc, 1 ch-1 sp after completion of Row 13)
Size 40-42 A Rows 4-14: Repeat Row 3. (64 dc, 1 ch-1 sp after completion of Row 14)
Sizes 40-42 C & D Rows 4-14: Repeat Row 3. (64 dc, 1 ch-1 sp after completion of Row 14)
Size 44-46 B Rows 4-15: Repeat Row 3. (68 dc, 1 ch-1 sp after completion of Row 15)
Size 48-50 B Rows 4-16: Repeat Row 3. (72 dc, 1 ch-1 sp after completion of Row 16)
Sizes 48-50 C & D Rows 4-16: Repeat Row 3. (72 dc, 1 ch-1 sp after completion of Row 16)
Fasten off after last repeat and weave in ends.
Continue to Attaching Bra Cups.
Bra Cup – Size Group 2
Size group 2 – Make 2
44-46 A, 52-54 A, 52-54 B, 52-54 C, 52-54 D, 52-54 E, 56-58 A, 56-58 B, 56-58 C, 56-58 D, 56-58 E, 60-62 A, 60-62 B, 60-62 C, 60-62 D, 60-62 E
Row 1: With 3.5mm hook, ch 5, dc in 4th ch from hook (skipped chs count as st), (2 dc, ch 1, 2 dc) in last, rotate to work opposite side of starting ch, dc in next 2 (last dc will be worked in 3rd ch of starting ch), turn. (8 dc, 1 ch-1 sp)
Row 2: Ch 2 (does not count as st), dc in same, dc in each across to ch-1 sp, (2 dc, ch 1, 2 dc) in ch-1 sp, dc in each across to end (last dc will be made in top of turning ch of Row 1), turn. (12 dc, 1 ch-1 sp)
Row 3: Ch 2 (does not count as st), dc in same, dc in each across to ch-1 sp, (2 dc, ch 1, 2 dc) in ch-1 sp, dc in each across to end, turn. (16 dc, 1 ch-1 sp) (st count will increase by 4 with each repeat of Row 3).
Size 44-46 A Rows 4-15: Repeat Row 3. (64 dc, 1 ch-1 sp after completion of Row 15)
Sizes 52-54 A, B, C, D, E Rows 4- 16: Repeat Row 3. (68 dc, 1 ch-1 sp after completion of Row 16)
Sizes 56-58 A, B, C, D, E Rows 4-17: Repeat Row 3. ( 72 dc, 1 ch-1 sp after completion of Row 17)
Sizes 60-62 A, B, C, D, E Rows 4-18: Repeat Row 3. ( 76 dc, 1 ch-1 sp after completion of Row 18)
Fasten off, weave in ends.
Continue to Attaching Bra Cups.

Bra Cup – Size Group 3
Size group 3 (make 2)
28-30 B, 28-30 C, 28-30 E, 32-34 B, 32-34 C, 32-34 D, 36-38 B, 36-38 C, 36-38 D, 36-38 E
Row 1: With 3.5mm hook, ch 11, dc in 4th ch from hook (skipped chs count as dc), dc in next 6, (2 dc, ch 1, 2 dc) in last, rotate to work opposite side of starting ch, dc in next 8 (last dc will be worked in 3rd ch of starting ch), turn. (20 dc, 1 ch-1 Sp)
Row 2: Ch 2 (does not count as st), dc in same, dc in each across to ch-1 sp, (2 dc, ch 1, 2 dc) in ch-1 sp, dc in each across to end (last dc will be made in top of turning ch of
Row 1), turn. (24 dc, 1 ch-1 sp)
Row 3: Ch 2 (does not count as st), dc in same, dc in each across to ch-1 sp, (2 dc, ch 1, 2 dc) in ch-1 sp, dc in each across to end, turn. (28 dc, 1 ch-1 sp) (st count will increase by 4 with each repeat of Row 3).
Sizes 28-30 B, C, E Rows 4-10: Repeat Row 3. (56 dc, 1 ch-1 sp after completion of Row 10)
Sizes 32-34 B, C, D Rows 4-11: Repeat Row 3. (60 dc, 1 ch-1 sp after completion of Row 11)
Sizes 36-38 B, C, D, E Rows 4-13: Repeat Row 3. (68 dc, 1 ch-1 sp after completion of Row 13)
Fasten off, weave in ends.
Continue to Attaching Bra Cups.
Attaching Bra Cups
- Using locking stitch markers and both Bra Cups RS facing, attach Bra cups to WS centre st of Bra Band – Be sure RS of both Bra Cups is facing out.
- Counting out from centre st, place marker in st number 20 (22, 26, 28, 30, 32, 36, 38, 40) sts.
- Repeat for opposite side from centre marker.
- Sew cups to WS of Bra Band,
- I used mattress stitch, ensuring that the needle enters from the front of Bra Cup and working back through the previous stitch sewn through.
Continue on to creating straps
Creating Straps
Halter Straps:
- With 2 strands and RS facing, attach yarn at peak of Bra Cup, ch 80.
- Fasten off, weave in ends. Repeat for other cup.
Back Ties
With 2 strands and RS facing, attach yarn in top edge corner of Bra Band, ch 60. Fasten off, weave in ends. Repeat for other side.

Optional – Line Cups
If you want to add a little more security to the cups of your top, you can line the cups.
This is best to do once you have tried on the top to ensure the stretch required for your cups.
- Measure the inside of 1 cup, from inside the centre join round to the where to cup is joined and note the measurement.
- Measure from the 2nd row of the under bust band up to the top of the bra cup – stretch the cup gently to your fit and note the measurement.
- Measure the width of your cup on to the fabric and mark each end, and lightly draw a line across the width.
- Find the centre point of the width and measure up to the height of the cup, and make a mark.
- Fold the fabric in half at the centre point and draw a line between the mark in the top centre down to the out edge.
- Cut along the lines. (Your fabric will be longer than the cup to allow for stretch)
- Use the 1st as a template to cut a 2nd triangle.
If you want to add padding to your cup liners:
- Make 4 triangles.
- Cup the top off 2 triangles, placing 1 full and one cut cup together.
- Place the cut cup on top of the full triangle.
- Leave the top opening open to insert padding as required.
- Work the pinning the same as For All Cups below keeping the 2 triangles in line
For All Cups
- Pin the fabric along the inside of the 2nd row of the bra band
- Pin the top of the fabric to under the strap and adjust the fabric and pin evenly along the sides.
- Sew in place.


Thank you for making your own Bella Bralette.
Purchase the Printable PDF Pattern
You can grab a copy of the printable Bella Bralette crochet pattern by simply clicking the link below to be taken to your favourite crochet pattern shop.
Don’t forget to share a picture of your completed bralette with me tagging me with @cosyrosieuk so I can celebrate your success with this pattern.