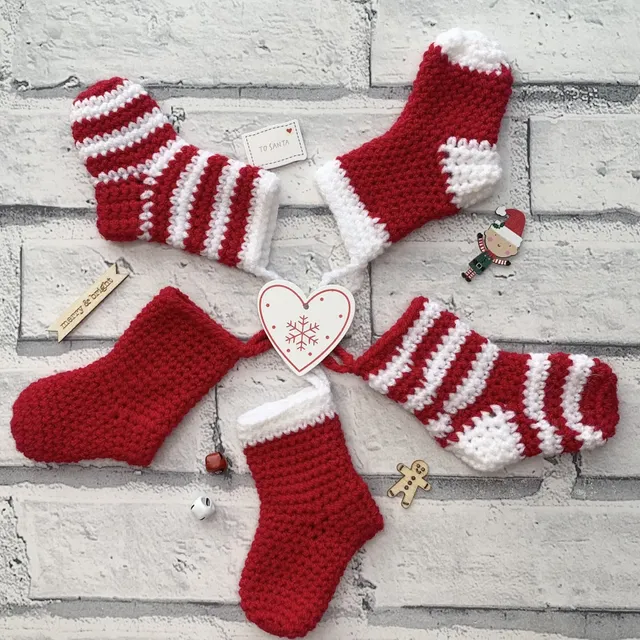
Chunky Crochet Christmas Stocking
Learn how to crochet a textured Christmas Stocking using chunky yarn with this free crochet pattern. The Holly & Berries Stocking Crochet Along features this exciting Christmas Crochet pattern that uses bobble stitches and post stitches to create the most amazing texture.
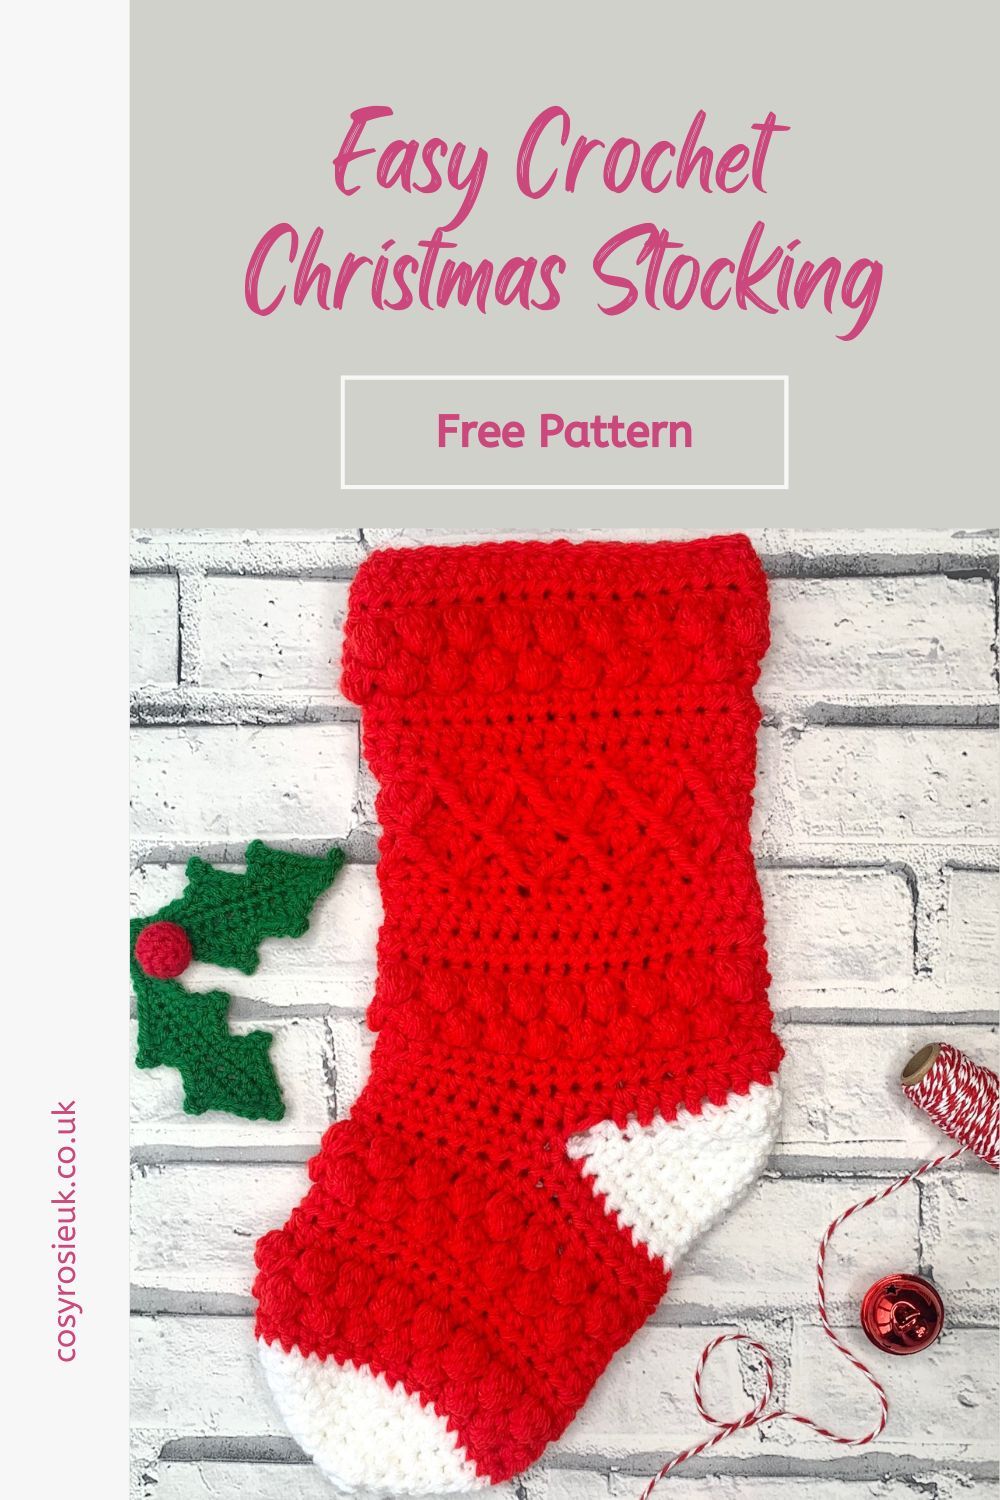
Chunky Crochet Christmas Stocking | Free Crochet Pattern
This pattern creates a pretty Christmas stocking, with LOTs of texture that you can create using this free stocking crochet pattern – the easy version of the Holly and Berries Crochet Stocking.
Here are some of the techniques that you will learn as you make your own Christmas Stocking:
- How to turn a heel
- Seaming with whip stitch
- Berry Stitch
- Working in the round
- Invisible decrease
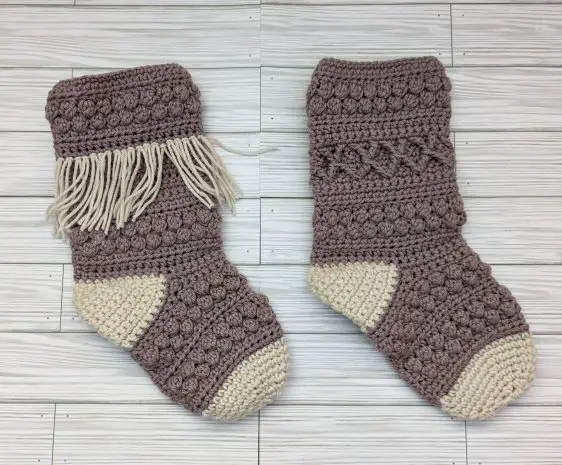
There is also an easier version of this stocking pattern that features a fringed section, skipping the diamond texture. Below you can see both versions together – the pattern on this page is to create the advanced, Diamond stocking pattern.
Click here to see the easy stocking pattern
How this event works | Crochet Christmas Stocking for Beginners
The Holly and Berries Stocking CAL began on 4th November 2022, each section of the pattern is released here on this website for you to follow along.
Each section of the pattern will featured a video tutorial to show you how to complete each section of the pattern. Each of the videos will be included right here, so no need to hunt around for the tutorials.
Purchase the Printable PDF Pattern
You can grab a copy of the printable crochet pattern for the Christmas Stocking in my pattern shops. Simply click the links below to be taken to your favourite pattern shops.

Which Pattern Should I Make? | 2 Crochet Stockings
With only a few rows different between the 2 versions, it’s completely your choice which version of the stocking to stitch up – of course, I’ll be encouraging you to make 2 stockings and giving the diamonds a go. Like all new techniques, a little practice goes a long way.
In fact, you don’t have to choose -both patterns will always be available so you can choose to stitch up both during the event, or once you are feeling more confident, you can try the more advanced version.
Chunky Crochet Stocking Pattern Information
Materials:
You can use any weight yarn with this crochet pattern – the smaller the yarn the smaller the finished size will be.
- 160m/175yds Chunky/Bulky (Size 5) yarn
- I used Paintbox Yarns Simply Chunky, 100% acrylic (100 g/3.5 oz. 136m/149yds) in 2 shades:
- A – Pillar Red (314)
- B – Paper White (300)
- 6mm Crochet Hook
- Scissors
- Needle
Finished Size:
- Total Length: 18″ by 6″ wide
Abbreviations:
US Terms (UK in brackets)
St(s) Stitches
Ch – Chain
Ch-sp – Chain Space
Sc (dc) – Single crochet (double crochet)
Sc2tog – Single (double) crochet decrease
Hdc (htr) – Half Double (treble) crochet
Berry st – Berry Stitch
FPTr (FPDTr) – Front post (double) Treble crochet
FPTr2tog (FPDTr2Tog) – Front post (double) Treble crochet 2 together
WS – wrong side
Gauge
11 stitches and 8 rows in hdc = 4″ x 4″ (10cm x 10cm) using 6mm hook
Pattern Notes
- Read through entire pattern before beginning. Please email [email protected] if you need assistance
- This pattern is worked 4 parts:
- Leg
- Heel
- Foot
- Toe
- The Leg and Foot sections are worked in rows.
- The heel is worked in short rows
- The Toe is worked in a continuous spiral
- Beginning Ch 1 DOES NOT count as a stitch.
- Beginning Ch 3 DOES count as a stitch.
- Ch-1 of Berry st in NEVER worked in, be sure to skip this ch when working rows after berry rows.
- It may be helpful to place markers in sl sts until you are comfortable skipping the ch-1 of the Berry st.
Special Stitches
Berry = Berry stitch
- YO, insert hook in next st, YO, pull up loop, YO, pull through 1st loop on hook.
- YO, Insert in same, YO, pull up loop, YO, pull through 1st loop on hook.
- YO, pull through 5 loops,
- Ch 1
FPTr = Front post treble crochet
- YO hook 2 times, insert hook around stitch indicated, YO, pull up loop,
- [YO, pull through 2] 3 times
FPTr2tog = Front post Treble 2 together
- YO hook 2 times, insert hook around stitch indicated, YO, pull up loop,
- [YO, pull through 2] 2 times
- YO 2 times, insert hook around next indicated, [YO, pull through 2] 2 times,
- YO, pull through remaining 3 loops
How to Make this Chunky crochet Christmas Stocking
Leg Part 1 | Advanced Crochet Christmas Stocking
Row 1: With A, Ch 40, sc in 2nd ch from hook and each ch across, turn. (39 sc)
Rows 2 & 3: Ch 1 (does not count as st), hdc in each across, turn. (39 hdc)
Row 4: Ch 1 (does not count as st), sc in same, *Berry in next, sl st in next; repeat from * across, turn. (19 Berry st, 1 sc, 19 sl st)
Row 5: Ch 1, sc in same, skip ch-1, *sl st in next Berry, sc in next sl st, skip ch 1; repeat from * to end, working sc in last, turn. (20 sc, 19 sl st)
Row 6: Ch 1, sc in same, sl st in next, *Berry st in next sc, sl st in next; repeat from * across to last st, sc in last, turn. (18 Berry st, 2 sc, 19 sl st)
Row 7: Ch 1, sc in same, sc in sl st, skip ch-1, *sl st in next Berry st, skip ch 1, sc in next sl st; repeat from * across to end working sc in last, turn. (21 sc, 18 sl st)
Rows 8-9: Ch 1, hdc in each across, turn. (39 hdc)
Rows 10-11: Ch 1, sc in each across, turn. (39 sc)
Row 12: Ch 3 (counts as st), dc in each across, turn. (39 dc)
Row 13: Ch 1, sc in same, sc in next 2, working around 2nd and 5th sc 2 rows below, FPtr2tog, *sc in next 3, starting around same as last and skipping 3 between 2 rows below, FPtr2tog; repeat from * across to last 3, sc in last 3, turn. (9 Ftr2tog, 30 sc)
Row 14: Repeat Row 12.
Row 15: Ch 1, sc in same, working around FPtr2tog 2 rows below, FPtr, *sc in next 3, starting around same as last and next FPtr2tog, FPtr2tog; repeat from * across to last 4, sc in next 2, FPtr around same as last FPtr2tog, sc in last, turn. (8 FPtr2tog, 2 FPtr, 29 sc)
Rows 16-17: Repeat Rows 10-11.
Rows 18-19: Repeat Rows 8-9.
Leg Part 2 | Chunky Crochet Christmas Stocking
Rows 20-26: Repeat Rows 4-10.
Fasten off, leaving long tail for sewing up.
With WS facing, seam using whip stitch.
Continue to Heel.
How to Turn a Heel | Chunky Crochet Christmas Stocking
The heel is worked in short rows meaning that the last stitch is worked into the row attached to the leg of the stocking and the remaining stitches are left unworked and the stitch count increases by 1.
Row 1: With B, with RS facing, and counting from seam, join in 9th stitch, ch 1 (does not count as st), sc in same, sc in next 8, skip seam, sc in next 10 sts, turn. (19 sc)
Row 2: Ch 1, sc in same, sc in next 11, leaving remaining 7 sts unworked, turn. (12 sc)
Row 3: Ch 1, sc in same, sc in next 5, leaving remaining 6 sts unworked turn. (6 sc)
Row 4: Ch 1, sc in same, sc in next 5, sc in next st 1 row below, turn. (7 sc)
 Row 4 – work final stitch into Row 1 of Heel
 Finished Heel
Row 5: Ch 1,sc in same, sc in next 6, sc in next st in row 1 row below, turn. (8 sc)
Row 6-14: Repeat Row 4, increasing number of stitches worked before working final sc 1 row below on leg by 1, turn. (17 sc at end of Row 14)
Row 15: Ch 1, sc in same, sc in next 16, sc in next st in row 1 row below, sl st to next st on leg, turn. (18 sc, 1 sl st)
Row 16: Ch 1, skip sl st, sc in next 18, sc in next st in row 1 row below, sl st in next st on leg. (19 sc, 1 sl st)
Fasten off, weave ends.
Adding the Foot
Worked in turned rows.
Row 1: With A, with RS facing, join yarn in 10th st of heel, ch 1, sc in same and next 9, skip sl st, sc in next 18 sts, skip sl st, sc in next 9, turn. (37)
Row 2: Ch 1, sc in same, sc in next 7, hdc3tog, sc in next 15, hdc3tog, sc in next 8, turn. (33)
Row 3: Ch 1, sc in each across, turn. (33)
Row 4: Ch 1 (does not count as st), sc in same, *Berry in next, sl st in next; repeat from * across, turn. (16 Berry st, 1 sc, 16 sl st)
Row 5: Ch 1, sc in same, skip ch-1, *sl st in next Berry, sc in sl st, skip ch 1; repeat from * to end working sc in last, turn. (17 sc, 16 sl st)
Row 6: Ch 1, sc in same, sl st in next, *Berry st in next sc, sl st in next; repeat from * to last st, sc in last, turn. (15 Berry st, 2 sc, 16 sl st)
Row 7: Ch 1, sc in same, sc in sl st, skip ch 1, *sl st in top of Berry st, skip ch 1, sc in sl st; repeat from * to end working sc in last, turn. (17 sc, 16 sl st)
Row 8-9: Ch 1, hdc in each across, turn. (33 hdc)
Rows 10-13: Repeat Rows 4-7
Row 14: Ch 1, hdc in each across, turn. (33 hdc)
Row 15: Ch 1, sc in each across. (33 sc)
Fasten off, leaving long tail for sewing.
With WS facing, seam using whip stitch.
How to crochet the Toe | Chunky Crochet Christmas Stocking
Worked in continuous rounds, recommended to place marker in 1st stitch.
Round 1: With B, with RS facing, join in 1st st after seam, ch 1, sc in same and each st around. (33 sc)
Round 2: Sc in each st around. (33 sc)
Round 3: [Sc in next 8 sts, sc2tog] 3 times, sc in last 3 sts. (30 sc)
Round 4: [Sc in next 7 sts, sc2tog] 3 times, sc in last 3 sts. (27 sc)
Round 5: Sc2tog, *sc in next 3, sc2tog; repeat from * around. (21 sc)
Round 6: *Sc in next 2, sc2tog; repeat from * to last st, sc in last. (16)
Round 7: Sc2tog 8 times. (8)
Fasten off, using tail to weave through remaining stitches to close.
Continue to Hanging Loop.
How to Crochet the Hanging Loop
Hanging Loop
Row 1: With A, with RS facing, join in top of leg, 1st before seam, ch 20, starting in 2nd ch from hook, sc in each back loop of ch, sl st to same as ch 1, turn. (19 sc)
Row 2: Ch 1, sc in each across. (19 sc)
Fasten off, leaving long tail for sewing back of loop.
Sew unattached end of loop to inside of leg to form loop.
Weave ends.
Finished your Stocking? Come and share your success in the Facebook Group! Click here to post in the Community Group
Purchase the Printable PDF Pattern
You can grab a copy of the printable crochet pattern for the Christmas Stocking in my pattern shops. Simply click the links below to be taken to your favourite pattern shops.