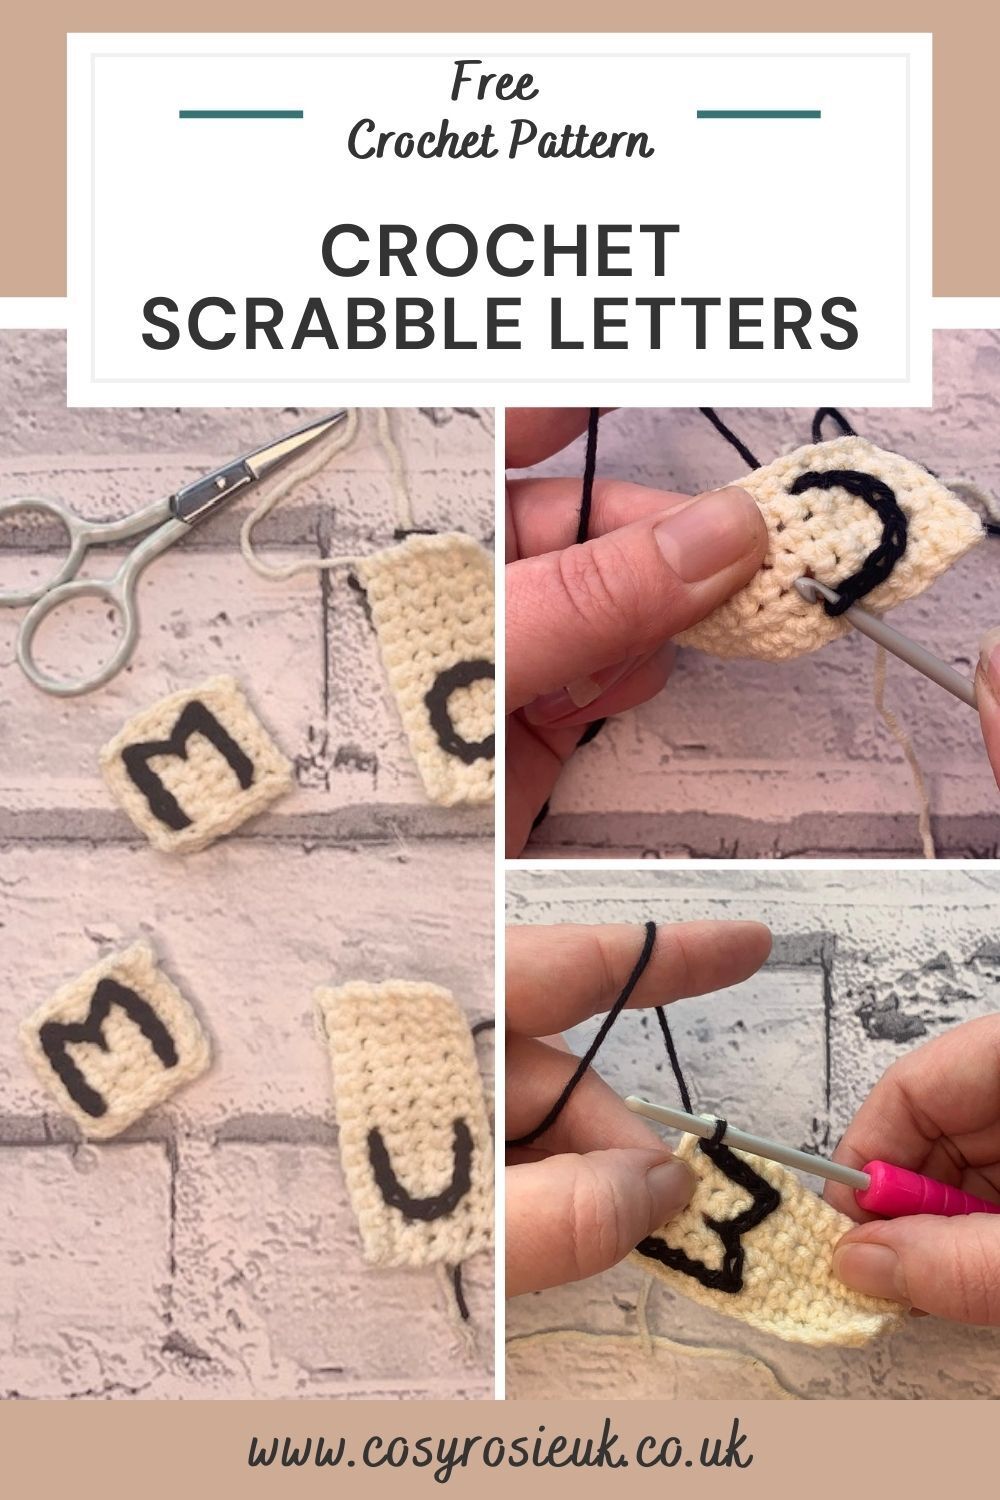
Crochet Scrabble Letters M, U & O
Crochet your own scrabble Letters to use as embellishments, or appliques on your crochet patterns. The letters are added using surface crochet which is a crochet technique that can allow you to add letters and many other shapes on to your crochet fabrics.
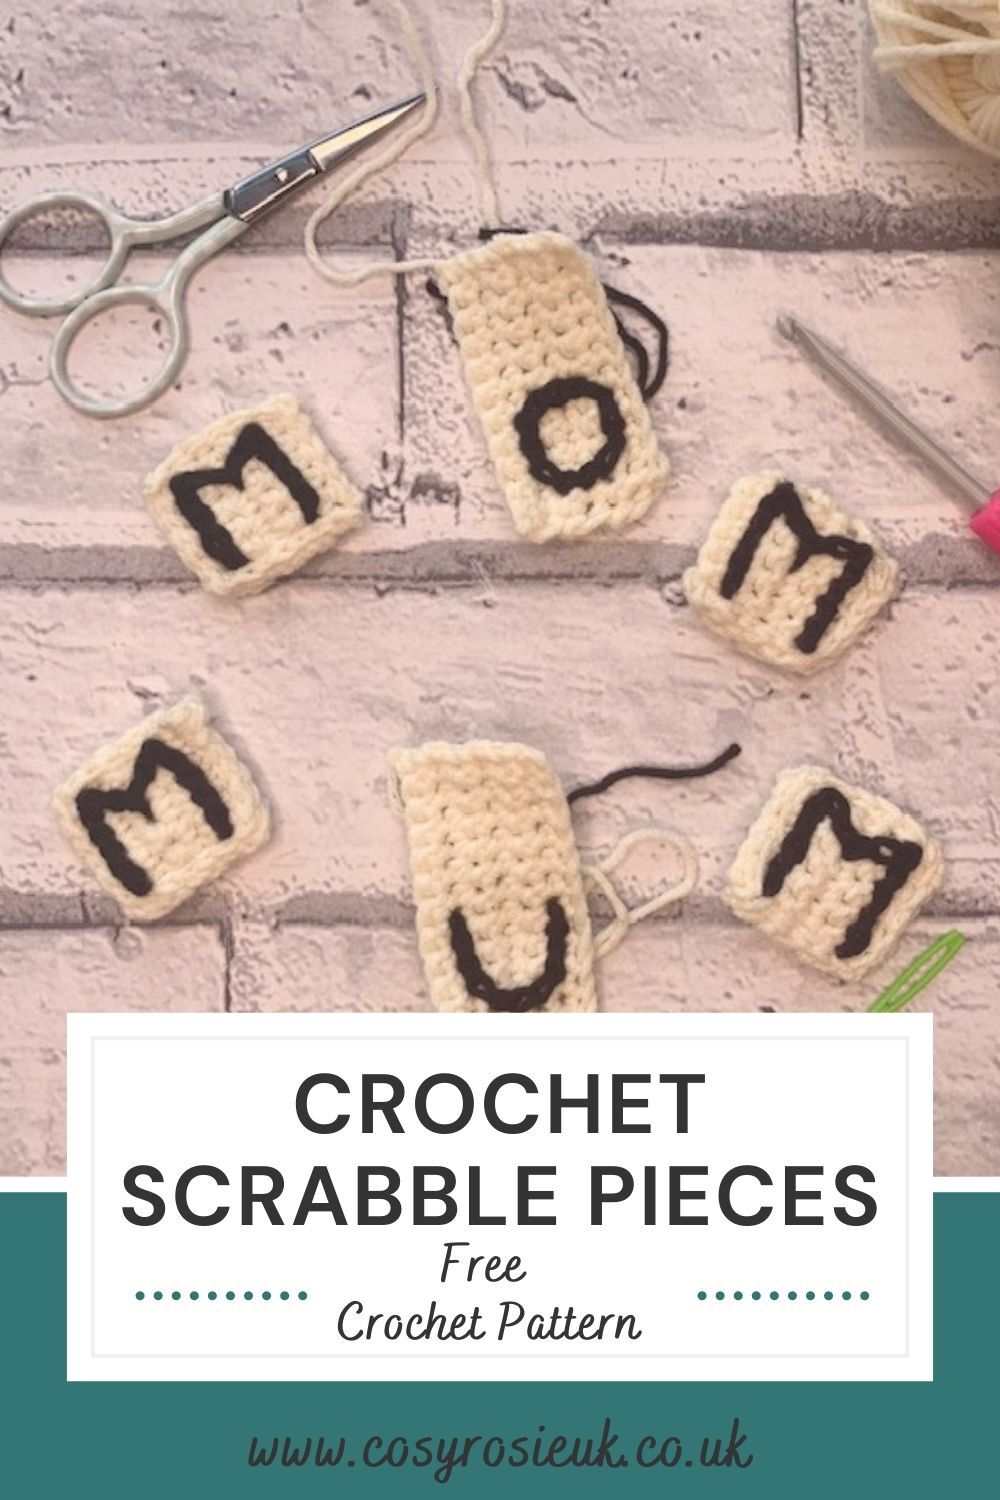
Free Crochet Scrabble Letters Pattern Free Crochet Patterns
These crochet scrabble letters are perfect to be used as an addition in so many crochet patterns! You could even make a whole set and use them when away from home to play with!
The crochet scrabble pieces use a crochet technique called Surface Crochet, where you slip stitch across the top of your project to add letters or other patterns. It almost appears 3D! Once you’ve mastered this technique, you’ll be adding letters to all sorts of projects like personalising beanies and scarves!
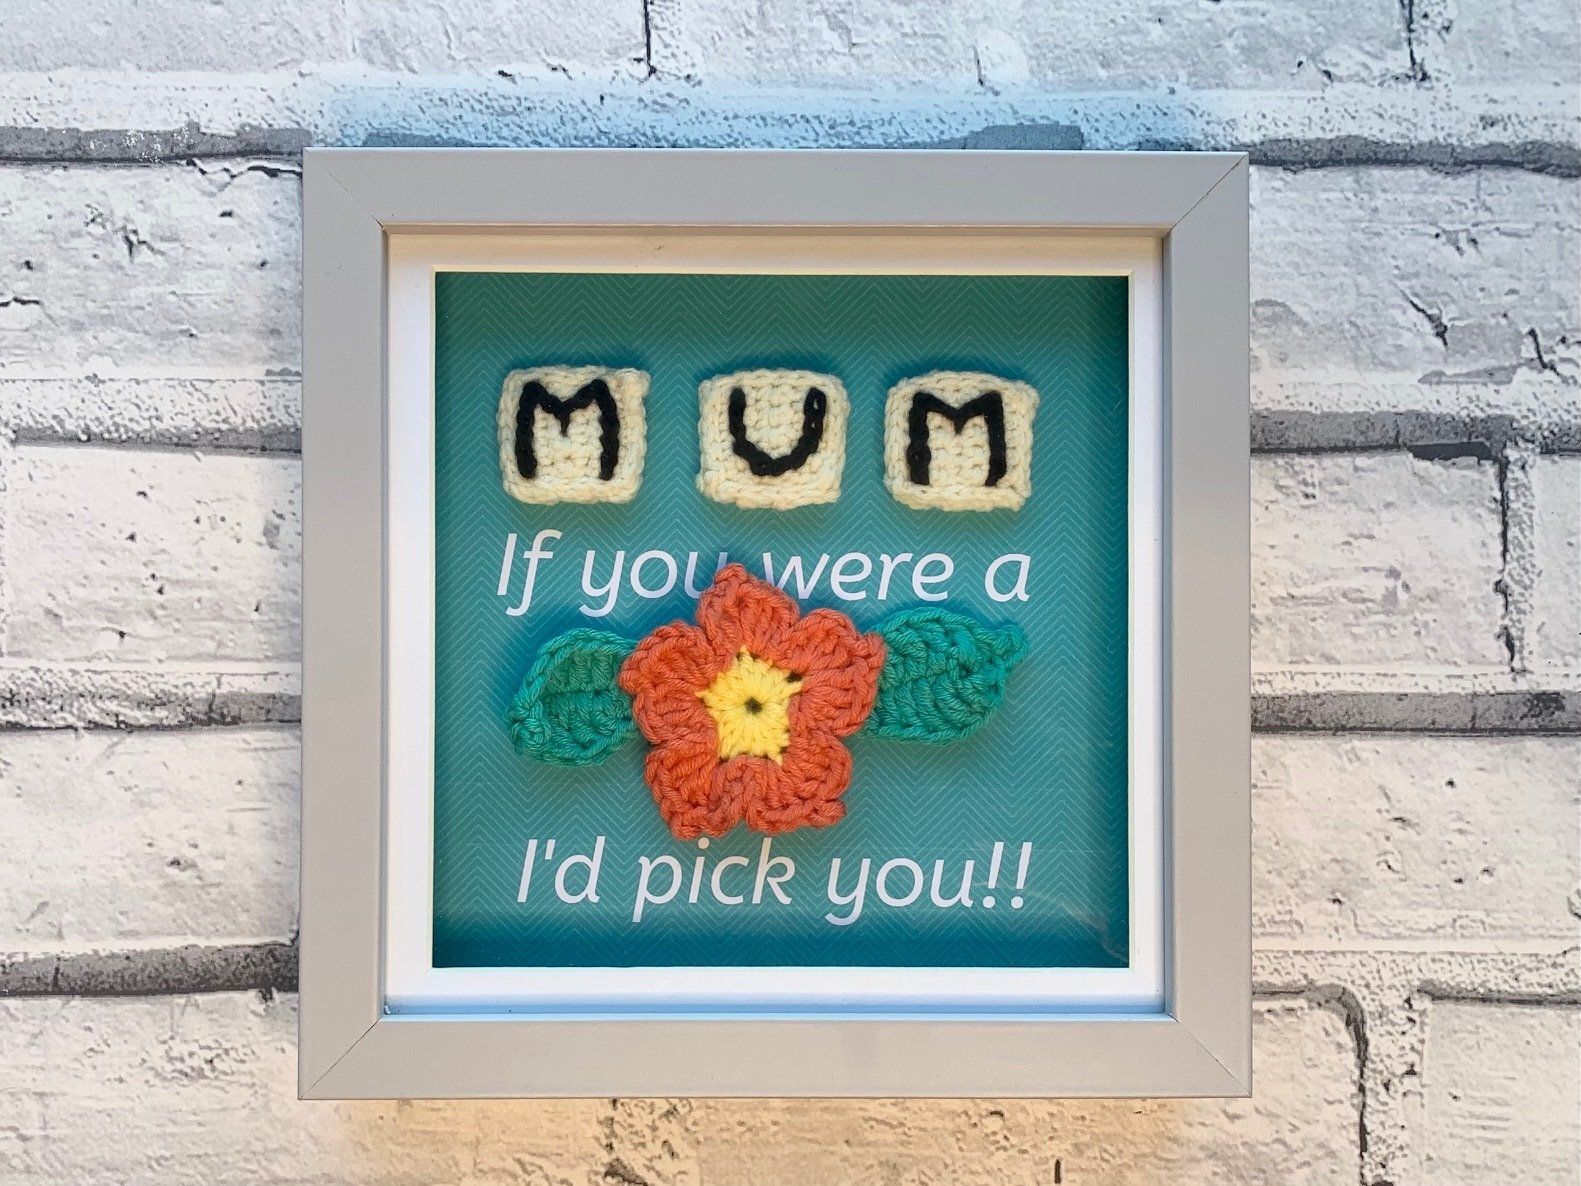
The crochet scrabble letters are used in the Mothers Day Frame CAL which is detailed below along with the leaf and flower pattern. You can find all the details below.
Please note that some of the links in my blog are affiliate links. I may earn a small commission if you purchase via this links, but the price you pay is not affected
Purchase the Ad-Free Printable PDF Pattern
Mothers Day Frame
If you’re taking part in the CAL to complete the Mothers Day Frame and you just can’t wait to get your hand on all the patterns, CLICK HERE to grab the full pattern PDF complete with patterned and plain printable backing for your shadow box frame or click the buttons below.
Skill Level: Beginner
Materials:
- 30m (36 yds) DK (size 3) Cotton or Cotton Blend yarn in a light cream shade.
- I used Sirdar Snuggly Replay in shade Ice Cream Dream (50g 150m/164yds)
- 10m (12 yds) DK (size 3) Cotton or Cotton Blend yarn in shade black
- I used Ricorumi DK 100% Cotton in shade 060.
- 3mm crochet hook
- Darning needle
- Scissors
Finished Size:
- 2.5 cm square.
Tension
- gauge is not essential for this pattern
Stitch Abbreviations: UK terms – (US in brackets)
St(s) Stitches
Ch Chain
Sl St Slip Stitch
Dc (Sc) Double Crochet (Single Crochet)
Pattern Notes:
- Whatever your skill level with crochet, I would always recommend reading through this pattern before beginning. Get in touch if you need any help completing the pattern.
- Pattern is worked as a rectangle which is folded to create a square
- The letter is surface crocheted to the top of one side of the rectangle prior to sewing up
How to Crochet these Crochet Scrabble Letters
Make one for each letter you are making.
Ch 13.
Row 1: Dc in 2nd Ch from hook and in each Ch across. Turn. (12)
Row 2: Ch1, Dc in 1st St and each St across.
Rows 3-6: Repeat Row 2.
Do not cut yarn – place a stitch marker in last stitch made while you surface crochet the letter.
Letter M:
- Insert hook 1 row in from starting slip knot.
- Attach black yarn to hook with a slip knot.
- Bring black yarn through stitch.
- Sl St across next 5 stitches.
- Sl St into stitch 1 row across and 1 row down.
- Sl St into St, 1 row in and 1 row down.
- Mirror where you have placed the slip stitches to create the other side of the letter M.
- Fasten off black yarn and bring the tail to the rear of the project.

Attach black yarn to hook with a slip knot.

Bring black yarn through stitch.

Sl St across next 5 stitches.

Sl St into stitch 1 row across and 1 row down. Sl St into St, 1 row in & 1 row down. Mirror and repeat on the other side of the letter M.

Fasten off black yarn and bring the tail to the rear of the project.

FYI – Stitch Chart
Letter U:
- Insert hook in 5th row from starting slip knot.
- Attach black yarn to hook with a slip knot.
- Bring black yarn through St.
- Sl St towards slip knot across next 4 stitches.
- Sl St into St 1 row across and 1 row down.
- Sl St across next 2 rows.
- Sl St into St, 1 row out and 1 row up.
- Mirror where you have placed the slip stitches to create the other side of the letter U.
- Fasten off black yarn and bring the tail to the rear of the project.


Letter O:
- Insert hook in 4th row from starting slip knot.
- Attach black yarn to hook with a slip knot.
- Bring black yarn through St.
- Sl St towards slip knot across next 3 Sts.
- Sl St into stitch 1 row across and 1 row down.
- Sl St across next 2 rows.
- Sl St into St, 1 row out and 1 row up.
- Sl St up over next 3 Sts.
- Sl St into St, 1 row in and 1 row up.
- Sl St across next 2 rows.
- Sl St to where yarn was joined.
- Fasten off black yarn and bring the tail to the rear of the project.


If you’re taking part in the CAL to complete the Mothers Day Frame and you just can’t wait to get your hand on all the patterns, CLICK HERE to grab the full pattern PDF complete with patterned and plain printable backing for your shadow box frame or click the buttons below.Purchase on Etsy Purchase on Ravelry
If you loved this free crochet pattern, why not check out my others free patterns by clicking the button belowMore FREE crochet patterns