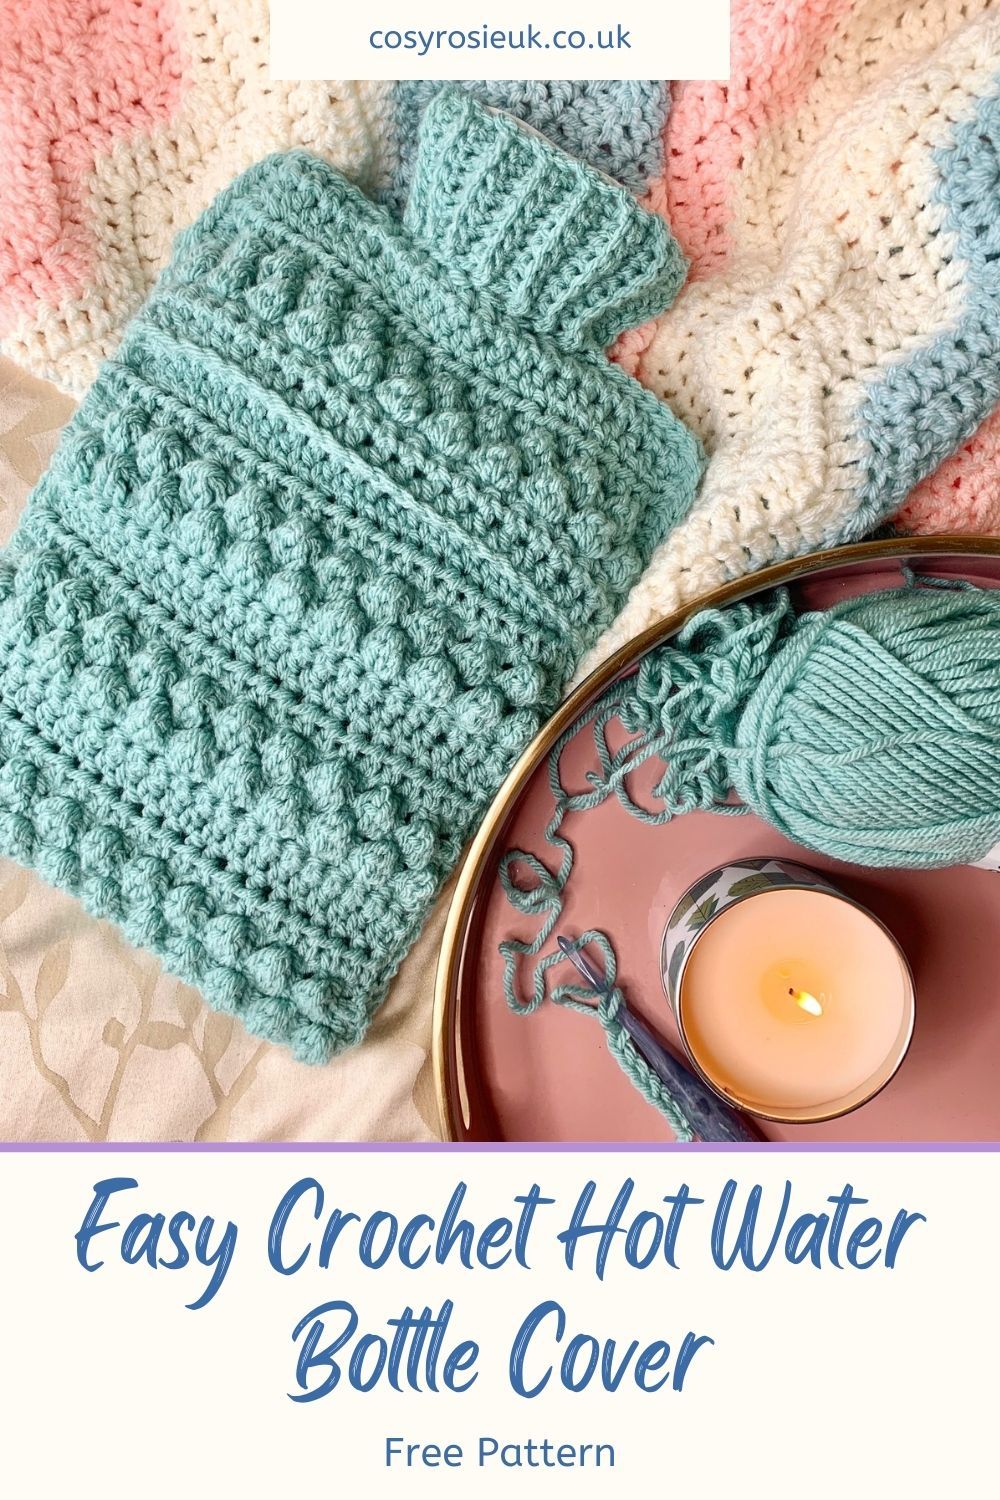
Free Crochet Hot Water Bottle Cover Pattern
Create your own crochet hot water bottle cover with this free pattern. This unique design allows you to insert the hot water bottle through a front opening and will from the top without removing the cover.

Easy Crochet Hot Water Bottle Holder
This free crochet hot water bottle cover pattern makes warming up extra snuggly, and the added texture created with the berry stitch makes it even more cuddly.
Unlike most crochet hot water bottle cover patterns, this pattern is created with 2 openings:
- Top Opening – allows you to fill the hot water bottle without removing the cover
- Front Opening – you can remove the bottle with ease whenever required
The added ribbing covers the top portion of the hot water bottle in the same fluted way, without restricting access.
You’ll also find a full video tutorial below to help you complete your project with ease.
Purchase the Printable PDF Pattern
If you’d like to increase your pattern reading skills, make notes as you work, or simply prefer to work from a printed pattern, you can get an AD-FREE, printable PDF version from Etsy or Ravelry by clicking the button below.
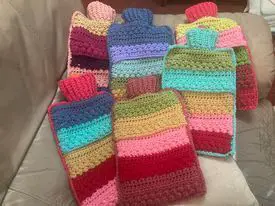
Crochet Hot Water Bottle Cover Ideas
The pattern testers for the Bobbly Hot Water Bottle Cover loved how quickly this pattern worked up and one tester made one for all her friends Christmas presents – what a great gift idea!
What is the best yarn for a crochet hot water holder?
It is commonly said that only natural fibres should be used for a hot water bottle cover, such as cotton or wool. However, I prefer to use acrylic yarn.
Acrylic yarn is a manmade fibre that can melt near direct heat, however the temperature of the water in your hot water bottle should not be boiling, so the risk of your yarn melting is minimal.
Use your hot water bottle safely – Click here to visit the Child Accident Prevention Trust for there recommendations surrounding the safe use.
Free Crochet Hot Water Bottle Cover Pattern Details
Materials
- 180m Size 6/ Bulky/Chunky Yarn
- I used Paintbox Yarns Simply Chunky, 100% acrylic (100 g/3.5 oz. 136m/ 149yds) in shade 332
- 6mm Crochet Hook
- Scissors
- Darning needle
- Optional – Stitch markers

Abbreviations
US terms (UK in brackets)
St(s) – Stitches
Ch – Chain
Ch Sp -Chain Space
Sl St – Slip Stitch
Sc (dc) – single crochet (double crochet)
Sc2tog (dc2tog) single (double) crochet decrease)
Hdc (htr) – Half double crochet (half treble crochet)
RS – right side
WS – wrong side
Pattern Notes
- Read through entire pattern before beginning. Please email [email protected] if you need assistance
- This pattern is worked 4 parts:
- Front Top
- Lower Front
- Back
- Ribbing
- The ribbing is worked in the round, all other parts worked in turned rows.
- Beginning Ch 1 DOES NOT count as a stitch.
- When working rows after berry st rows, sl sts are worked in berry and sc are worked in sl st.
Gauge
- 11 stitches and 8 rows in hdc = 4″ x 4″ (10cm x 10cm) using 6mm hook
Finished Size
Body:
- 22 cm x 30cm (8.5″ x 12″)
Ribbing:
- 6 cm tall (2.5″)
Special Stitches
berry (berry stitch) = yo, insert hook in next, yo, pull up loop, yo, pull through 1 loop, yo, insert hook in same, yo, pull up loop, yo, pull through 1 loop, yo, pull through all loops on hook, ch 1 to secure (ch 1 to close does NOT count as stitch)
The berry stitch is worked on the wrong side of the fabric and viewed on the right side.

How to crochet a Hot Water Bottle Cover
Lower Front | Free Crochet Hot Water Bottle Cover
Row 1: Ch 24, sc in 2nd ch from hook and each ch across,
turn. (23 sc)
Row 2 (WS): Ch 1 (does not count as st), sc in same, berry in next, *sl st in next, berry in next; repeat from * across to last, sc in last, turn. (11 berry st, 10 sl st, 2 sc)
Row 3: Ch 1, sc in same, *skip ch-1, sl st in next berry, skip ch-1, sc in next sl st; repeat from * across, sc in last, turn. (12 sc, 11 sl st)
Row 4: Ch 1, sc in same, sl st in next, *berry in next sc, sl st in next; repeat from * to last, sc in last, turn. (10 berry
st, 2 sc, 11 sl st)
Row 5: Ch 1, sc in same, sc in next, *sl st in next, sc in next; repeat from * across to last, sc in last, turn. (14 sc, 9 sl sts)
Rows 6-7: Ch 1, hdc in each across, turn. (23 hdc)
Rows 8-9: Ch 1, sc in each across, turn. (23 sc)
Rows 10-24: Repeat Rows 2-9, ending on Row 8 repeat.
Fasten off, weave ends.
Top Front | Free Crochet Hot Water Bottle Cover
Row 1: Ch 24, hdc in 2nd ch from hook and in each across, turn. (23 hdc)
Rows 2 & 3: Ch 1, sc in each across, turn. (23 sc)
Row 4: Ch 1, sc in same, sl st in next, *berry in next sc, sl st in next; repeat from * across to last, sc in last, turn. (10 berry st, 2 sc, 11 sl st)
Row 5: Ch 1, sc in same, sc in next, *sl st in next berry, skip ch-1, sc in next; repeat from * across to last 2, sc in next 2, turn. (13 sc, 10 sl st)
Row 6: Ch 1, sc in same, berry in next, *sl st in next, berry in next; repeat from * across to last sc in last, turn. (11 berry st, 10 sl st, 2 sc)
Row 7: Ch 1, sc in same, *skip ch-1, sl st in next berry, skip ch-1, sc in next sl st; repeat from * across, sc in last, turn. (12 sc, 11 sl st)
Rows 8-9: Ch 1, hdc in each across, turn. (23 hdc)
Fasten off, weave ends.
Continue to Back.

Back | Free Crochet Hot Water Bottle Cover
Row 1: Ch 24, sc in 2nd ch from hook and each ch across,
turn. (23 sc)
Row 2 (WS): Ch 1 (does not count as st), sc in same, berry in next, *sl st in next, berry in next; repeat from * across to last, sc in last, turn. (11 berry st, 10 sl st, 2 sc)
Row 3: Ch 1, sc in same, *skip ch-1, sl st in next berry, skip ch-1, sc in next sl st; repeat from * across, sc in last, turn. (12 sc, 11 sl st)
Row 4: Ch 1, sc in same, sl st in next, *berry in next sc, sl st in next; repeat from * to last, sc in last, turn. (10 berry
st, 2 sc, 11 sl st)
Row 5: Ch 1, sc in same, sc in next, *sl st in next, sc in next; repeat from * across to last, sc in last, turn. (14 sc, 9 sl sts)
Rows 6-7: Ch 1, hdc in each across, turn. (23 hdc)
Rows 8-9: Ch 1, sc in each across, turn. (23 sc)
Rows 10-31: Repeat Rows 2-9 ending on Row 7 repeat.
Fasten off, weave ends.
Continue to Joining.
Joining | Free Crochet Hot Water Bottle Cover
- With Back piece WS facing, place Lower Front on top to match bottom corners, secure with stitch marker
- Using berry rows as guide, secure the sides of Back and Lower front
- Match Top Front to top corners of Back
- Using berry rows as guide, secure Top Front to sides of Back and over top of Lower Front (all 3 parts will overlap).
- Count 6 sts in from upper corner, pin Top Front to Back.
- Repeat for other Top Front Corner

Joining
Round 1: With RS facing, join in marked 6th stitch from Top Front corner through both Top Front and Back.
Working through both Top Front and Back, ch 1, sc in each across, rotate, working across row ends, place 31 sc evenly across, rotate, working across opposite side of starting ch, sc in each across, rotate, working across row ends, place 31 sc evenly across, rotate, working across top, sc in next 6 to marked, leave remaining sts unworked. (94 sc)
Do NOT fasten off. Continue to Ribbing

Ribbing | Free Crochet Hot Water Bottle Cover
Round 1: With RS facing, working in unworked sts and in one layer only of Top Front, *sc in next, sc2tog; repeat from * around Top Opening, join. (14 sc)
Row 1: Ch 9, working in BLO, sc in 2nd ch from hook and in each across, sl st in next of Top Front, turn. (8 sc)
Row 2: Working in BLO, sc in next 7, sc in last, turn. (8 sc)
Row 3: Ch 1, working in BLO, sc in next 8, sl st in next in Top Front, turn.
Rows 4-13: Repeat Rows 2-3.
Row 14: Ch 1, insert hook through next and opposite side of ch, sc in same, sc in each across joining ribbing to starting ch, sl st to next sc.
Fasten off, weave ends.

Made It?
Come and share a photo of your finished Gloriosa Crochet Skirt Pattern in the community group so we can all celebrate your success!