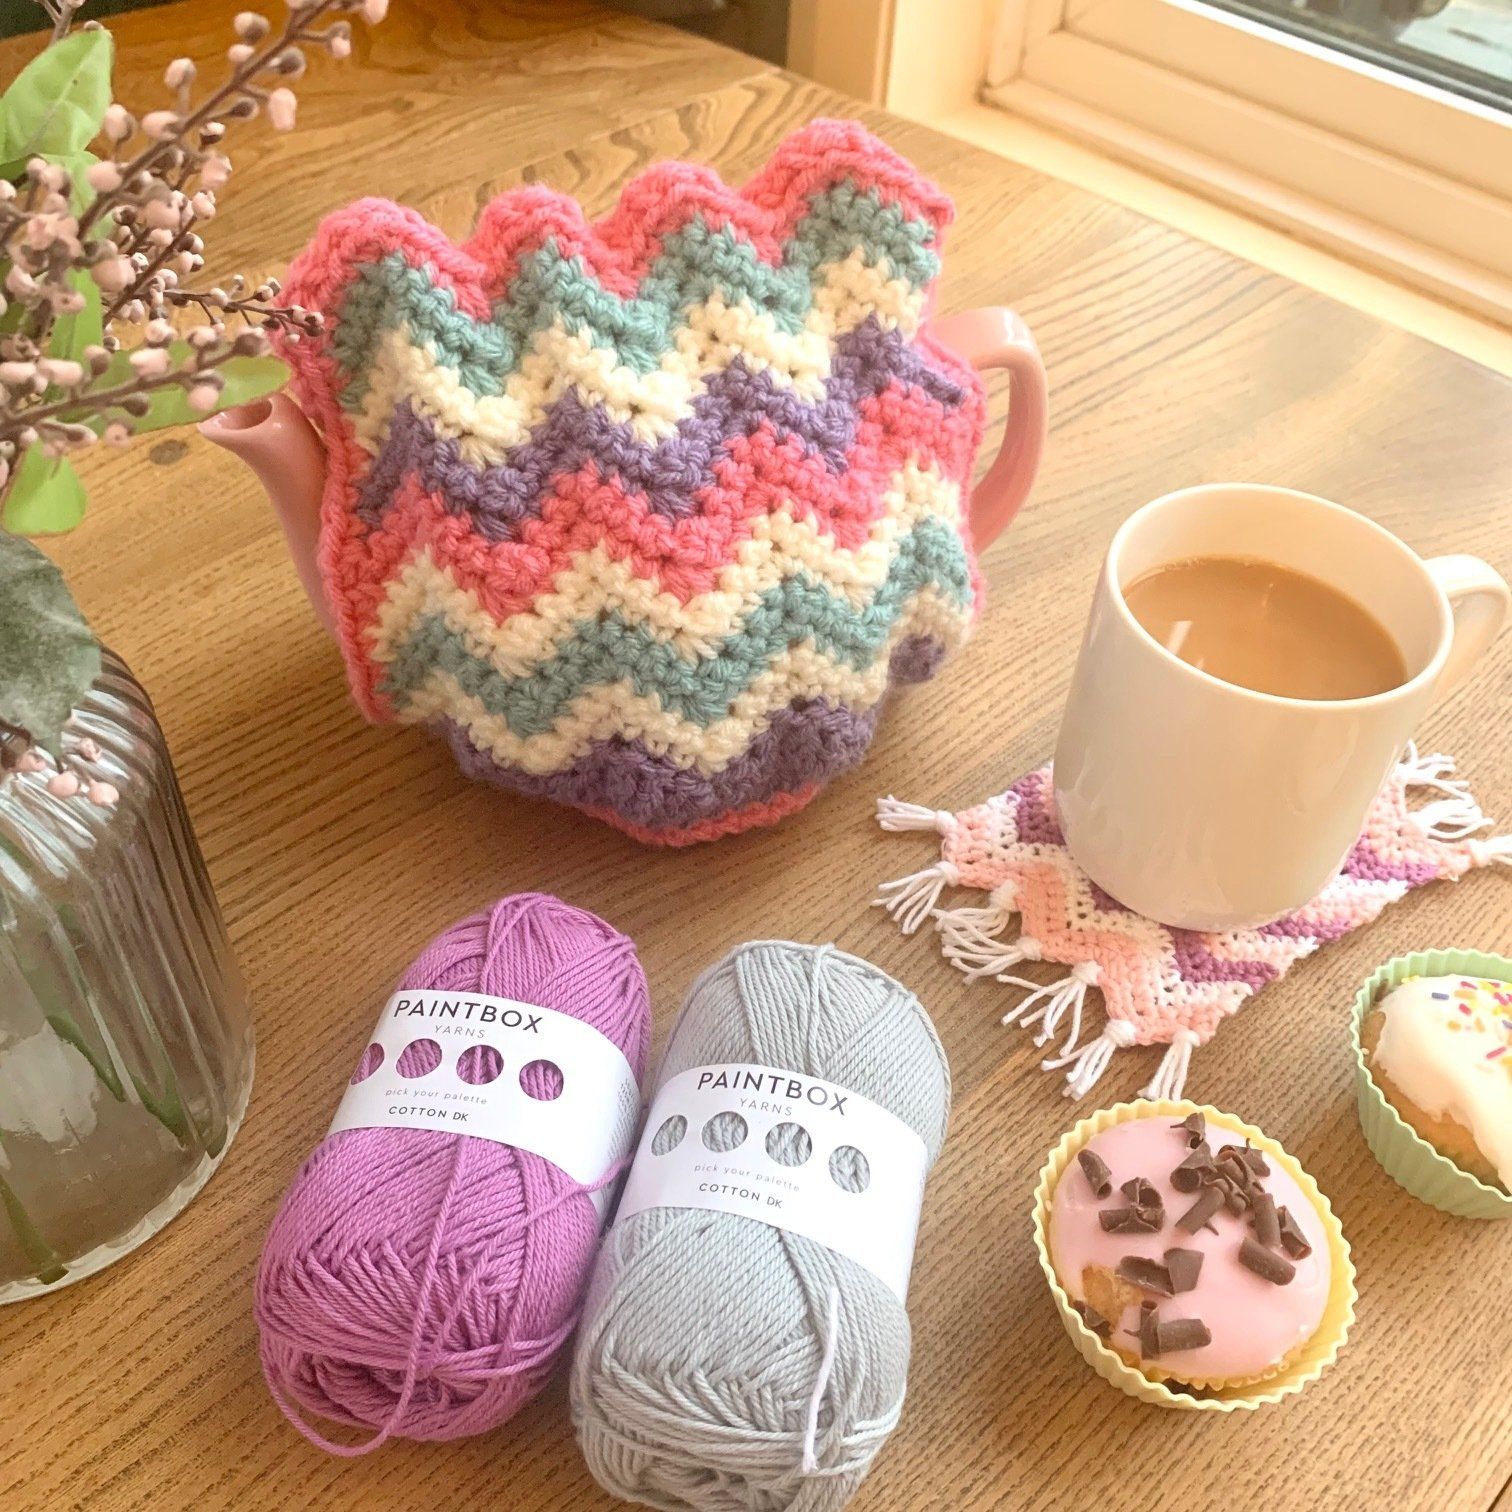
Free Crochet Tea Cosy Pattern
Learn how to crochet your own tea cosy with this free crochet pattern. The pattern can be adjusted to fit any teapot and keep that cuppa warm. You can follow along with the written pattern or watch the crochet tea cosy pattern tutorial on YouTube.
Please note that some of the links in my blog are affiliate links. I may earn a small commission if you purchase via these links, but the price you pay is not affected
Crochet Tea Cosy Pattern | Free Crochet Patterns
There is nothing better than taking a few moments to relax in your day for a hop cup of tea. With the New Year finally here, this free crochet tea cosy pattern is a great way to keep your tea warm for longer and extend your relaxation time.
Whether you enjoy your cuppa with no distractions, settled down while reading a good book or simply to accompany your crochet time, the simple stitch repeat of the crochet chevron, is a perfect mindless project that will add to your relaxation time.
The Chevron stitch can be worked so many different ways and as you can see from my other designs including the Bittersweet Margaret Skirt and the Breezy Cushion, the colours used make a big impact on how bold the pattern stands out.
New Years Resolution Blog Hop – 2022
This pattern was featured in the New Years Resolution Blog Hop on 1st January 2022.
Click the button below to see all the patterns that were featured in this event.

Purchase the Printable PDF Pattern
You can grab a copy of the printable crochet pattern for the Time for Me Tea Cosy in my pattern shops for just £4.00. Simply click the links below to be taken to your favourite pattern shops.
How to crochet a tea cosy
Skill Level: Beginner
Materials:
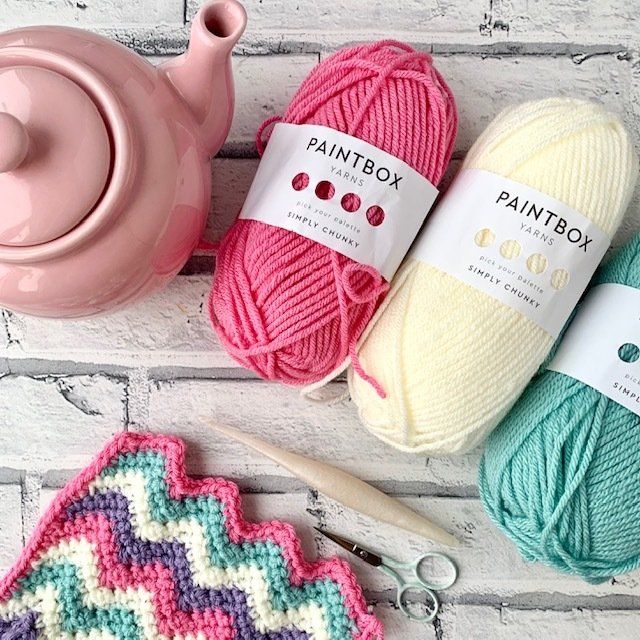
- Chunky/Bulky (size 4) 100% acrylic yarn
- I used Paintbox Yarns Simply Chunky in the following 4 shades:
- A -346 – Dusty Lilac
- B- 302 – Champagne White
- C- 332 – Washed Teal
- D- 350 – Bubblegum Pink
- Click here to purchase this yarn from LoveCrafts
- 5mm crochet hook
- Scissors
Abbreviations: US terms (UK in brackets)
St(s) Stitches
Ch Chain
Sc (Dc) Single crochet (Double Crochet)
3Sc (3Dc) Work 3 Single (UK-Double) Crochet into the same stitch
Sc2Tog (Dc2Tog) Single Crochet 2 together (Double crochet 2 together)
Sc3Tog (Dc3Tog) Single crochet 3 together (Double crochet 3 together)
HDc (HTr) Half Double Crochet (Half Treble Crochet)
Dc (Tr) Double Crochet (Treble Crochet)
3Tr (3DTr) Work 3 Treble (UK-Double Treble) Crochet into the same stitch
Rs Right Side
Gauge:
- is not essential. Check the length of the 1st row as instructed in pattern notes
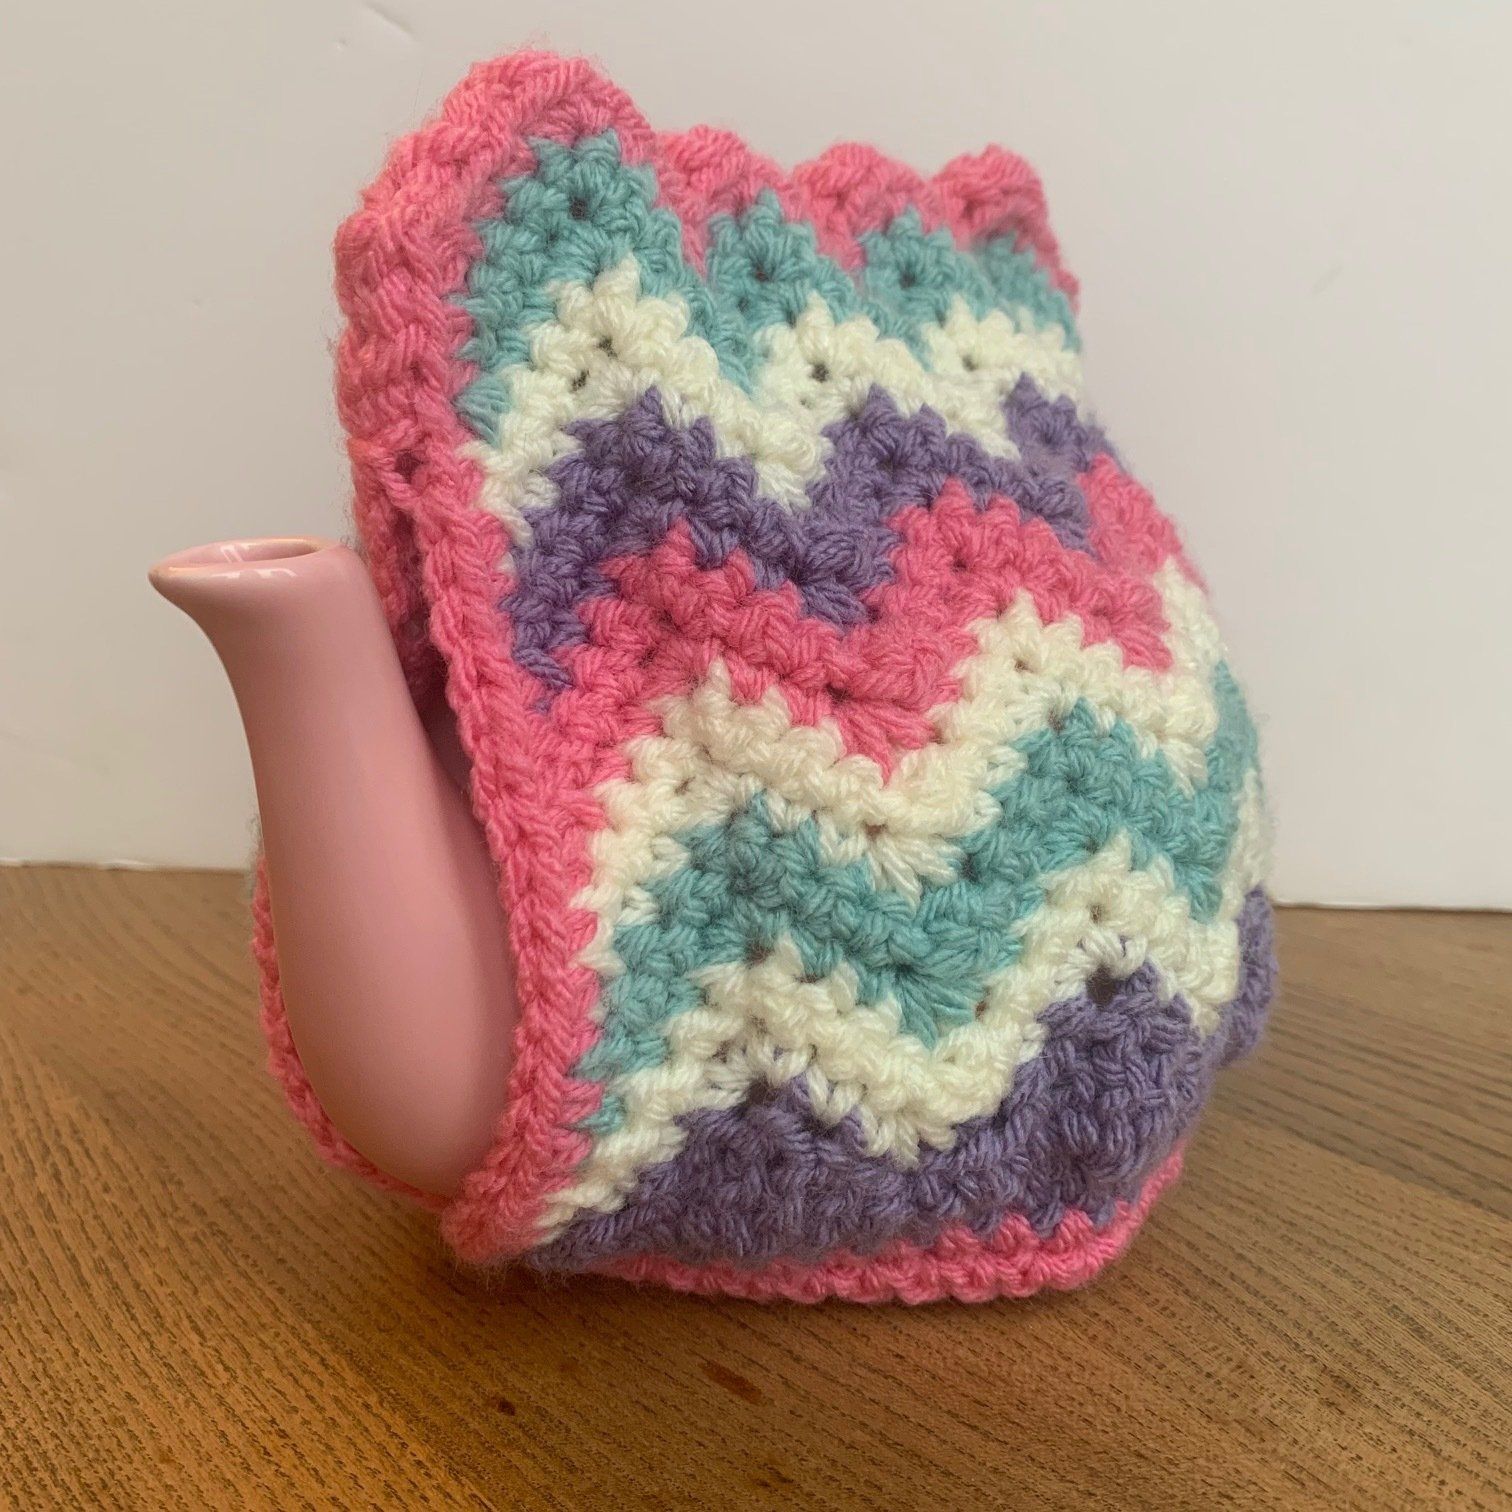
Finished Size:
- 7.5″ wide by 7″ tall
Pattern Notes:
- Whatever your skill level with crochet, I always recommend reading through this pattern before beginning. Get in touch if you need any help completing the pattern.
- The tea cosy is worked in 2 panels before sewing together.
- Ch1 at the beginning of the rows DO NOT count as a stitch.
- To ensure a good fit, check the length of the 1st row fits between the spout and the handle loosely.
Measure & Adjust
- Measure your teapot between the handle and the spout
- This pattern is designed for a measurement of up to 8 inches
If you need to adjust the starting chain:
- Stitch multiple is 6 chains, plus 1, plus 1 for the foundation chain
Time for Me Tea Cosy | Free Crochet Pattern
Make 2
With A – Ch26
To adjust the length of the chain, add or subtract in 6’s for the stitch repeat. e.g. Ch20 or Ch32.
Row 1: RS. HDc in 2nd ch from hook and each ch across. Turn. (25)
Row 2: Ch1 (does not count as st), Sc in same st as Ch1, *HDc, Dc, 3Tr, Dc, HDc, Sc*, repeat between * and * to end. Turn. (33)
Row 3: Change to B. Ch1, skip st under ch, Sc in next st, Sc in next 2 sts, *3Sc in next, Sc in next 2 sts. Sc3Tog over next 3 sts, Sc in next 2 sts*, repeat between * and * to last 5 sts, 3Sc in next, Sc in next 2 sts, Sc2Tog across last 2 sts. Turn. (33)
Row 4: Repeat Row 3.
Rows 5 & 6: Change to C. Repeat Row 3.
Rows 7 & 8: Change to B. Repeat Row 3.
Rows 9 & 10: Change to D. Repeat Row 3.
Rows 11 & 12: Change to A. Repeat Row 3.
Rows 13 & 14: Change to B. Repeat Row 3.
Rows 15 & 16: Change to C. Repeat Row 3.
Rows 17: Change to D. Repeat Row 3. DO NOT fasten off.
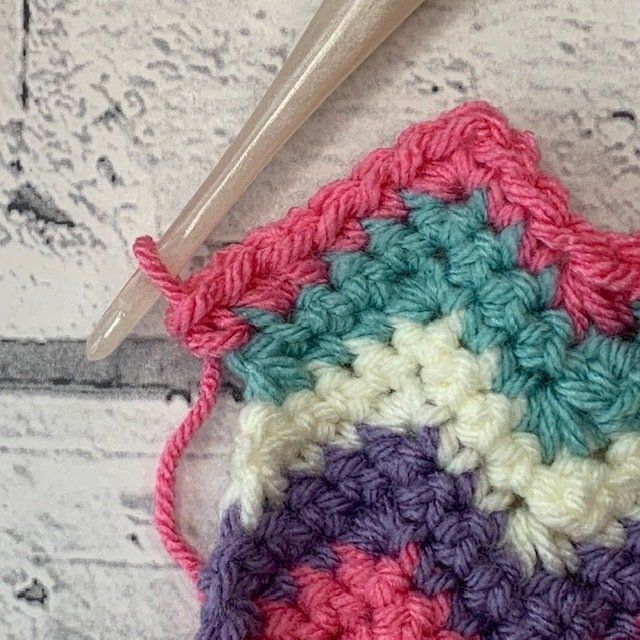
Edging – Continuing working down the side of the panel with RS Facing:
- Ch1, Sc into end of each row to bottom of panel. Fasten off.
- Rejoin yarn on other panel edge, ensuring RS facing:
- Ch1, Sc into end of each row to top of panel. Fasten off.
Sewing Up & Joining Panels | Free Crochet Tea Cosy Pattern
- Place panels together with right facing out
- Pin 1 bottom edge together (this is where the spout will come out
- Pin top of chevrons together
- Try cozy on teapot
- Pin above spout and handle as per desired fit
Sewing Up
Using Mattress stitch:
- Sew across top of chevrons starting from join above handle round to above spout
Adding Edging Row – Rejoin yarn, with RS facing in bottom corner edge under handle seam.
Row 1: Ch1, Sc into same as Ch1, Sc into each stitch across to other side, working across spout opening to join both sides together. Turn. (50)
Row 2: Ch1, Sc into each st across. Fasten off and weave in all ends.
Pop the kettle on and make a cuppa which will be kept warm with your new teapot cosy.