Summer Crochet Tote Bag Pattern
Create a textured, crossbody bag with this summer crochet tote bag pattern that can be easily lined to prevent stretching as you load it up with all your “day-out” essentials.

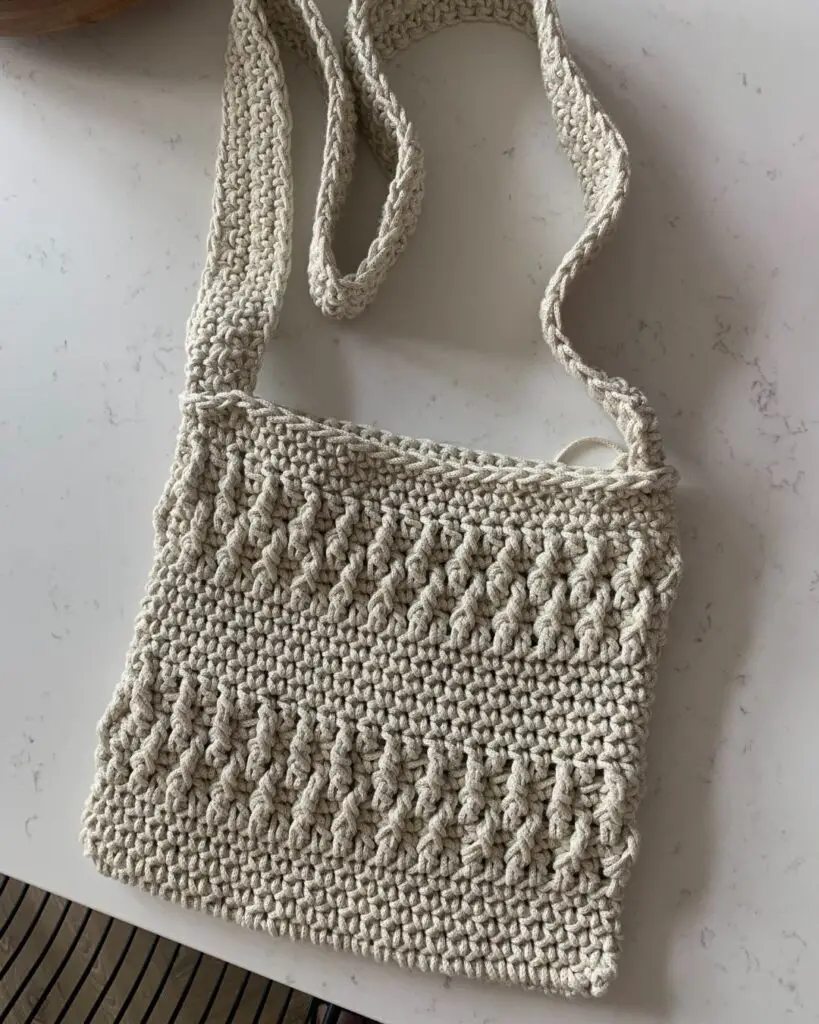
Sunny Days Crossbody Bag
Following on from the Sturdy Summer Bag, I was looking for a crochet bag pattern that would look stunning in a single colour, so it would pair well with lots of outfits, rather than the colour standing out – the easiest way to make a bag stunning in my book, is to add texture.
I love the simplicity of a crossbody bag, as it allows me to carry lots of items without tying up my hands, keeping them free to capture photos of where I’m visiting.
This summer crochet tote bag pattern is a combination and development of 2 of my previously released patterns; the Sturdy Summer Bag and the Pool Ripples Clutch. This bag pattern features the same textured stitch as the Pool Ripples Clutch, but it is sized up, by using a heavier weight of cotton and the base of the bag has been adjusted from the one used in the Sturdy Summer Bag to create a true base, ideal for supporting larger items such as cameras and books.
Want to print this pattern?
You can choose to purchase a printable version of this pattern that includes the lining instructions. The pattern is written in both US and UK terms, where as this web-version is only available in US terms. Click the button below to purchase from your preferred retailer.
What type of yarn is needed for a Summer Crochet Tote Bag Pattern?
100% cotton is always a great choice for bag making, as it’s hard wearing. For the Sunny Day’s Crossbody Bag, I choose to use a lighter weight Macrame cord from Hobbycraft and the thickness can sometimes a little tough on our hands but the finished project always looks flawless, and shop bought.
I used Knitcraft Return of the Mac Metallic in Gold Sparkle that features a gold thread running through it and one my testers used the silver version. The yarn is described as chunky, which would be Size 5, and it measures 3mm. If you are looking for an alternative, any 3mm macrame cord would work well to make this summer crochet bag pattern.
One of my testers opted to hold 2 strands of Aran weight yarn together to create a thicker yarn and was able to create the same finished size – she used Knitcraft Cotton Acrylic in 2 shades – photo shared below.

Should you line crochet bags?
Adding a lining to your crochet bags is essential to prevent the bag loosing shape, stretching beyond the finished size you created and extending the life of your handmade bag. It also helps to prevent the yarn being stained by the contents of your bag – I had a drink leak in my Sunny Days Bag while on holiday in France so rather than ruining my whole bag, I could simply swap out the lining to a new fabric.
If you are not confident at lining your bags, especially bags that have a base and need more than a slip-in lining, I have a photo and video tutorial taking you through the steps of created a box bag lining that you can follow to line this summer crochet bag pattern and all your other bags too. Click here to view how to line a crochet bag with a base.
Inspirational Images
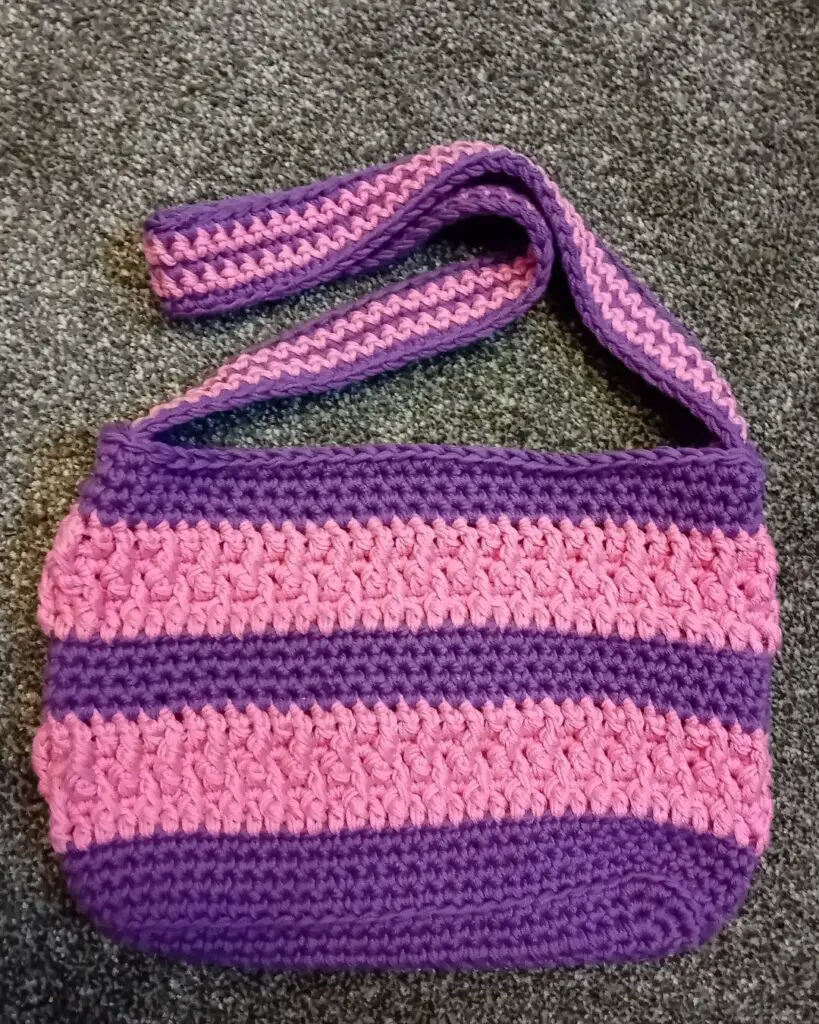
There is nothing better than seeing other peoples completed projects to inspire you to stitch up your own version. Julie opted for the same yarn I used and Laura chose to double stand 2 Aran weight yarns from her stash – I love how both their bags turned out!
Pattern Information | Summer Crochet Tote Bag Pattern
Materials
To complete this project you will need:
- 250m Chunky weight 100% cotton
- I used Knitcraft Return of the Mac 80% cotton, 20% metalic (200g 105m) in shade 12 Gold Sparkle
- 6mm hook
- 4 stitch markers
- Needle for chunky yarn
Optional Lining:
- fabric measuring 11.5″ by 22″
- sewing thread to match lining
- sewing needle
- 1″ button
Abbreviations
US Terms
st(s) – stitch(es)
ch – chain
sl st – slip stitch
sc – single crochet
FP tr – Front Post treble
BLO – work into back loop only
RS – right side
YO – yarn over
Pattern Notes
- Please read through the entire pattern before beginning, regardless of skill level. Please contact me ([email protected]) if help is needed to understand any part of pattern.
- The body of the bag is worked in joined rounds
- The handle is worked separately and sewn in place
- Beginning ch 1 does not count as stitch
- When instructed to work in BLO, ensure the right side of the bag is facing
- There is a photo tutorial to assist with lining the bag
Gauge
10 sts and 11 rows = 4″ in sc with 6mm crochet hook
Finished Size
- 10.5″ wide, 9.5″ tall, 2″ wide
- 105cm length handle – this will lightly stretch with use
Special Stitches
FP tr = front post treble crochet
- YO 2 times
- Insert hook around from front to back to front of dc 2 rows below
- YO, pull up loop
- (YO, pull through 2 loops) 2 times
Summer Crochet Tote Bag Pattern – Video Tutorial
How to crochet this summer bag pattern
Round 1 (RS): Ch 25, sc in 2nd from hook, sc in next 22, 3 sc in last, rotate to work in other side of ch, sc in next 22, 2 sc in last, join – 50 sc
Round 2: Ch 1, 2 sc in same as ch 1, sc in next 22, 2 sc in next 3, sc in next 22, 2 sc in next 2, join – 56 sc
Round 3: Ch 1, 2 sc in same as ch 1, 2 sc next, sc in next 22, 2 sc in next 6, sc in next 22, 2 sc in next 4, join – 68 sc
Round 4: Ch 1, working into BLO, sc in each st around, join – 68 sc
Rounds 5-7: Ch 1, sc in each around, join – 68 sc
Round 8: Ch 3 (counts as st), dc in each st around, join – 68 dc
Round 9: Ch 1, sc in each st around, join – 68 sc
Round 10: Ch 3 (counts as dc), *FP tr around dc 2 rounds below, dc in next; repeat from * around, join – 34 FP tr, 34 dc
Round 11: Repeat Round 9
Round 12: Ch 2 (does not count), FP tr around ch-3 2 rows below, dc in next, *FP tr around dc 2 rows below, dc in next; repeat from * around, join – 34 FP tr, 34 dc
Rounds 13-16: Ch 1, sc in each st around, join – 68 sc
Rounds 17-25: Repeat Rounds 8-16
Fasten off, weave ends

Optional Button Closure
With the RS facing, lay flat and locate the middle stitch across the top of the bag by counting in from the side edge and marking 16th stitch, count across to next side to check 15 sts remaining to next side edge, join yarn in marked st, ch 14, sl st to same
Sew button on RS of other side of bag body
Fasten off, weave ends
Continue to Handle
Handle
Handle
Row 1: Leaving a long tail. ch 100, working into back bump of ch, sc in 2nd ch and each ch across, turn – 99 sc
Rows 2-4: Ch 1, sc in each across, turn – 99 sc
Fasten off with a long tail, weave ends.
- Position small handle edge, inline with smaller side edge of bag body inside the bag
- repeat for other small handle edge
- using long tail. sew handle to body of bag
Optional: Continue to Lining
Once you’ve completed your bag and added the handle, it’s time to create and sew in the lining. Click here to find the detailed tutorial to create a boxed lining for your beautiful crochet bag.
Want to print this pattern?
You can choose to purchase a printable version of this pattern that includes the lining instructions. There are 2 versions of the pattern included in your purchase, one in US and 1 in UK terms, where as this web-version is only available in US terms. Click the button below to purchase from your preferred retailer.