
Granny Hexagon Cardigan Pattern Free
Crochet your own cardigan with this easy to follow granny hexagon cardigan pattern. This design uses 3 different stitches to create a lightweight, summer version of this popular style of crochet cardgian pattern that’s created by joining together 2 crochet hexagons.
Strawberry Sundae Granny Hexagon Cardigan
You have no doubt seen the granny hexagon cardigan patterns everywhere, some worked up in bright colours, others with added granny squares inserted into the back panel, and some with hoods added too!
The concept of simply joining 2 crochet hexagons together to create a cardgian is genius – but I wanted to design a version that would avoid some of the pitfalls that are shared in Facebook Groups, and that could be worn in warmer weather too.
Size Inclusive | Make it Your Way!
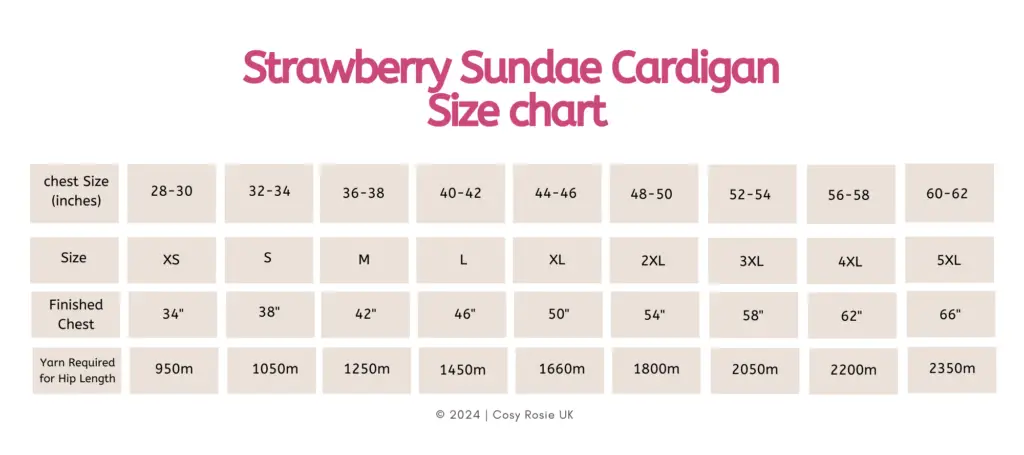
The Strawberry Sundae Crochet Hexagon Cardigan pattern has been designed for sizes XS-5XL, while ensuring that the finished look of the design is the same regardless of which size is made.
The simplest designs are made to create a finished hexagon, based on the bust size, resulting in larger sizes creating larger hexagons. The nature of this design means that the larger the hexagon, the longer and wider the sleeve. As someone who is plus size, but only 5 foot tall, that really wouldn’t work for me.
This design uses only 3 different sized hexagons across all 9 sizes, and additional width is worked on the back and the front panels depending on the required finished size. The risk of HUGE armholes is completely eliminated by maintaining a consistent hexagon size.
The way this pattern is written, also allows you to customise the finished size – you can easily add additional width in the back of the cardigan, or add a wider front panel PLUS the finished length is completely your choice.
Wear it – Whatever the Weather!
Whatever the season, I love to layer and cardigans are my go to. In the warmer weather, I still want to have the option of adding a layer, either to keep my shoulders covered, or simply to jazz up an otherwise bland outfit.
This granny hexagon cardigan pattern has been designed using a DK/Size 3 weight yarn, but the pattern also includes the sizes to create the hexagons in, so you can make the pattern in any weight yarn.
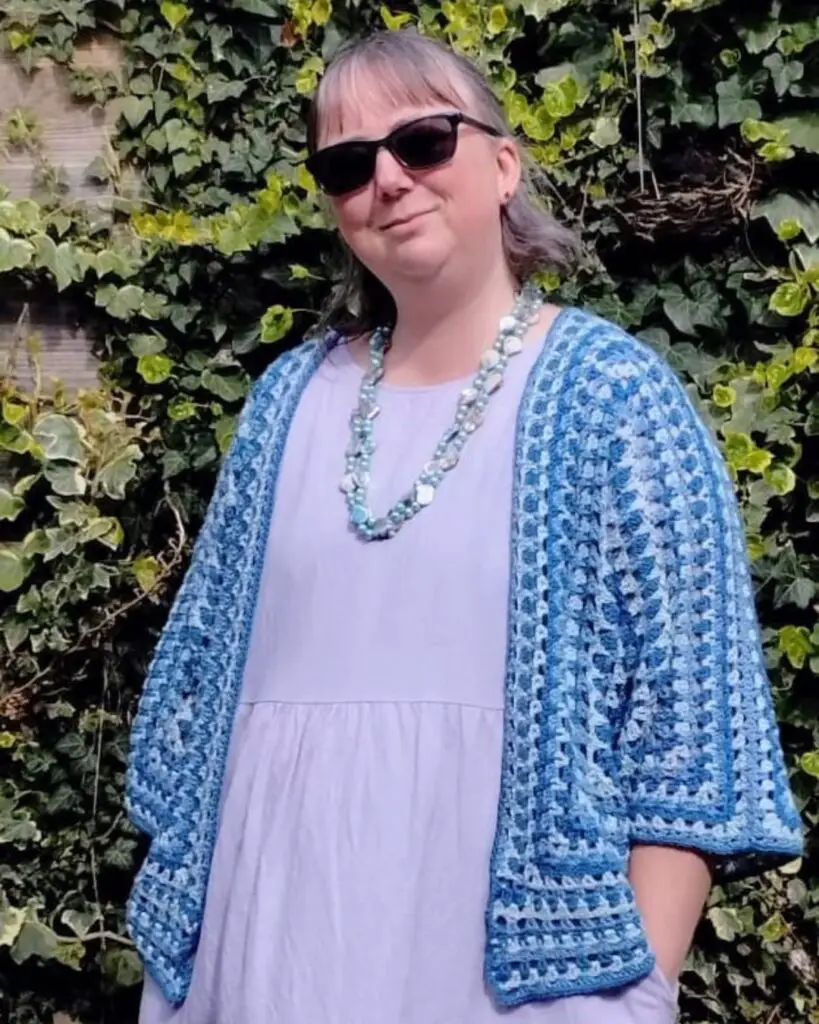
I’ve created 2 versions of this pattern using different yarns to see how it works up in different fibres. My original sampled was worked in 3 different shades of Stylecraft Naturals Bamboo Cotton, and my 2nd was worked in Rowan Softyak, which is a blend of cotton, yak and nylon.
Both yarns worked well, and really showed off the stitch pattern fabulously – so you really can use any yarn for this crochet cardigan pattern, but a cotton or cotton blend is a great choice for the warmer weather.
Purchase the Printable Pattern
Go ad-free, by purchasing the printable pattern from your favourite crochet pattern retailer. Simply click the button below and purchase for an instant download.
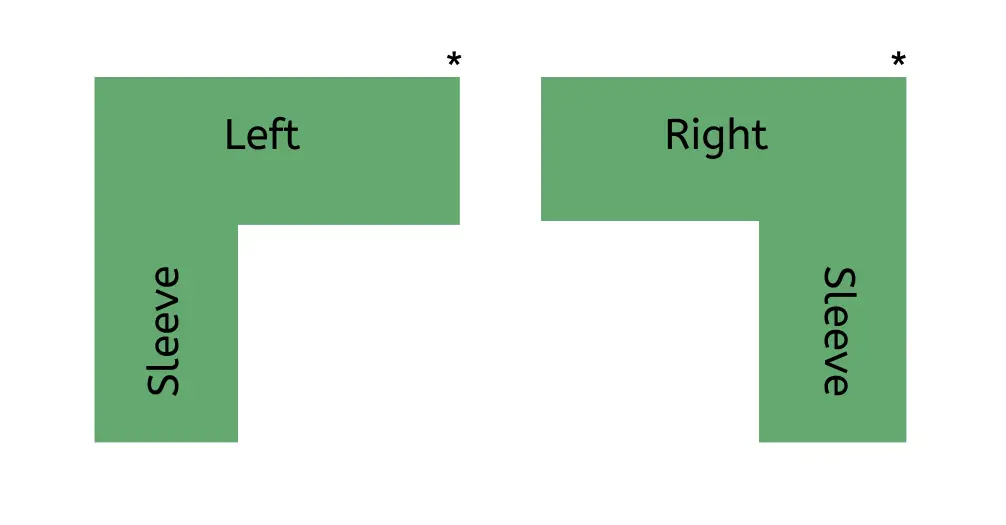
Understanding the Schematic
There are lots of numbers on the schematic below, but the most important one is the circular finished bust size which is created by adding the extra width from the back panel – Not all sizes will add additional width to the front of the cardigan.
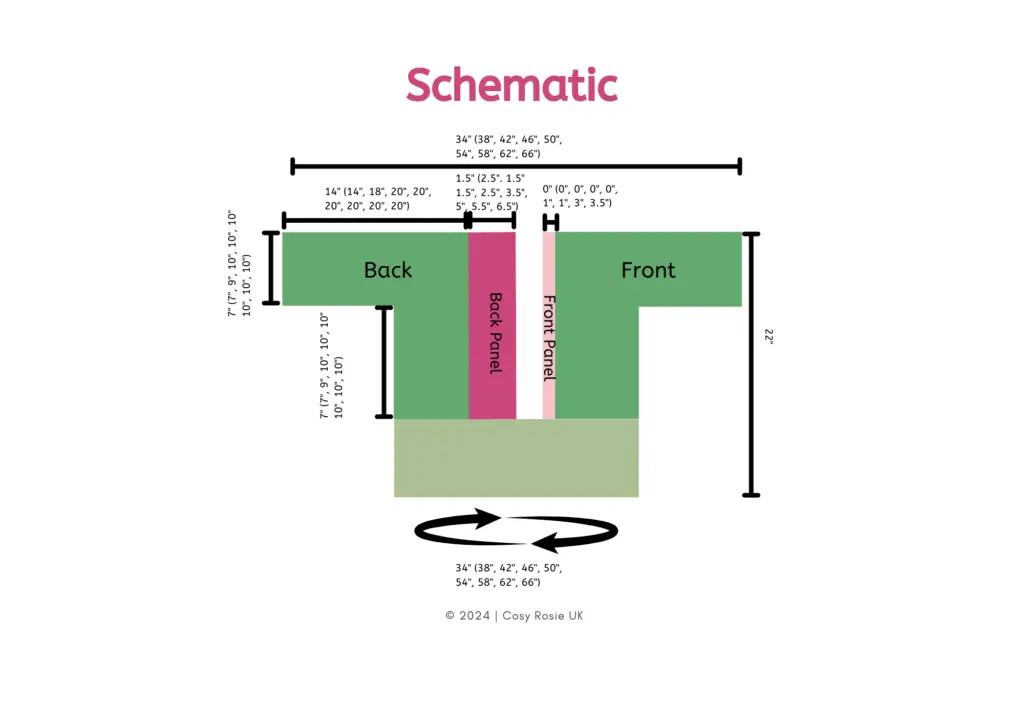
You can also see the finished sleeve width above, which is similar across all 9 sizes – the size of the sleeve is created by the finished size of the hexagon folded into the cardigan shape.
Which size will you make?
This hexagon cardgian is designed with just 4″ of positive ease (this means the finished bust size is 4″ larger that your bust measurement), but you can create a more loose fit but making one size up if you’d prefer.
You can also the estimated total amount of yarn required per size too – remember this is calculated based on the written pattern and does not include allowance for any adjustments to the width or length.
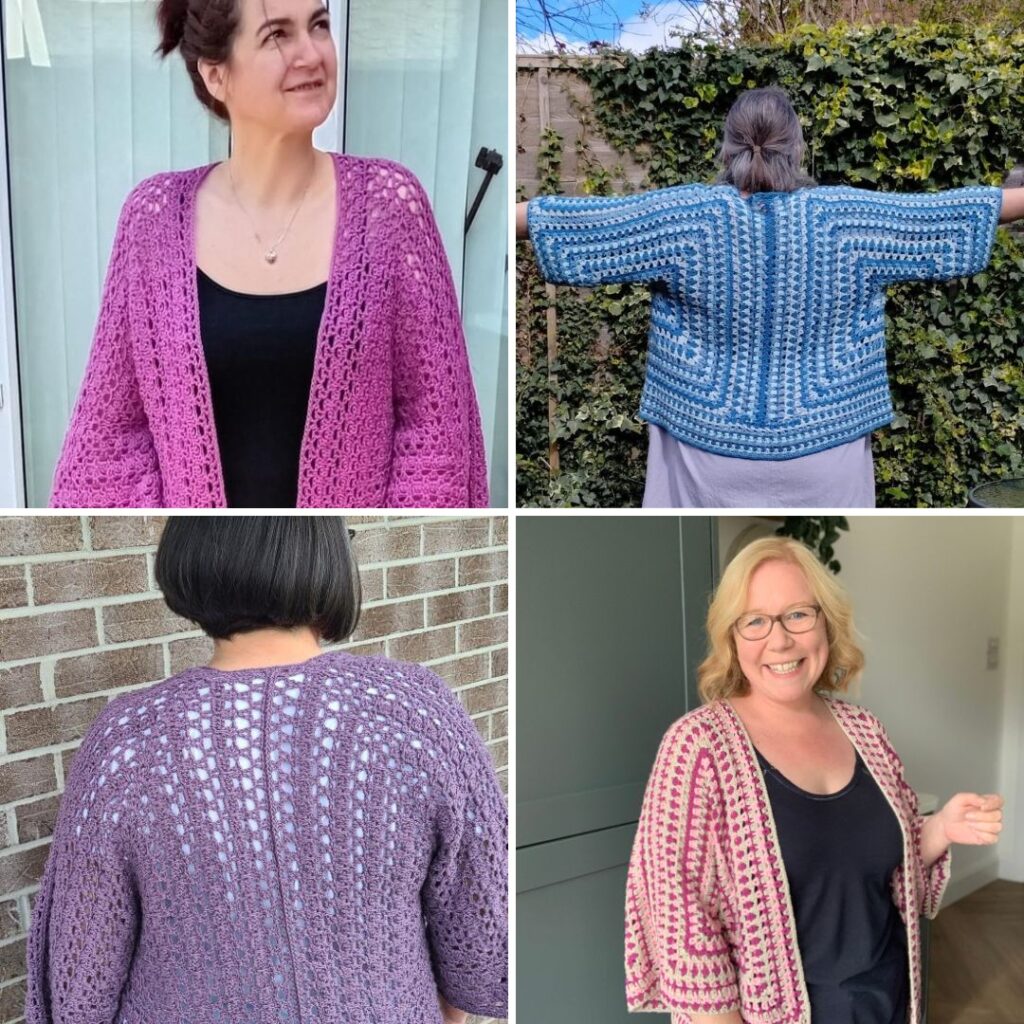
Colour Inspiration | Granny Hexagon Cardigan
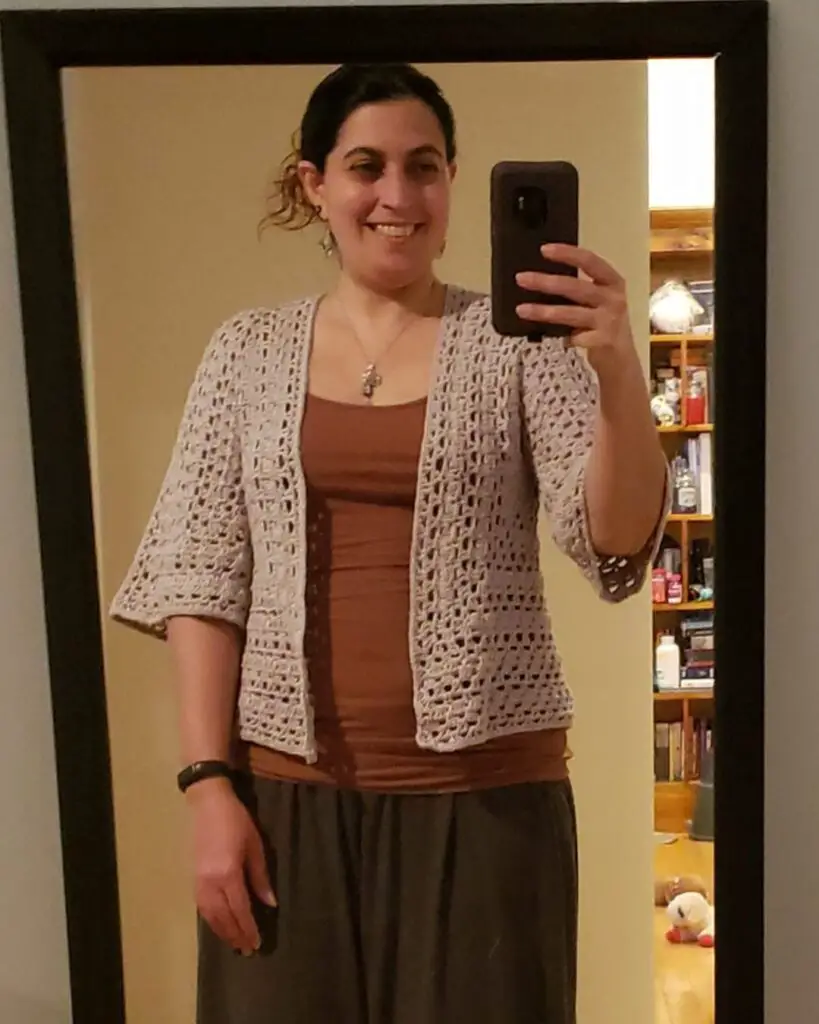
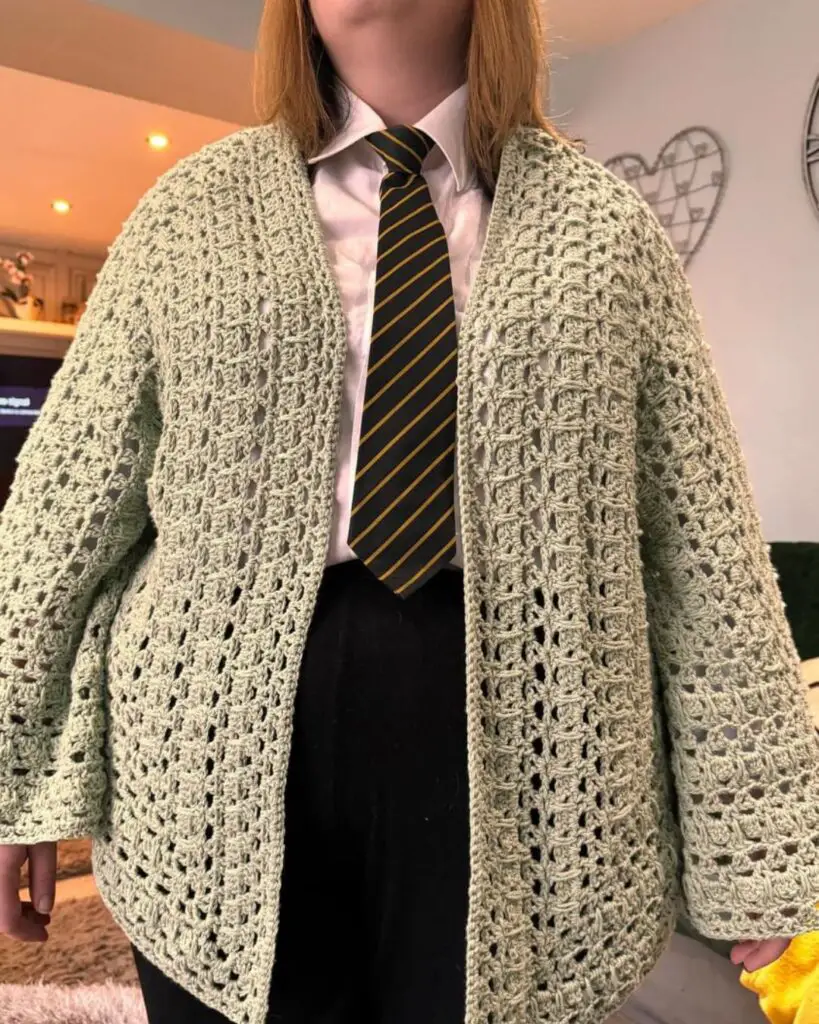
Once again, my pattern testers have surpassed themselves helping me to ensure the pattern is easy to follow, and creating their own versions of the Strawberry Sundae Cardgian. Pictured below are their finished versions – I’m so grateful for the hard work they do.


Granny Hexagon Cardigan Pattern Information
Materials
- Any DK/Size 3 cotton or cotton blend yarn – see size chart for required amounts.
- I used Stylecraft Naturals Bamboo Cotton (40% cotton, 60% bamboo) 100g 250m/273yds, in the following 3 colours
- A -Mulberry (7250)
- B- Natural (7146)
- C- Blossom (7167)
- I used Stylecraft Naturals Bamboo Cotton (40% cotton, 60% bamboo) 100g 250m/273yds, in the following 3 colours
- 4mm hook
- Scissors
- Darning needle
- Stitch Markers
Abbreviations – US Terms
St(s) – stitch(es)
Ch – chain
Ch Sp – chain space
Sc – single crochet
Dc – double crochet
Dc-spike – 3dc with long dc in middle of cluster
v-st – V stitch
RS – right side
FO – fasten off
PM – place marker
NC – next colour
TC – turning chain
YO – yarn over
Special Stitches
v-st = (dc, ch 1, dc) in indicated sp/st
dc-spike = dc in ch-1 sp between 3-dc group, long dc in ch-1 sp of v-st 2 rounds below, dc in same sp as first dc
long dc = yo, insert hook in ch-1 sp 2 rounds below, yo, pull loop up to height of current round, [yo, pull through 2 loops] 2 times
Pattern Notes
- If you have any questions regarding pattern instructions please reach out – [email protected]
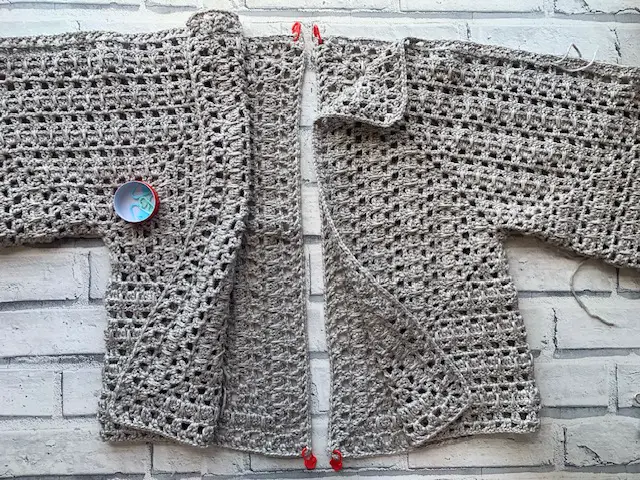
- This pattern is worked in turn rounds, creating two panels with 6 sides, with turned rows worked on 1 edge of each panel to finish the back, before joining
- Once joined, turned rows are worked along the bottom edge to create the desired finished length
- If using multiple colours, it is recommended to fasten off after each round, working over your ends throughout
- If working design in 1 colour, it’s recommended to sl st across each to next ch-3 sp
- Beginning ch-4 counts as (dc, ch 1) throughout
- Beginning ch-3 counts as dc throughout
- Each round should be joined in any ch-3 sp
- It is recommended to place markers in ch-3 sps for ease of finding them
Gauge
Each edge should measure 4.5″ across after Round 5. Use a larger or smaller crochet hook to achieve the correct size.
Video Tutorial | Granny Hexagon Crochet Cardgian Pattern Free
Granny Hexagon Pattern
Hexagon – Make 2 – Worked in turned Rounds
Round 1: With A, Ch 4, sl st in 1st ch to create ring, working in centre of ring, ch 5 (counts as dc, ch 2), [2dc, ch 2] 5 times, dc, join to 3rd ch, turn – 6 2dc, 6 ch-2 sps
Round 2. RS: With B, Join in any ch-sp, ch 4 (counts as dc, ch 1), (dc, ch 3, v-st, ch 1) in same, working in ch-2 sps only, [v-st, ch 3, v-st, ch 1] 5 times, join to 3rd ch, turn – 12 v-st, 6 ch-3 sps
Round 3: With C, join in any ch-3 sp, ch 4 (counts as dc, ch 1), (dc, ch 3, v-st, ch 1) in same, skip next v-st, *working in ch-1 sp between v-sts, (3dc, ch 1) in each to next ch-3 sp, skip next v-st, (v-st, ch 3, v-st, ch 1) in next ch-3 sp, skip next v-st; repeat from * to last v-st of round, join to 3rd ch, turn – 6 3-dc groups, 12 v-st, 12 ch-1 sps, 6 ch-3 sps
Note:–pattern will ripple from Round 4 onwards, this is correct to allow for square to fold into cardigan shape.
Round 4: With A, join in any ch-3 sp, ch 3 (counts as dc), (2 dc, ch 3, 3 dc, ch 1) in same, skip v-st, *working in ch-1 sp before 3dc group, (3dc spike, ch 1), skip 3dc group, working in ch-1 sp after 3dc group, (3dc spike, ch 1), skip v-st, (3 dc, ch 3, 3 dc, ch 1) in next ch-3 sp, skip v-st; repeat from * around to end, join to 3rd ch, turn – 12 3-dc spike, 18 ch-1 sps, 12 3-dc groups, 6 ch-3 sps
*Note for Round 5: v-st will be worked in spike dc, except when working in corner 3dc groups.
Round 5: With B, join in any ch-3 sp, ch 4, (dc, ch 3, v-st, ch 1) in same, skip 1 dc, *(v-st in middle dc of next 3dc group, ch 1, skip 2 dc) across to next ch-3 sp, skipping 1 dc after last 3dc group, (v-st, ch 3, v-st, ch 1) in next ch-3 sp, skip 1 dc; repeat from * around, ending last repeat in final 3dc group, join to 3rd ch, turn – 36 v-st, 30 ch-1 sps, 6 ch-3 sps
Each edge should measure 4.5″ across after Round 5.
Round 6: With C, join in any ch-3 sp, ch 4 (counts as dc, ch 1), (dc, ch 3, v-st, ch 1) in same, skip next v-st, *working in ch-1 sp between v-sts, (v-st, ch 1) in each across, skip last v-st, (v-st, ch 3, v-st, ch 1) in next ch-3 sp, skip next v-st; repeat from * to last v-st of round, join to 3rd ch, sl st in each to next ch-3 sp, turn – 42 v-st, 36 ch-1 sps, 6 ch-3 sps
Round 7-18 (18, 22, 26, 26, 26, 26, 26, 26): Repeat Rounds 3-6 a further 3 (3, 4, 5, 5, 5, 5, 5, 5) times, changing colour at the end of each round, continuing the same order of colour changes (or until the edge measures 14” (14”, 18”, 20”, 20”, 20”, 20”, 20”, 20”) ending on a repeat of Round 6 – 132 (132, 162, 192, 192, 192, 192, 192, 192) v-st, 126 (126, 156, 186, 186, 186, 186, 186, 186) ch-1 sps, 6 ch-3 sps
Fasten off, weave ends
Continue to Back Panel once both hexagons are completed
Placing Markers
It is recommended to use different coloured place markers for the front and the back panels. This will help you reposition the cardigan after working the additional panels and avoid confusion.
I used red markers to mark the back panel, a light blue for the front.
If you need to reposition your hexagons, simply pair the back markers to the front markers with the RS facing to create the same layout.
Joining Yarn for Back/Front Panels
It is recommended to create both hexagons before beginning the back panels to ensure you create a left and right panel from the hexagons.
When beginning the left back panel, you should join at * with the sleeve positioned on the left
When beginning the right back panel, you should join at * with the sleeve positioned on the right
Note – if you are crocheting left handed, reverse the sleeve positions.
Back Panel | Granny Hexagon Cardigan
worked in turned rows
With RS facing, PM in top and bottom ch-3 sp of hexagon to mark position of both back panel and front panels – See above for more details about where to join for the back panel
Row 1. WS: With NC, join in 1st marked ch-3 sp, ch 5 (counts as dc, ch 2), skip next v-st, working in ch-1 sp between v-sts, (3dc, ch 1) across to last, ch 1, dc in ch-3 sp, turn – 2 dc, 2 ch-2 sps, 20 (20, 25, 30, 30, 30, 30, 30, 30) 3dc, 20 (20, 25, 30, 30, 30, 30, 30, 30) ch-1 sp
Row 2. RS: With NC, join in last worked ch sp, ch 4, (3dc spike, ch 1) in same as ch-sp as ch 4, skip 3dc, *working in ch-1 sps between stitch groups, (3dc spike, ch 1) in each to last ch-1 sp, (3dc spike, ch 1) in last ch-1 sp, dc in 3rd ch, turn – 2 dc, 21 (21, 26, 31, 31, 31, 31, 31, 31) spike, 22 (22, 27, 32, 32, 32, 32, 32, 32) ch-1 sp
XS, M, L: FO. Repeat for 2nd panel. Continue to Seaming Back & Shoulders.
S, XL, 2XL, 3XL, 4XL, 5XL: Continue to Row 3
Row 3: With NC, join in last worked ch-sp, ch 4, (dc, ch 1) in same, skip 1 dc, [v-st in middle dc of next 3dc group, ch 1, skip 2 dc] across to last 3dc group, skip [dc, ch-1 sp], dc in 4th ch of tc, turn – 1 dc, x (22, x, x, 32, 32, 32, 32, 32) v-st, x (22, x, x, 32, 32, 32, 32, 32) ch-1 sp
S, XL: FO. Repeat for 2nd panel. Continue to Seaming Back & Shoulders.
2XL, 3XL, 4XL, 5XL: Continue to Row 4.
Row 4: With NC, join in last worked ch-sp, ch 4, working in ch-1 sp between v-st, skip next v-st, (v-st, ch 1) in each sp across to last, dc in ch-3 of tc, turn – 2 dc, x (x, x, x, x, 31, 31, 31, 31) v-st, x (x, x, x, x, 32, 32, 32, 32) ch-1 sp
2XL: FO. Repeat for 2nd panel. Continue to Front Rows.
3XL, 4XL, 5XL: Continue to Rows 5-6.
Row 5: With NC, join in last worked ch-sp, ch 4 (counts as dc, ch 1), skip next v-st, working in ch-1 sp between v-sts, (v-st, ch 1), skip next v-st, (3dc, ch 1) across to last ch-1 sp before ch-3 sp, (v-st, ch 1) in last, dc in ch-3 sp, turn – 2 dc, 1 v-st, x (x, x, x, x, x, 31, 31, 31) 3dc, x (x, x, x, x, x, 32, 32, 32) ch-1 sp
Row 6: Repeat Row 2 – 2 dc, x (x, x, x, x, x, 32, 32, 32) spike, x (x, x, x, x, x, 32, 32, 32) ch-1 sp
3XL: FO. Repeat for 2nd panel. Continue to Front Rows.
4XL, 5XL: Continue to Row 7.
Row 7: Repeat Row 3 – 1 dc, x (x, x, x, x, x, x, 33, 33) v-st, x (x, x, x, x, x, x, 33, 33) ch-1 sp
4XL: FO. Repeat for 2nd panel. Continue to Front Rows.
5XL: continue to Row 8.
Row 8: Repeat Row 4 – 2 dc, x (x, x, x, x, x, x, x, 32) v-st, x (x, x, x, x, x, x, x, 33) ch-1 sp
FO. Repeat for 2nd panel. Continue to Front Rows.
Front Panel | Granny Hexagon Cardigan
worked in turned rows
For sizes 2XL, 3XL, 4XL, 5XL only – note numbering change
With RS facing, lay both hexagons in cardigan shape, ensuring back panel is to the rear, PM in top and bottom ch-3 sp on front of hexagon to mark front panel.
Row 1. WS: With NC, join in 1st marked ch-3 sp, ch 4 (counts as dc, ch 1), skip next v-st, working in ch-1 sp between v-sts, (3dc, ch-1) across to last ch-1 sp before ch-3 sp, (v-st, ch 1) in last, dc in ch-3 sp, turn – 2 dc, 2 ch-2 sps, 30 (30, 30, 30) 3dc, 30 (30, 30, 30) ch-1 sp
Row 2. RS: With NC, join in last worked ch-sp, ch 5 (counts as dc, ch 2), skip v-st, *working in ch-1 sps between stitch groups, (3dc spike, ch 1) in each to last ch-1 sp, (3dc spike, ch 2) in last ch-1 sp, dc in 3rd ch, turn – 2 dc, 31 (31, 31, 31) spike, 32 (32, 32, 32) ch-1 sp
2XL, 3XL: FO. Repeat for 2nd panel.
Continue to Seaming Back & Shoulders.
4XL, 5XL: Continue to Row 3.
Row 3: With NC, join in last worked ch-sp, ch 4, (dc, ch 1) in same, skip 1 dc, [v-st in middle dc of next 3dc group, ch 1, skip 2 dc] across to last 3dc group, skip [dc, ch-1 sp], dc in 4th ch of tc, turn – 1 dc, x (x, 32, 32) v-st, x (x, 32, 32) ch-1 sp
Row 4: With NC, join in last worked ch-sp, ch 4, working in ch-1 sp between v-st, skip next v-st, (v-st, ch 1) in each sp across to last, dc in ch-3 of tc, turn – 2 dc, x (x, 31, 31) v-st, x (x, 32, 32) ch-1 sps
Row 5: With NC, join in last worked ch-sp, ch 4 (counts as dc, ch 1), skip next v-st, working in ch-1 sp between v-sts, (v-st, ch 1), skip next v-st, (3dc, ch 1) across to last ch-1 sp before ch-3 sp, (v-st, ch 1) in last, dc in ch-3 sp, turn – 2 dc, 1 v-st, x (x, 31, 31) 3dc, x (x, 32, 32) ch-1 sp
FO. Repeat for 2nd panel
Continue to Seaming Back & Shoulders
Seaming Back & Shoulders
Seam back – Arrange both Back Panel edges together, with RS facing:
- Place slip knot on hook, join in top edge ch-3 corner of Back Panel edge, inserting hook from front (RS) through the back loop of 2nd ch
- Insert hook into the back loop of 2nd ch of the other Back Panel top edge ch-3 corner, inserting hook from front (RS) (3 loops on hook)
- Yarn over with working yarn, pull through both corner ch and loop on hook to slip stitch and join
- Repeat sl st across by inserting hook through next st on first panel from RS, then inserting hook through next st on other back panel, sl st through both
- Continue sl st to end
Fasten off, weave ends, continue to Shoulder Seaming
Shoulder Seaming
- Place slip knot on hook, join in arm edge ch-3 corner, inserting hook from front (RS) through the back loop of 2nd ch
- Insert hook into the back loop of 2nd ch of the other arm edge ch-3 sp, inserting hook from front (RS) (3 loops on hook)
- Yarn over with working yarn, pull through both corner ch and loop on hook to slip stitch and join
- Repeat sl st by inserting hook through next st on first arm panel worked from RS, then inserting hook through next st on other arm panel then sl st through both to end of arm panel
- Repeat across to end of Front Panel
Adding Length | Granny Hexagon Cardigan
worked in turned rows
Row 1. WS: With NC, in bottom ch-3 corner of front edge, join in 1st marked ch-3 sp, ch 5 (counts as dc, ch 2), skip next v-st, working in ch-1 sp between v-sts, (3dc, ch 1) across to last, ch 1, dc in ch-3 sp, turn – 2 dc, 2 ch-2 sp, 44 (44, 54, 64, 64, 64, 64, 64, 64) 3dc, 43 (43, 53, 63, 63, 63, 63, 63, 63) ch-1 sp
Note for Row 1 – to work across back panel row ends, count the number of back panel rows created, multiple by 2, e.g. 6 Rows x 2 = 12. Divide by 4 = 3 3dc to be worked, 1 additional 3dc should be worked into the joining seam
Row 2. RS: With NC, join in last worked ch sp, ch 4, dc in same, (3dc spike, ch 1) in ch-2 sp, skip 3dc, *working in ch-1 sps between stitch groups, (3dc spike, ch 1) in each to last ch-1 sp, (3dc spike, ch 1) in last ch-2 sp, dc in 3rd ch, turn – 2 dc, 2 ch-2 sps, 44 (44, 54, 64, 64, 64, 64, 64, 64) 3dc spike, 43 (43, 53, 63, 63, 63, 63, 63, 63) ch-1 sp
Note for Row 2 – work long dc into Row ends when working across row ends
Row 3: With NC, join in last worked ch-sp, ch 4, (dc, ch 1) in same, skip 1 dc, [v-st in middle dc of next 3dc group, ch 1, skip 2 dc] across to last, (dc, ch 1, dc) in 3rd ch of tc, turn – 46 (46, 56, 66, 66, 66, 66, 66, 66) v- st, 45 (45, 55, 65, 65, 65, 65, 65, 65) ch-1 sp
Row 4: With NC, join in last worked ch-sp, ch 4, working in ch-1 sp between v-st, skip next v-st, (v-st, ch 1) in each sp across to last, dc in 3rd ch of tc, turn – 2 dc, 44 (44, 54, 64, 64, 64, 64, 64, 64) v-st, 45 (45, 55, 65, 65, 65, 65, 65, 65) ch-1 sp
Row 5: With NC, join in last worked ch-sp, ch 5 (counts as dc, ch 2), skip next v-st, working in ch-1 sp between v-sts, (3dc, ch 1) across to last, ch 1, dc in ch-3 sp, turn- 2 dc, 2 ch-2 sp, 44 (44, 54, 64, 64, 64, 64, 64, 64) 3dc,
43 (43, 53, 63, 63, 63, 63, 63, 63) ch-1 sp
Continue to repeat Rows 2-5 until desired length achieved
FO, weave ends
Continue to edging
Edging | Granny Hexagon Cardigan
Row 1: With RS facing, join in bottom edge corner, ch 1, sc evenly across row ends, working 2 sc across each row end, to ch-3 sp, sc in ch-3 sp, sc in each stitch across to last st before neck opening, sc3tog beginning in last st on side panel, working in shoulder seam and first stitch of neck opening, rotate to work across neck opening, sc in each st across to last in neck opening, sc3tog beginning in last st of neck opening, working in seam and first st of side panel, rotate to work down side panel, sc in each across to next ch-3 sp, sc in ch-3 sp, sc evenly across row ends, working 2 sc across each row end, to end
FO, weave ends.
Continue to Sleeve Edging
Optional – Sleeve Edging
Round 1: Join in shoulder seam, ch 1, sc in each st around, join, FO
Repeat for other sleeve.
Weave all ends.

Purchase the Printable Pattern
Go ad-free, by purchasing the printable pattern from your favourite crochet pattern retailer. Simply click the button below and purchase for an instant download.
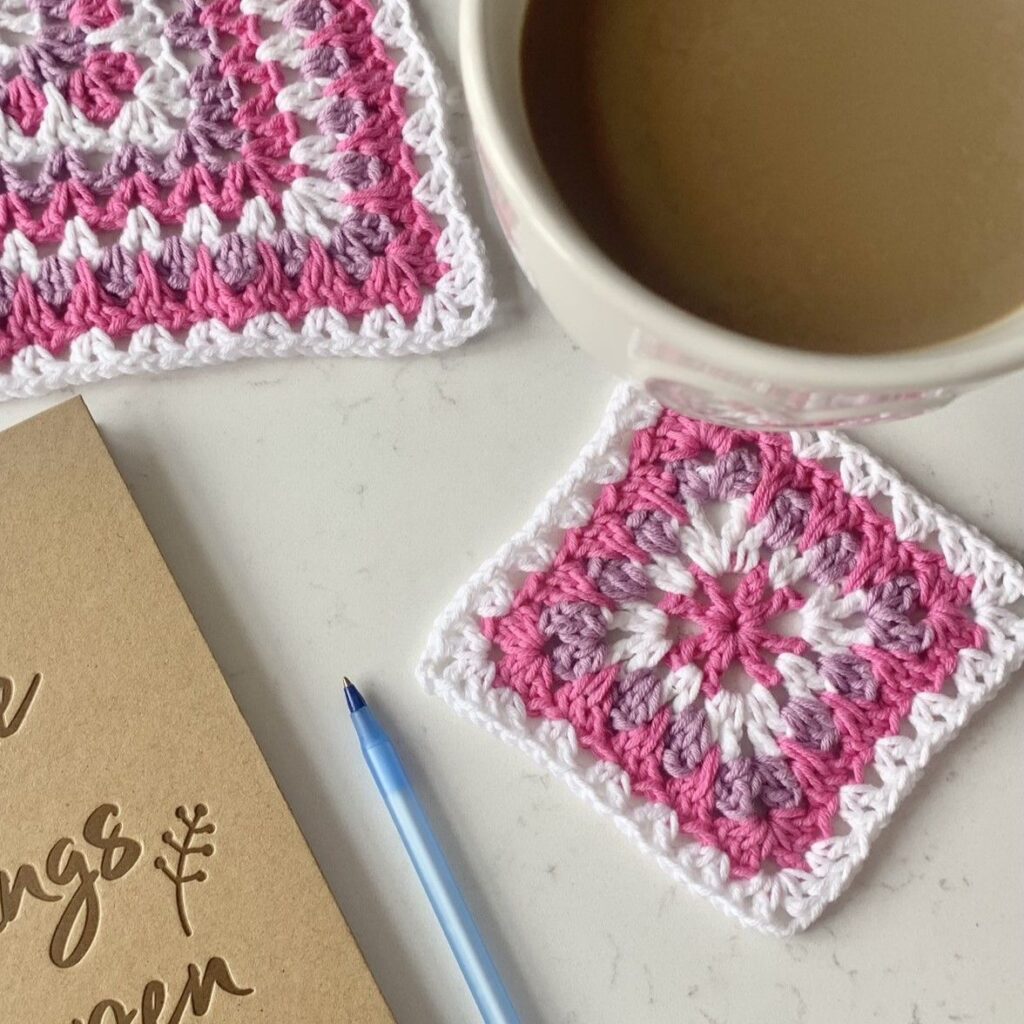
Looking to Add a pocket?
The Strawberry Sundae stitch pattern used to create this granny hexagon cardigan pattern has also been used in a square coaster, which is idea to use to create pockets for your cardigan. Click here to stitch up a couple of pockets for your cardigan


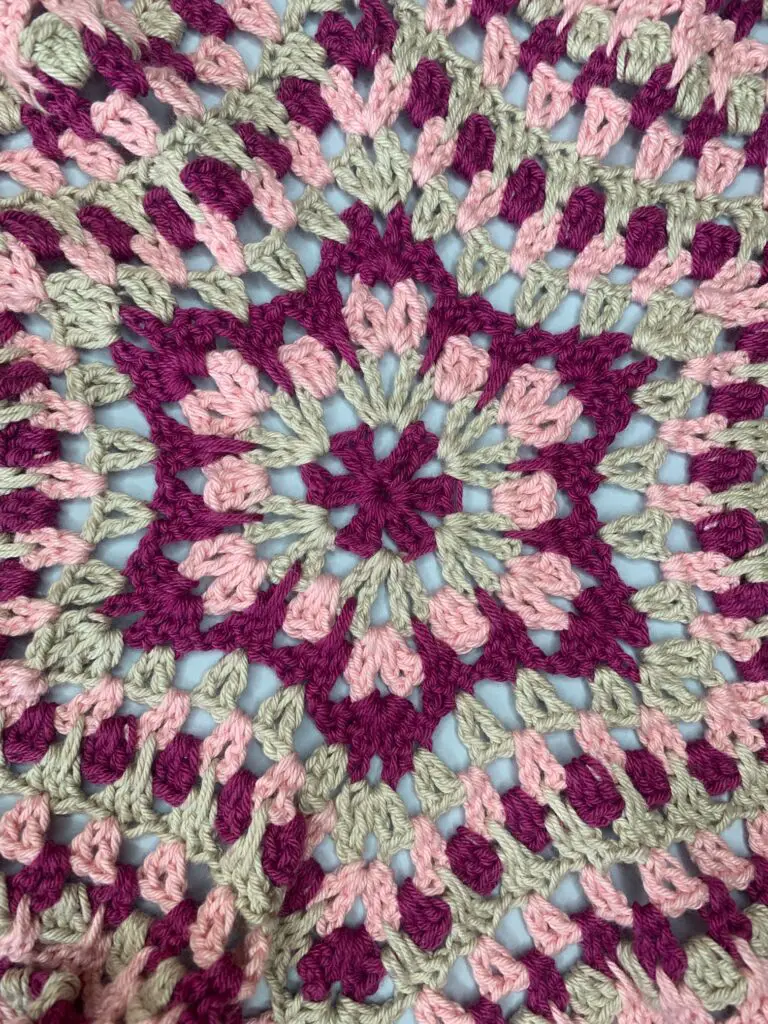
There is a picture of a granny sdquare style star in this pattern. Is there a pattern for the star, it’s beautiful!
Hi Deborah, the picture is showing the centre of the hexagon which can be created by working the first 5 rounds. I have another granny star pattern that you can find here