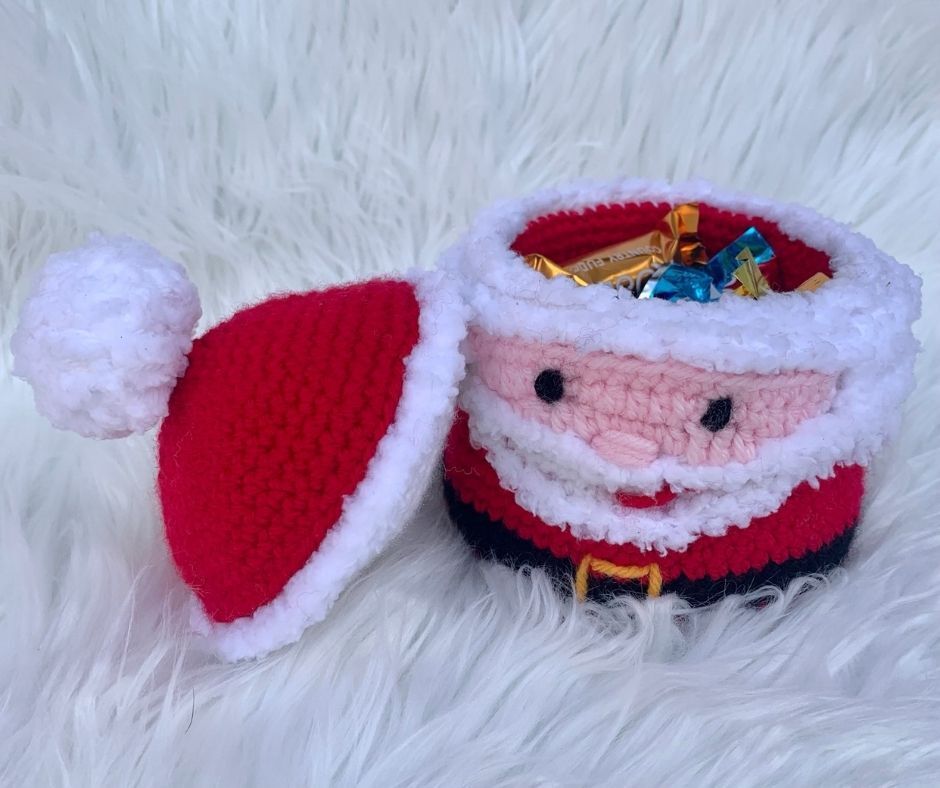
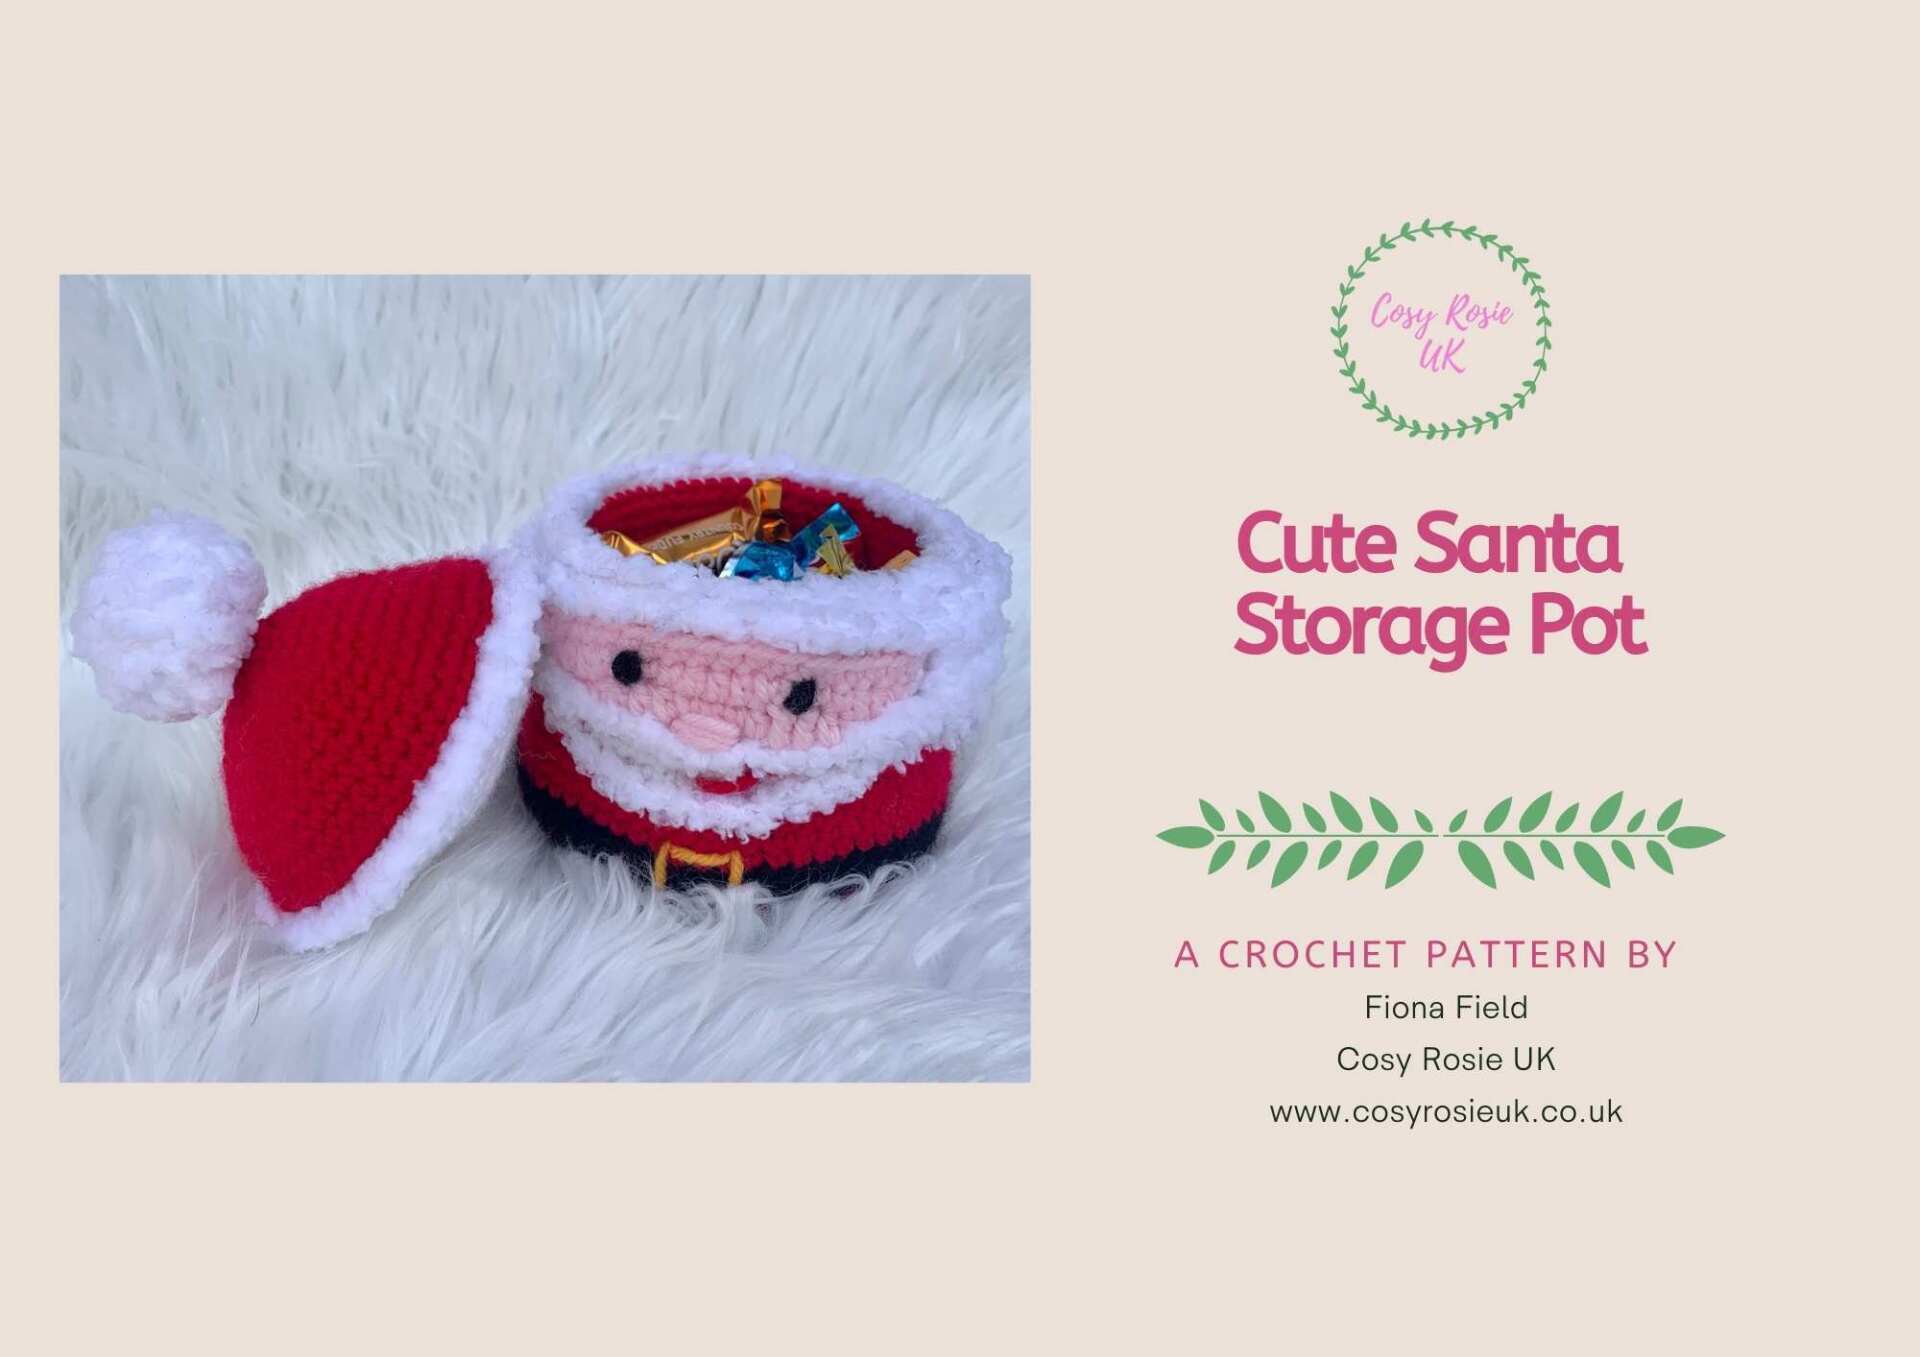
Crochet Santa Gift Basket with Lid
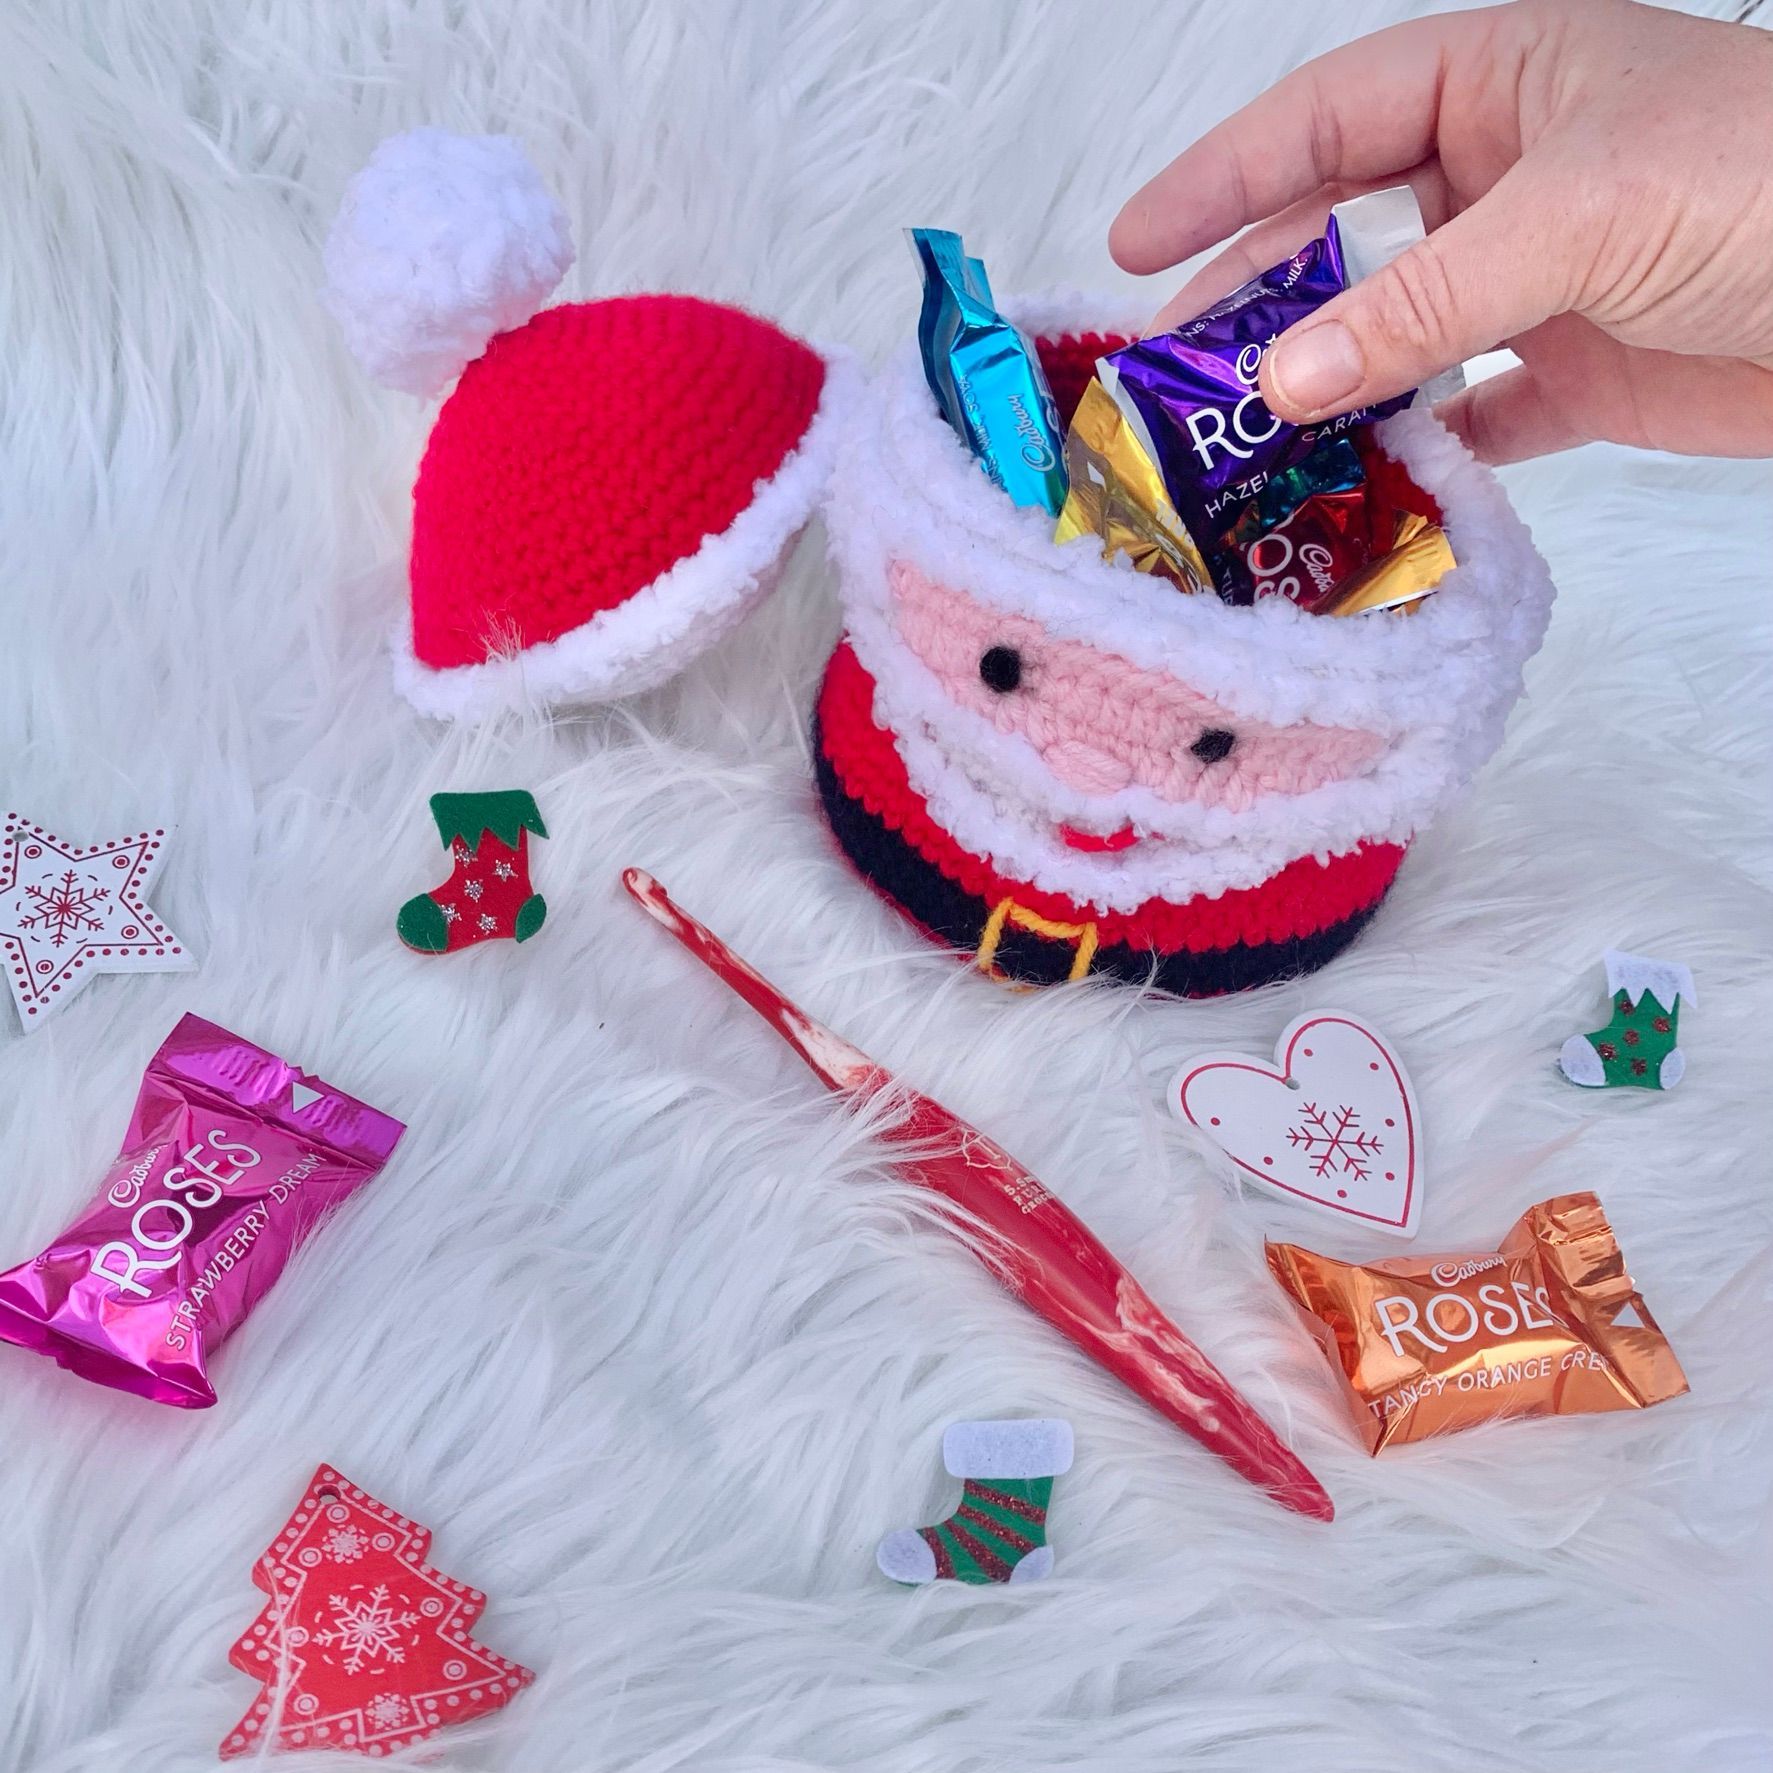
You can crochet this cute Santa gift basket with a lid with this free crochet Santa basket pattern. Craft the perfect gift basket for those Santa lovers and fill with their favourite candy and treats, or you can use it as a Christmas table decoration for years to come – you know the ones, you get out every year with fond memories!
Please note that some of the links in my blog are affiliate links. I may earn a small commission if you purchase via these links, but the price you pay is not affected
Crochet Santa Gift Basket with Lid | Free Crochet Patterns
If you’re a Christmas lover like me, the big gift giver himself, will feature throughout your gift giving and decorations! I seem to always be on the look out for Santa’s with a happy face!
I wanted to create a pattern that would help me gift those secret Santa gifts in my own way! When we are issued that low value to spend, our love of crochet comes into its own! I’m pretty certain the rules of Secret Santa don’t prohibit handmade!
Whether you are gifting anonymously, or looking for create a cute stocking filler, this crochet Santa gift basket will allow you to create a handmade gift alongside your gift!
This little basket can hold more than you think! I fit a whole carton of Cadbury Roses inside my pot, with room to spare! Obviously, as soon as I’d taken the pictures, I treated myself to the caramel barrels – my favourite!
You can fill your gift basket with anything from nail varnishes, mini yarn skeins, toy cars, LOL surprise balls and many, many more! Like many things, when it comes to gift wrapping, your imagination is your own limitation!
There is something special about crafting a gift, but there are some people who we want to include our handmade with love makes, alongside something we know they will enjoy – this Crochet Santa Gift Basket is the perfect way to wrap those gifts with extra love!
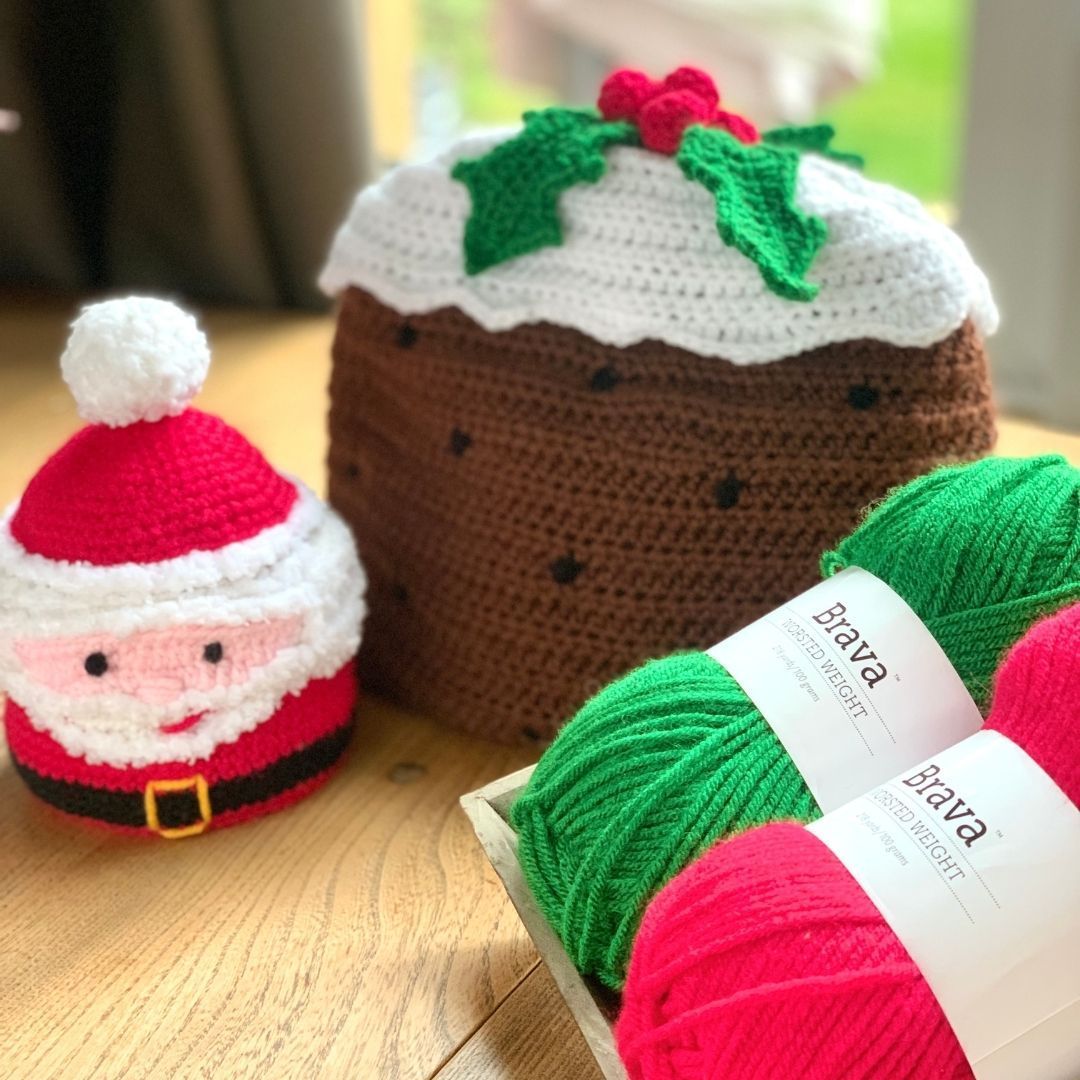
Plus, it can be used for years to come! My own Santa basket is now used on the Christmas breakfast table! We know that Santa is tired after working throughout the night, so my little tribute is to theme my breakfast table with all things Santa!
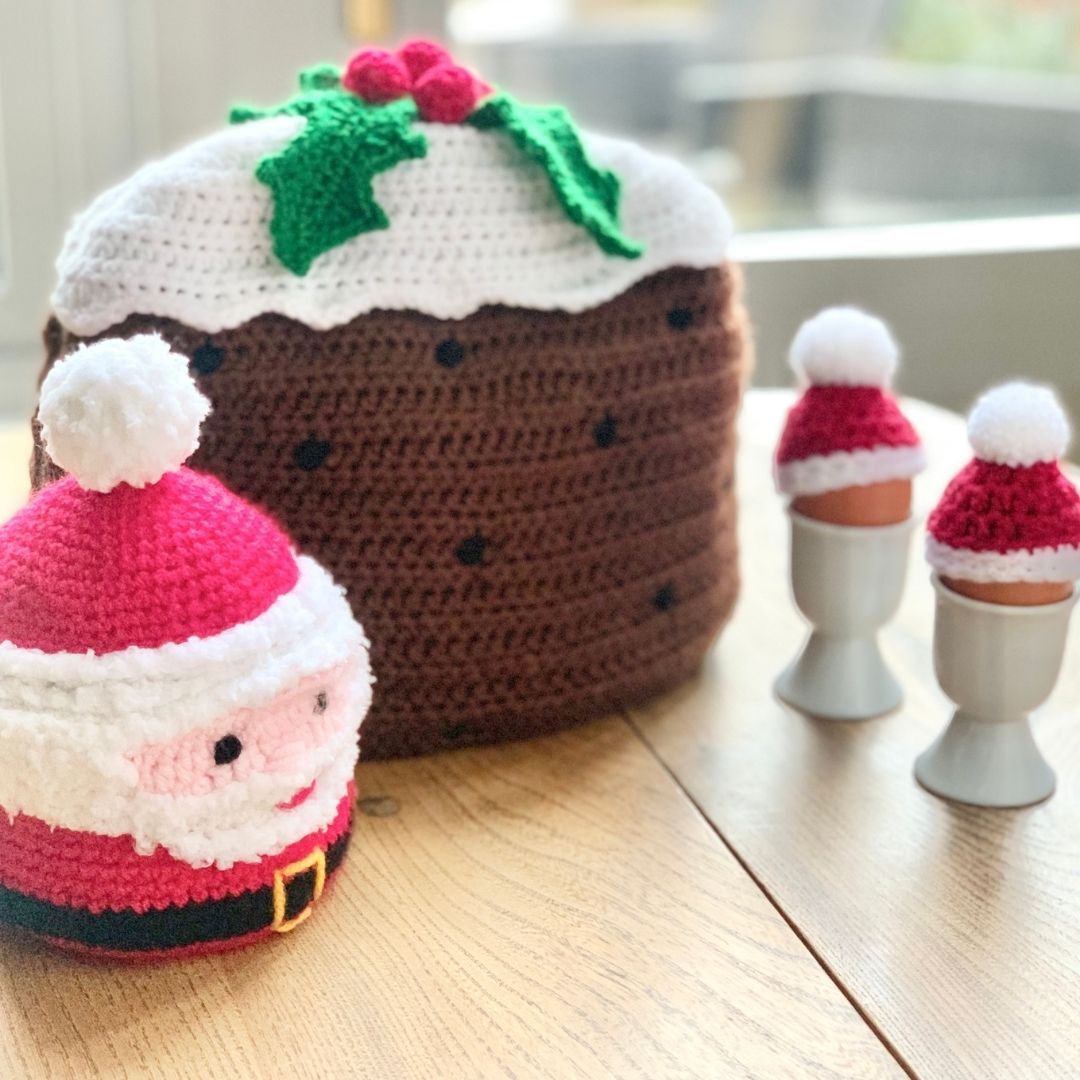
Find the corresponding crochet patterns to make your own Christmas Breakfast Set here:
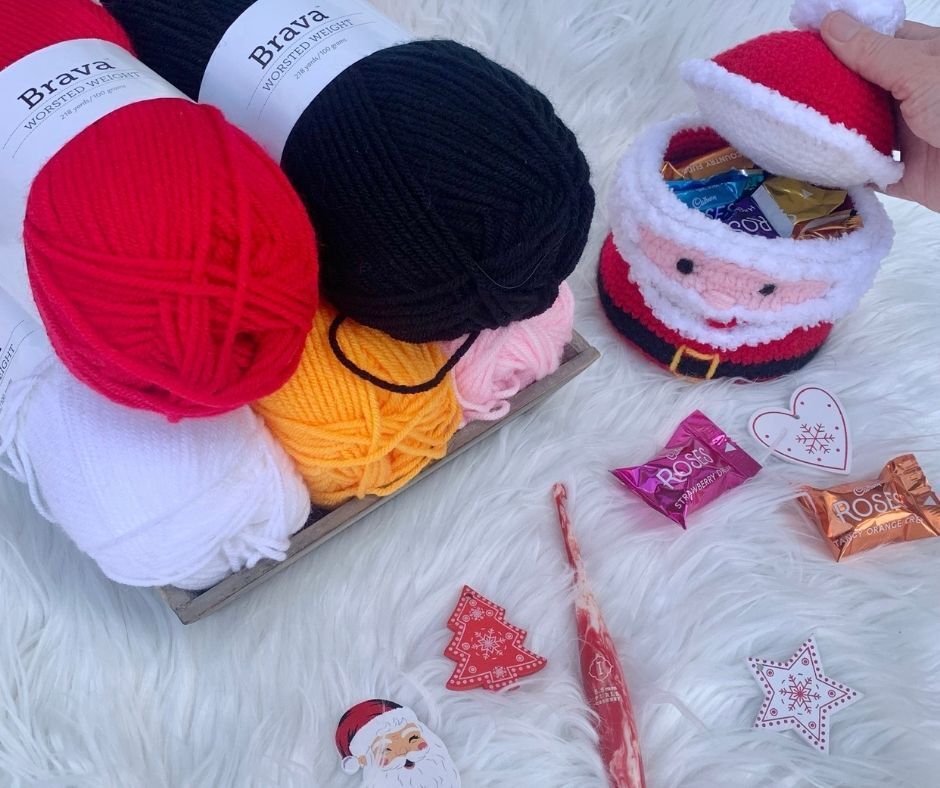
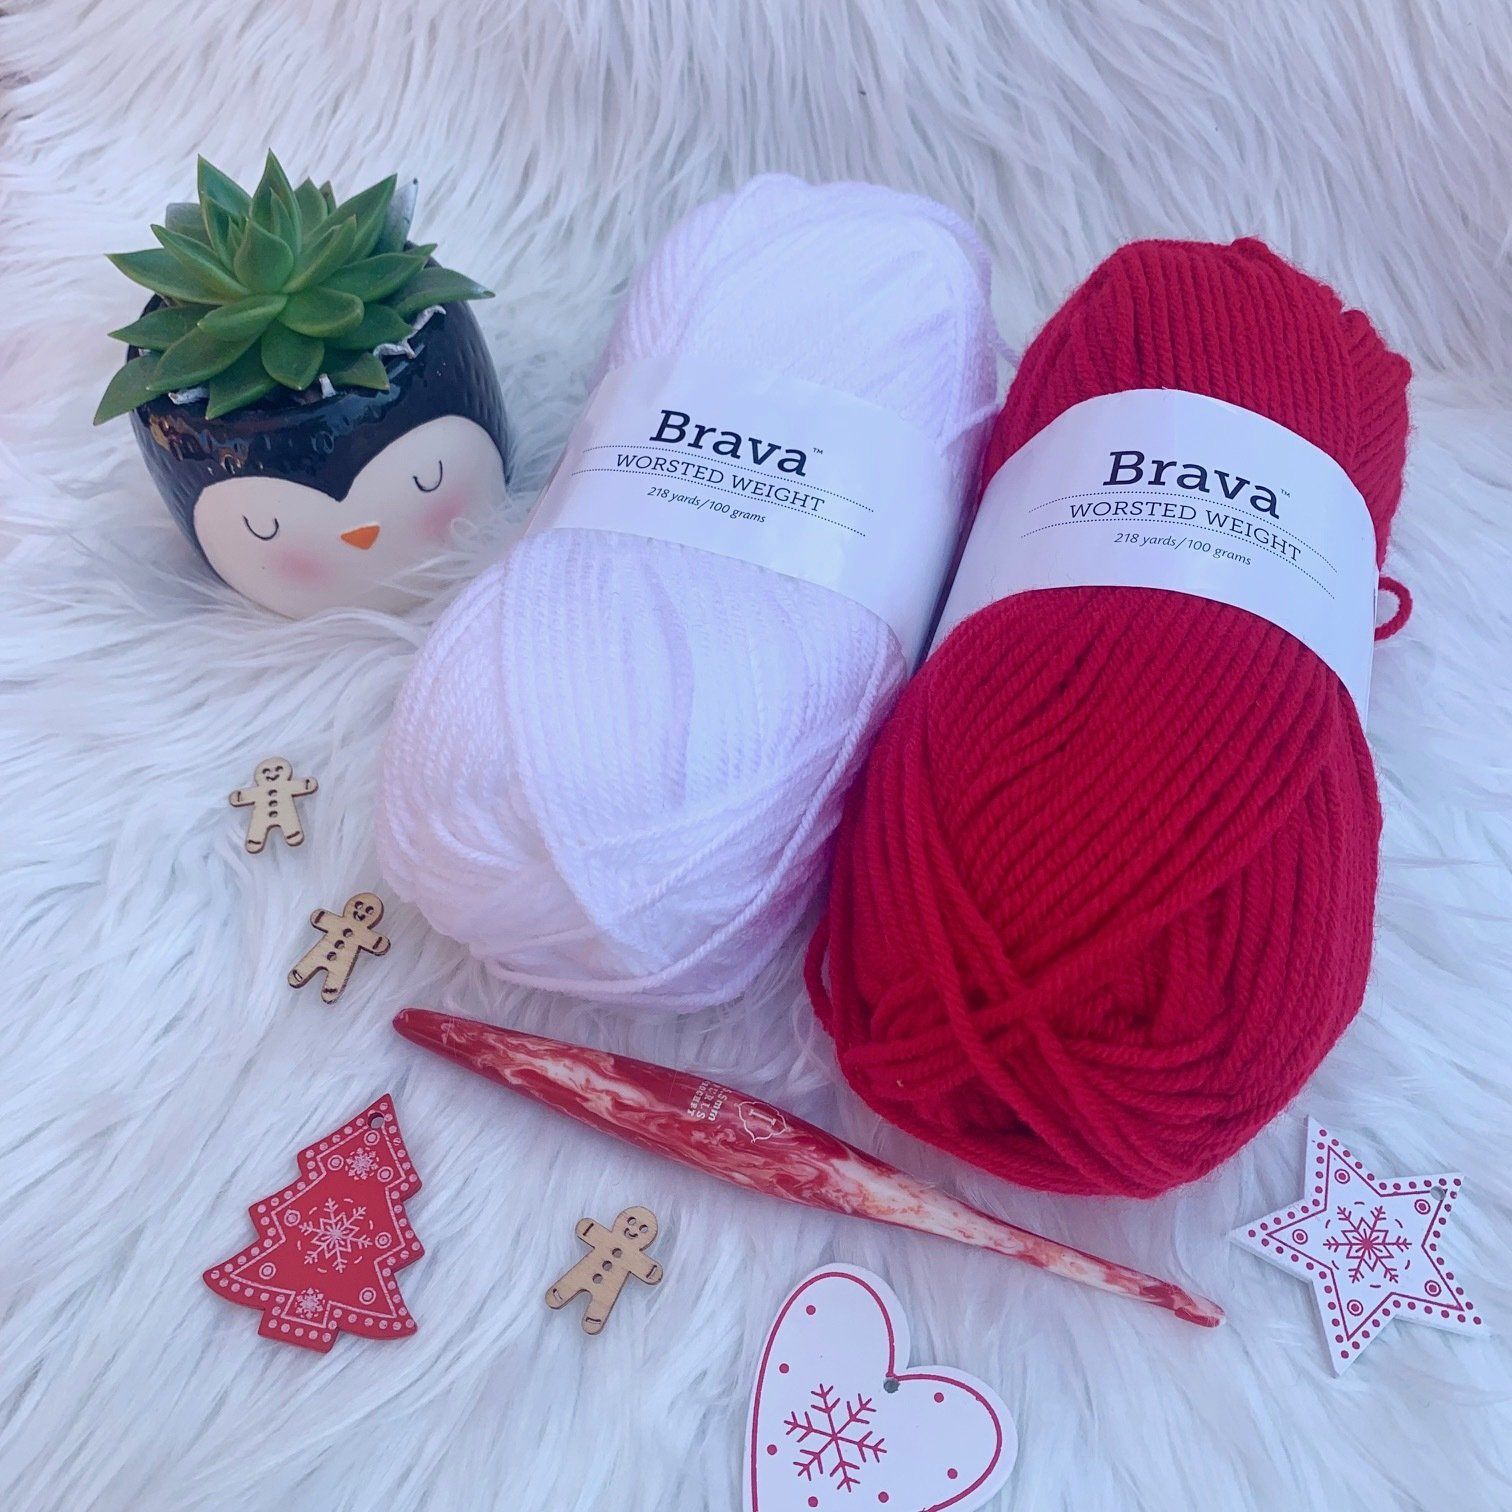
The yarn I used in this project was kindly provided by We Crochet.
This was my first time working with Brava Worsted and I was really, super impressed with the quality of this yarn when you consider the price bracket – it’s so well priced!
Purchase the Printable PDF Pattern
You can download your own printable PDF copy of the Crochet Santa Gift Basket from either my Etsy Shop or Ravelry Shop. Click the button below to purchase from your favourite retailer.
Cute Santa Storage Pot | Free Pattern Details
Skill Level: Advanced Beginner
Materials:
- Brava Worsted Weight Yarn (100% Acrylic – 218yds/100g) in the following 5 shares:
- A – Red – 150m
- B – Blush – 20m
- C – Black – 10m
- D – White – 75m
- E – Caution – 30cm
- Optional – to make Santa’s Beard Fluffy
- Sirdar Snuggly Snowflake Chunky (100% Polyester, 25g 68yds) – 17m
- 4mm Crochet Hook
- scissors
- Tapestry needle
CLICK HERE TO GET YOUR YARN FROM WECROCHET
Abbreviations – US Terms
St(s) – Stitch(es)
Ch – Chain
Sl st – Slip stitch
sc – single crochet
sc2tog – single crochet decrease
hdc – half double crochet
hdc2Tog – half double crochet decrease
dc – Double crochet
BLO – work into the back loop only
MC – Magic circle
Pattern Notes
- Whatever your skill level with crochet, it’s recommended to read through this pattern before beginning. Get in touch if you need any help completing the pattern on [email protected].
- This pattern is worked in 2 pieces; Lid and Base which are both worked in the round.
- The eyes, nose and mouth are embroidered onto the pot and the optional fluffy element is worked through the front loop using the surface crochet technique.
- Beginning ch-1 does NOT count as stitch.
Finished Size:
- 3.5″ deep, 4″ across the base, 6.5″ tall (including pompom)
Gauge:
- Gauge is not essential, but a consistent tension is recommended
Colour Work:
It’s recommend to use intarsia style colour work for this project.
Colour changes should be made in the stitch before the colour change is required, by completing the last stitch in the new colour.
You do not need to carry the non working yarn.
There is no need to cut or fasten off the yarn, simply leave the unworked yarn at the last worked stitch and pick it up when needed, ensuring there is no pulling or tension on the yarn to work it in the rest of the round.
Example – Round 17, 30th Stitch
- Insert hook in 30th stitch
- In original colour (Red), Yarn over, bring up a loop
- Change to White
- Yarn over, pull through 2 loops
- Continue working next stitch in the new colour
Base | Crochet Santa Gift Basket
Base
Round 1: With A, MC (or chain 4, slip stitch to the 1st chain made to create a ring) 6 sc into the centre of the ring, sl st to 1st sc to join – 6 sc
Round 2: Ch 1 (does not count), 2 sc in same as ch 1 and each around, join – 12 sc
Round 3: Ch 1, *sc, 2 sc in next*; repeat between * and * to end, join – 18 sc
Round 4: Ch 1, *sc in next 2, 2 sc in next*; repeat between * and * to end, join 24 sc
Round 5: Ch 1, *sc in next 3, 2 sc in next*; repeat between * and * to end, join – 30 sc
Round 6: Ch 1, *sc in next 4, 2sc in next*; repeat between * and * to end, join – 36 sc
Round 7: Ch 1, *sc in next 5, 2sc in next*; repeat between * and * to end, join – 42 sc
Round 8: Ch 1, sc in next 3, *2 sc in next, sc in next 6*, repeat between * and * to end, join – 48 sc
Round 9: Ch 1, *sc in next 7, 2 sc into next*; repeat between * and * to end, join – 54 sc
Round 10: Ch 1, sc in next 4, *2sc in next, sc in next 8*, repeat between * and * to end, join – 60 sc
Round 11: Ch 1, *sc in next 9, 2 sc into next*, repeat between * and * to end, join – 66 sc
Round 12: Ch 1, working in BLO, sc each around, join – 66 sc
Rounds 13-14: With C, ch 1, sc in each around, join.
Rounds 15-16: With A, ch 1, sc in each around, join.
Round 17: Ch 1, sc in next 30, with D, working in BLO, sc in next 5, with A, sc in each to end, join.
Round 18: Ch 1, sc in next 27, with D, working in BLO, sc in next 5, with A, sc in each to end, join.
Round 19: Ch 1, sc in next 25, with D, sc in BLO of next 15, with A, sc in each to end, join.
Round 20: With D, ch 1, working into BLO around, sc in next 31, hdc in next, dc in next, hdc in next, sc in each to end, join.
Round 21: Continuing with D, working in BLO, ch 1, sc in next 25, working through both loops of stitch, with B, sc in next 2, hdc in next, dc in next 2, hdc in next, sc in next 3, hdc in next, dc in next 2, hdc, sc in next 2, with D, working in BLO, sc in each to end, join.
Round 22: Ch 1, working in BLO, hdc in next 24, with B, working through both loops of stitch, dc in next 3, sc in next 11, hdc in next 3, with D, working in BLO, hdc in each to end, join.
Round 23: Ch 1, working in BLO, sc next 24, with B, working through both loops of stitch, sc in next 17, with D, working in BLO, sc in each to end, join.
Round 24: Ch 1, working in BLO, sc in each around, join.
Rounds 25-26: With A, ch 1, working in BLO, sc in each around, join.
Round 27: Ch 1, skip st under ch, sc in each remaining st around, join – 65 sc
Round 28: Repeat Round 27. 64 sc
Rounds 29-37: Ch 1, sc in each around, join.
Fasten off after Round 37. Weave ends. Fold at row 25 and tuck inside.
Continue to Face.
Face | Crochet Santa Gift Basket
Santa’s Eyes
- Thread the darning needle with black yarn
- Bring needle through wrong through top of sc in Round 22, above the 2 dc in Round 21
- Insert the needle through top of dc in Round 21
- Repeat sewing in same, 3 times, to create an eye.
- Repeat for second eye
- Fasten off and secure ends


Santa’s Nose
- Thread the darning needle with pink
- Bring needle through from wrong side, at the start of the 3 taller stitches (hdc, dc, hdc) in Round 20
- Insert needed back to wrong side through last hdc, to cover the 3 taller stithes
- Sew over the group of stitches 4 times to create his nose
- Fasten off and secure ends


Santa’s Jaunty Smile
- Thread the darning needle with red yarn
- Bring needle through from wrong side, 1 row, and 1 stitch lower than corner of nose
- Insert needle through stitch 2 rows down from middle of nose, bring needle from back to come out through sc 1 row above the top of the mouth
- ReiInsert needle 2 rows down, through the middle of the sc
- Repeat positioning for the bottom of the smile
- Fasten off and secure ends.
Continue to Buckle and Beard
Belt and Buckle | Crochet Santa Gift Basket
Santa’s Belt Buckle
- Thread needle with orange yarn
- Bring needle through from wrong side, inline with edge of nose, above the row of black
- Skip 3 sts, insert needle to create top of belt
- Repeat to create base of belt
- Bring needle through wrong side through edge of belt top, skip 2 rows of black, to insert needle and create side of belt
- Repeat for other side of belt.
- Fasten off and secure ends.

Adding Santa’s Beard and Hair | Crochet Santa Gift Basket
Round 1: Join in unworked front loop in Row 20 (as photo), ch 1, using surface crochet to work through unworked front loops, sl st in each unworked loop of D, to beginning of pink face area, working down Rows 17-19, across the base of the beard, continue to sl st in each unworked loop, working up Rows 17-19, sl st in each to edge of pink face area, sl st in each remaining unworked loop of Row 20, join.
Round 2: Ch 1, working through unworked front loops, sl st through each on Row 21, working across under the nose round to end, join.
Row 3: Ch 1, working through unworked front loops, sl st through unworked front loops of Round 21 to start of pink face, turn.
Rows 4-5: Ch 1, working through unworked front loops of next row, sl st in each unworked loop to other side of pink face, turn.
Round 6: Ch 1, working through unworked front loops of next row, sl st through each unworked loop around to end of Round 24 to end, join.
Fasten off and weave in ends.
Continue to Pompom.
Pompom | Crochet Santa Gift Basket
Pompom
Choose from a traditional yarn pompom or create a ball using the optional Snuggly Snowflake and 5mm hook, or hold 2 strands of White together.
Round 1: Make MC (or ch 4, sl st to 1st to create ring), ch 1, 8 hdc in centre of ring, join – 8 hdc.
Round 2: Ch 1 (does not count), 2 hdc in each around, join – 16 hdc.
Round 3: Ch 1, hdc2tog in each around, join, stuff firmly with fibre fill, fasten off with long tail. Using tail, weave through each st to close,
Fasten off, weave remaining ends.
Continue to Lid
Lid | Crochet Santa Gift Basket
Round 1: With A, MC (or chain 4, slip stitch to the 1st chain made to create a ring) 6 sc into the centre of the ring, sl st to 1st sc to join – 6 sc
Round 2: Ch 1 (does not count), 2 sc in same as ch 1 and each around, join – 12 sc
Round 3: Ch 1, *sc, 2 sc in next*; repeat between * and * to end, join – 18 sc
Round 4: Ch 1, *sc in next 2, 2 sc in next*; repeat between * and * to end, join 24 sc
Round 5: Ch 1, *sc in next 3, 2 sc in next*; repeat between * and * to end, join – 30 sc
Round 6: Ch 1, *sc in next 4, 2sc in next*; repeat between * and * to end, join – 36 sc
Round 7: Ch 1, sc in each around, join – 36 sc
Round 8: Ch 1, *sc in next 5, 2sc in next*; repeat between * and * to end, join – 42 sc
Round 9: Ch 1, sc in each around, join – 42 sc
Round 10: Ch 1, sc in next 3, *2 sc in next, sc in next 6*, repeat between * and * to end, join – 48 sc
Round 11: Ch 1, *sc in next 7, 2 sc into next*; repeat between * and * to end, join – 54 sc
Round 12: Ch 1, sc in each around, join – 54 sc
Round 13: Ch 1, sc in next 4, *2sc in next, sc in next 8*, repeat between * and * to end, join – 60 sc
Round 14: Ch 1, *sc in next 9, 2 sc into next*, repeat between * and * to end, join – 66 sc
Attach Pompom through Round 1, with RS facing.
Round 15: With D, ch 1, working in BLO, sc in each around, join – 66 sc
Round 16: Ch 1, *sc in next 9 sts, sc2tog across next 2 sts*, repeat between * and * to end, join – 60 sc
Round 17: Ch 1, sc in next 4 sts, *sc2tog across next 2 sts, sc in next 8 sts*, repeat between * and * to end, join – 54 sc
Round 18: Ch 1, *sc in next 7 sts, sc2tog across next 2 sts*, repeat between * and * to end, join – 48 sc
Round 19: Ch 1, *sc in next 6 sts, sc2tog across next 2 sts*, repeat between * and * to end, join – 42 sc
Round 20: Ch 1, *sc in next 5 sts, sc2tog across next 2 sts*, repeat between * and * to end, join – 36 sc
Round 21: Ch 1, *sc in next 4 sts, sc2tog across next 2 sts*, repeat between * and * to end, join, – 30 sc
Round 22: Ch 1 *sc in next 3 sts, sc2tog across next 2 sts*, repeat between * and * to end, join – 24 sc
Round 23: Ch 1, *sc in next 2 sts, sc2tog across next 2 sts*, repeat between * and * to end, join – 18 sc
Round 24: Ch 1, *sc in next, sc2tog across next 2 sts*, repeat between * and * to end, join – 12 sc
Stuff lid with fiber fill.
Round 25: Ch 1, sc2tog around, join – 6 sc
Fasten off with long tail.
Use tail to weave through each st to close.
Weave in remaining ends.
Made it? | Santa Gift Basket
Why not share your success with me and the community group? Click here to join, snap a picture and let us celebrate your success!
To get your copy of this beautiful Crochet Santa Gift Basket pattern, you can click on the button below to purchase via your favourite retailer.
If you’re a fan of crochet Christmas Patterns, why not check out these other crochet patterns: