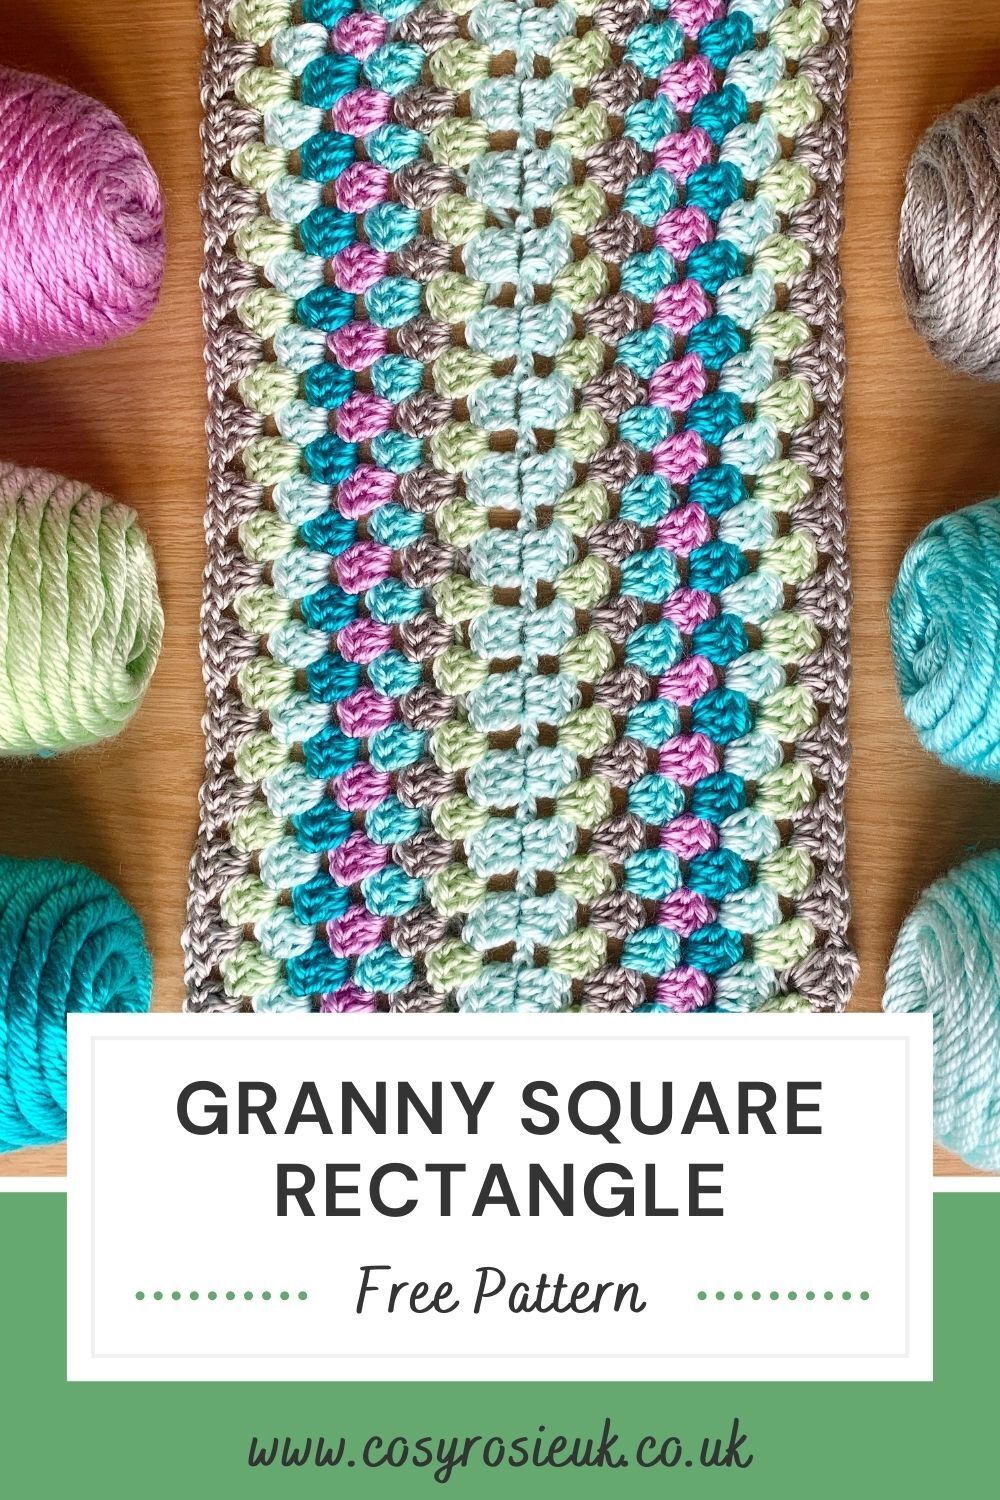
Free Granny Square Rectangle Pattern
Feeling a little bored of crocheting granny squares? Why not make a granny rectangle instead?! Below, you’ll find the written pattern for a rectangle granny square and you’ll learn how long your starting chain should be to make any size crochet rectangle blanket in the round.
I’m not aware of anyone with a square bed or sofa so, the granny rectangle is the perfect choice to create beautiful, snuggly blankets, using the same crochet stitch as the basic granny square (3Tr Cluster).There is also a video to crochet along too the written crochet Granny Rectangle Table Runner pattern below.

Working in Rounds to Create a Rectangle!
It’s all about the way we start the granny square crochet project that makes it a rectangle! The Granny Rectangle starts with a long chain which gives your blanket the correct length and width to form a rectangle. Just like the basic granny square, the rectangular granny square is worked in continuous rounds.
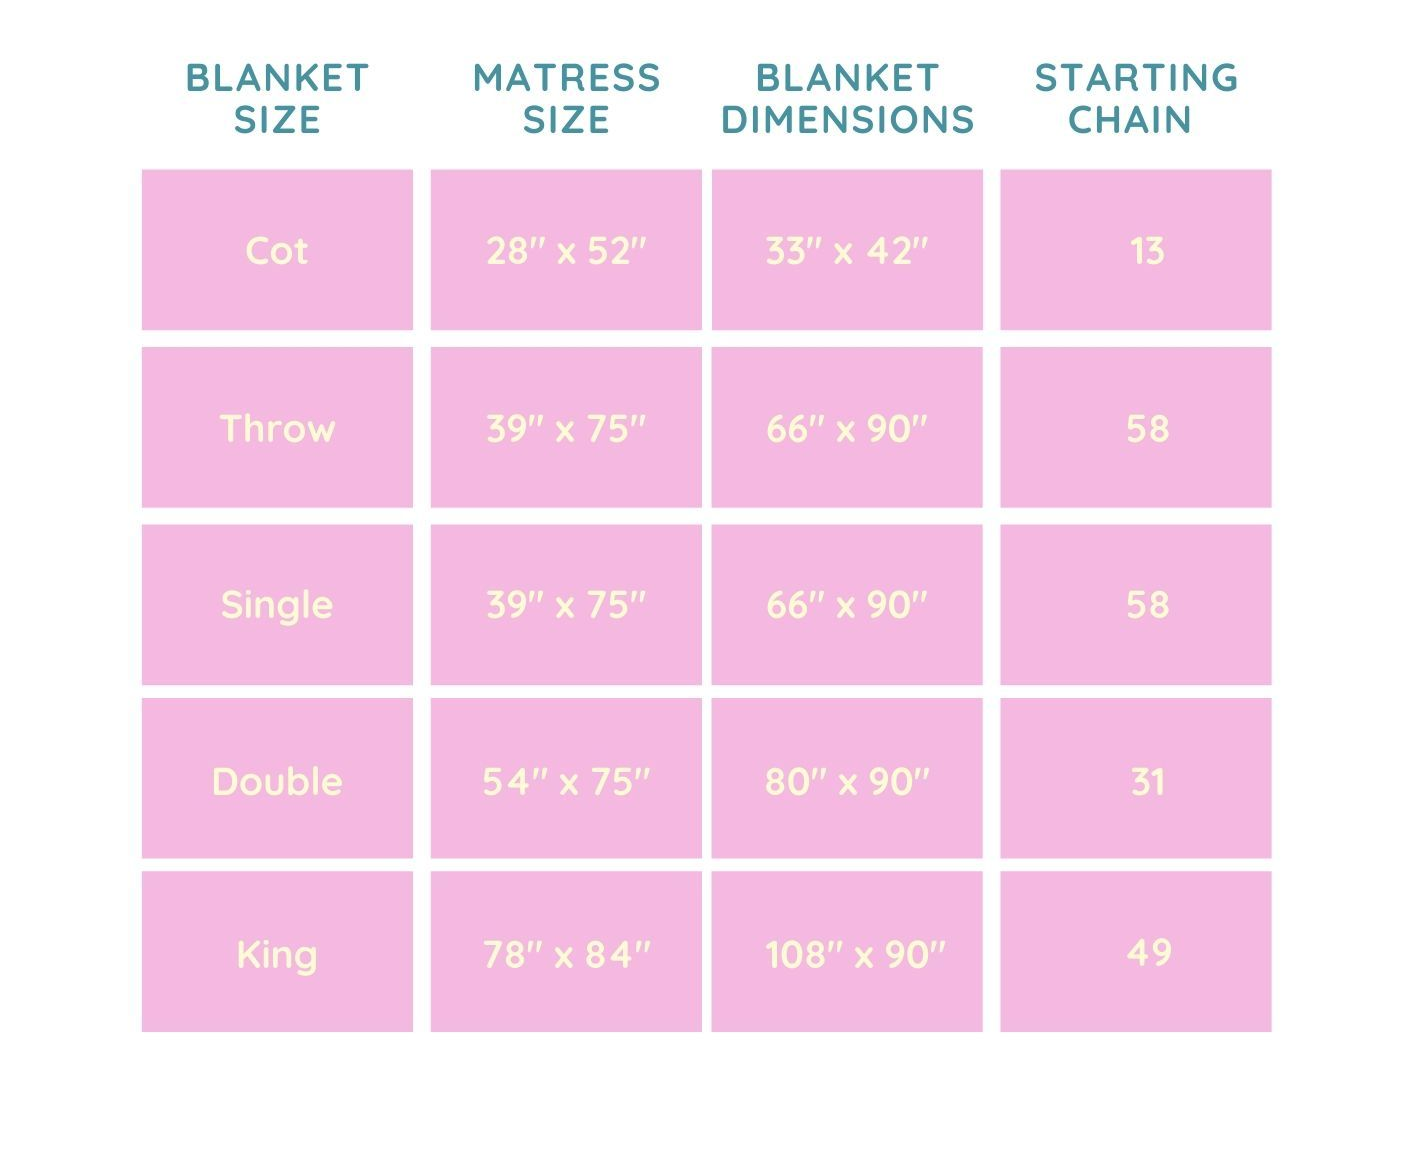
You’ll find the chart below details the 5 most popular crochet blanket sizes along with an estimated starting chain using Size 3/DK weight yarn to make your blanket.
Although the amount of wool needed to complete them is not provided, it will help you get started to create your own beautiful crochet blankets. The sizes given below also include a drape over the side of the bed, so it looks fabulous when finished.
The written pattern for a rectangular granny square, will help you learn how to create a your first granny rectangle to crochet your own a Granny Rectangle Table Runner.
How to make a rectangular granny square in any size?
One of the most popular questions around making a granny square rectangle is how to recreate this pattern in any size with any yarn.
Like many patterns in crochet, it’s a simple case of maths.
The formula to create the rectangle blanket size you want to create, is to subtract the width of the blanket from the length. The remaining number is the length your starting chain should be:
- Formula: Length – width = chain length
Read on below to see some examples of this formula in use to create some of the standard blanket sizes.
Granny Rectangle Throw – Starting Chain
A rectangular granny square throw blanket will measure 66″ wide by 90″ long. When we insert these measurement into the formula it gives us a starting chain length of 24″:
- 90″ – 66″ = 24
Therefore, whatever yarn weight you want to work your blanket in, from bulky down to sport weight, as long as your starting chain measures 24″, your finished blanket will reach 66″ by 90″.
But, wait – you need to know the multiple to create the right number of chains to work the stitch pattern into. Read on to make that chain perfect.
Rectangular Granny Square Starting Chain
The stitch multiple for the granny stitch is 3 plus 1.
This means that your starting chain should be in multiples of 3; such as 60, 72 or 99. Plus you need to add 1 extra on for the chain. In this pattern it will allow you to work into the end of the chain before working back along the otherside of the chain.
Rectangular Granny Square starting chain examples:
- 60 chains (20 x 3) + 1 = a starting chain of 61
- 72 chains (24 x 3) + 1 = a starting chain of 73
- 99 chains (33 x 3) + 1 = a starting chain of 100
Calculating the starting chain this way will also give you the number of granny stitches (3Dc/3Tr) you should have before working into the end of the chain – a great way to check you’re pattern will workout as expected.
The free rectangular granny square pattern below is a great introduction to this fun way to work the well loved granny stitch in a new way and create a colourful table runner as you learn a new crochet technique.
Choose your Blanket Size
Using the chart below, you can select the starting chain to create the finished size blanket you want to create – the chart is based on worsted/Aran weight yarn, combined with a 5mm crochet hook.
The free pattern granny rectangle pattern below, is written to create a table runner, to adjust the finished size, use the starting chain in the table below to create the finished size you want.
Granny Rectangle Crochet Pattern | Free Crochet Pattern
Skill Level– Beginner
Materials:
- Double knit yarn in up to 6 different colours.
- I used The Womens Institute Premium Acrylic Yarn in shades White, Light Blue, Navy for the photo tutorial.
- 4mm crochet hook.
- Darning needle
- Scissors
Finished Size:
32 inches x 12 Inches
Abbreviations in US Terms (UK Terms in brackets)
Ch Chain
Ch Sp Chain Space
Sl St Slip Stitch
Dc (Tr) Double crochet (treble crochet)
3Dc (3Tr) work 3 double (treble) crochet into the same ch or ch sp (also known as the granny stitch)
How to Make Granny Rectangle Table Runner | Round 1
With your 1st colour choice:
Round 1: Ch58, 2dc in 4th ch from hook, *ch1, skip 2 ch, 3dc in next Ch*. Repeat between * and * until 3 chs remain, ch1, [3dc, ch2, 3dc, ch2, 3dc] in last ch, rotate to work on other side of starting chain, *ch1, skip 2 ch, 3dc in next Ch* (sts should be worked opposite to sts worked on the other side of chain), repeat between * and * to final chain, [ch1, 3dc, ch2, 3dc, sl st to top of 3rd ch to join round. Fasten off.
Access the printable PDF for this AND all my other patterns for just £5 per month!
Click here to get your Full Bloom Pass today!
How to Make Granny Rectangle Table Runner | Rounds 2 & 3
Round 2: Join 2nd colour choice in any corner sp, ch3 (counts as dc here and throughout pattern), [2dc, ch2, 3dc, ch1] in corner sp, [3dc, ch2, 3dc, ch1] in next corner sp, *3dc, ch1 in each ch sp across to next corner, [3dc, ch2, 3dc, ch1] in next 2 corner sps, *3dc, ch1 in each ch sp across to next corner, sl st to top of Ch3 to join round. Fasten off.
Round 3: Join 3rd colour choice in any corner sp, ch3, [2dc, ch2, 3dc, ch1] in corner sp, 3dc, ch1 in next ch sp, [3dc, ch2, 3dc, ch1] in corner sp, *3dc, ch1 in each ch sp across to next corner, [3dc, ch2, 3dc, ch1] in corner sp, 3dc, ch1 in next ch sp, [3dc, ch2, 3dc, ch1] in corner, *3dc, ch1 in each ch sp across to next corner, sl st to top of Ch3 to join round. Fasten off.


Continuous Granny Rectangle Pattern
Rounds 4 -12: Work an additional 10 additional rounds changing colours in each round.
With each additional round. the number of chain spaces between the 2 corners increases.
In each corner space you will work
- 3dc, ch2, 3dc, ch1
In each chain space between the corners and down the sides, you will work
- 3dc followed by a ch1
Once you have worked all your rows for either your table runner or your blanket, add an edging of your choice to add that final flourish.
Click the button below to see 5 easy and simple edgings! Fasten off and weave in all ends.
5 Easy Granny Square Edgings
I’d love to know how you’ve gotten on with your Granny Square Rectangle! Add a comment below or tag me in a photo on your social media – @cosyrosieuk